I love sweaters and shawls, especially since I am always cold in the air-conditioned restaurants (not that we have needed air conditioning in Michigan this summer!). Thinking of the wardrobe challenge, sweaters are one of the items that I end up buying. Yes I do know how to crochet, yet trim on a jacket is about as far as that usually ends up. A small knitting machine sits in the corner of the studio (on my bucket list to learn how to use 🙂 ).
I was recently sewing a fringe skirt and the tweed scraps falling on the floor reminded me of meeting a women wearing a really cute, long, loosely woven (sweater looking) vest. It was at the annual conference for ASDP, so I had to ask the question that only sewer’s are allowed to ask each other “did you make that?”. She had indeed! I was really intrigued when she mentioned using water-soluble stabilizer and scraps from her last sewing project – yes, scraps!
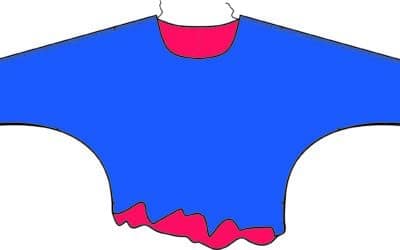
Below is an example of using scraps from my tweed skirt:
Supplies needed:
Decorative Yarn, tweed fabric threads, or other scraps
NOTE: WAWAK sewing has offered my readers a discount for July – yeah!
Purchase a minimum of $30 and receive 10% off your entire order – Use coupon code WAB714 when checking out (expires July 31st) Thank them when you order, they are the best! :))
Lay out one layer of water-soluble stabilizer (54″ for a scarf)
Randomly place yarn, scraps, hairy yarn, etc.
Place another layer of water-soluble stabilizer (same length as the first piece) on top of the yarns
Using long pins, pin through all the layers
Starting at one end, stitch down the center of the stabilizer, stitching through all the layers. Be careful not to sew through any pins, stitch all the way to the end. (Draw a straight line down the center if you need something to follow).
From the center, align the edge of the presser foot with the first stitched line. Stitch a second row, and a third, and 4th, until you get to about 1″ from the edge of the stabilizer. (If your machine has a Laser Vision Guide, like my BrotherDreamweaver, this would be the perfect application!)
Continue stitching rows along the entire length of the stabilizer until you have the desired width.
Turn the fabric and stitch a row from side to side, across the width of the stabilizer.
Continue to stitch row after row until the entire length is filled.
The width of the stitched rows depend on how tight you want the weave of the new fabric or lace. Just be sure to keep it somewhat tight or the yarns will fall away.
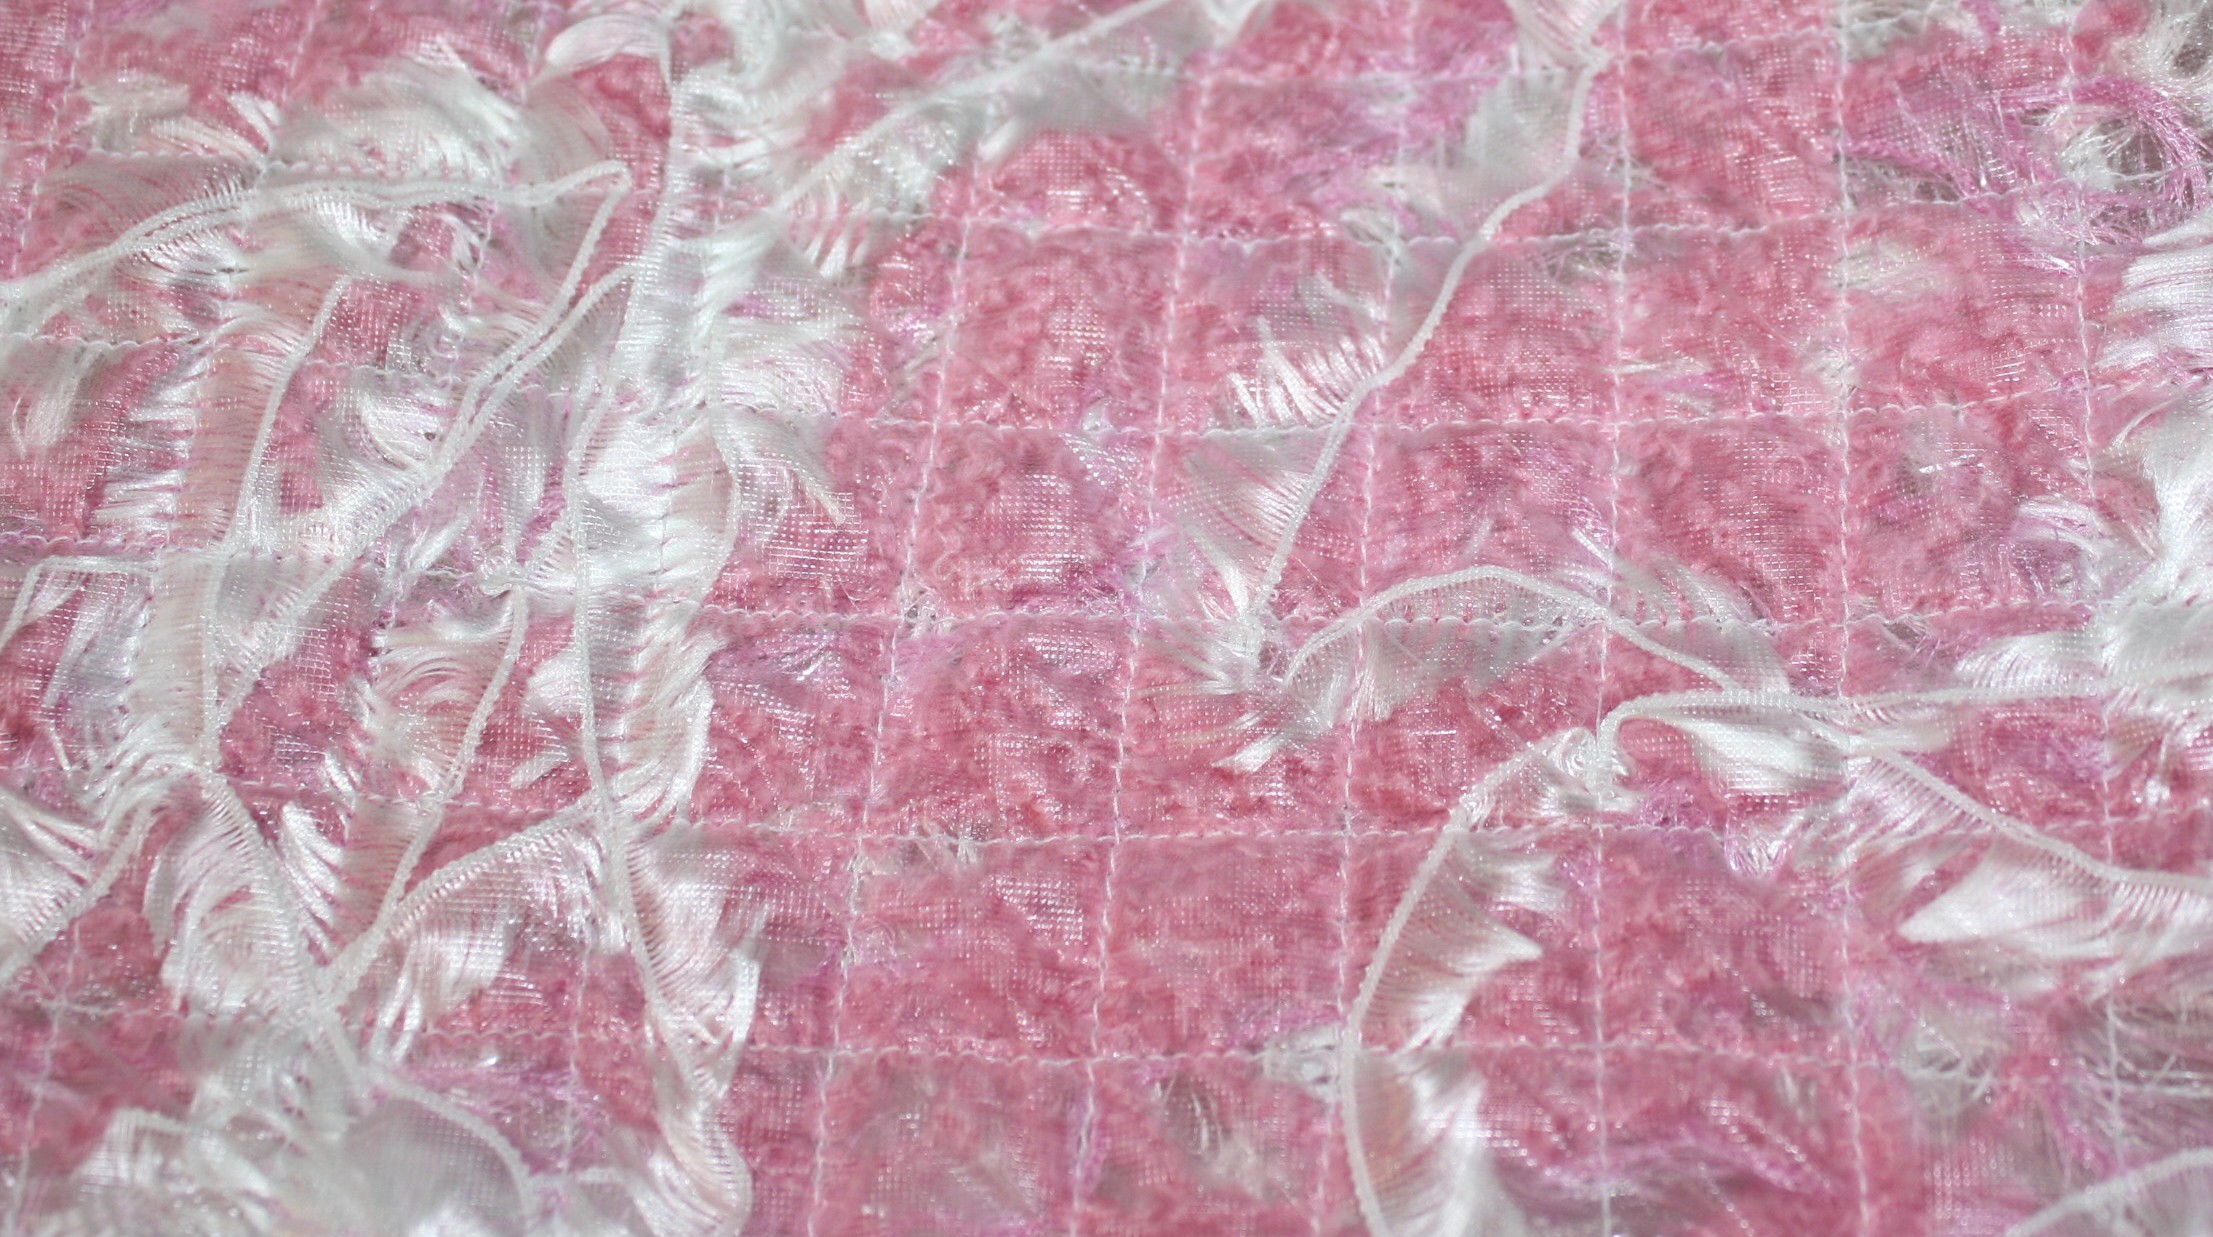
The next step is easy! Rinse the fabric panel in warm water and watch the water-soluble stabilizer disappear or throw the fabric in the wash on a hand-wash cycle, again with warm water.
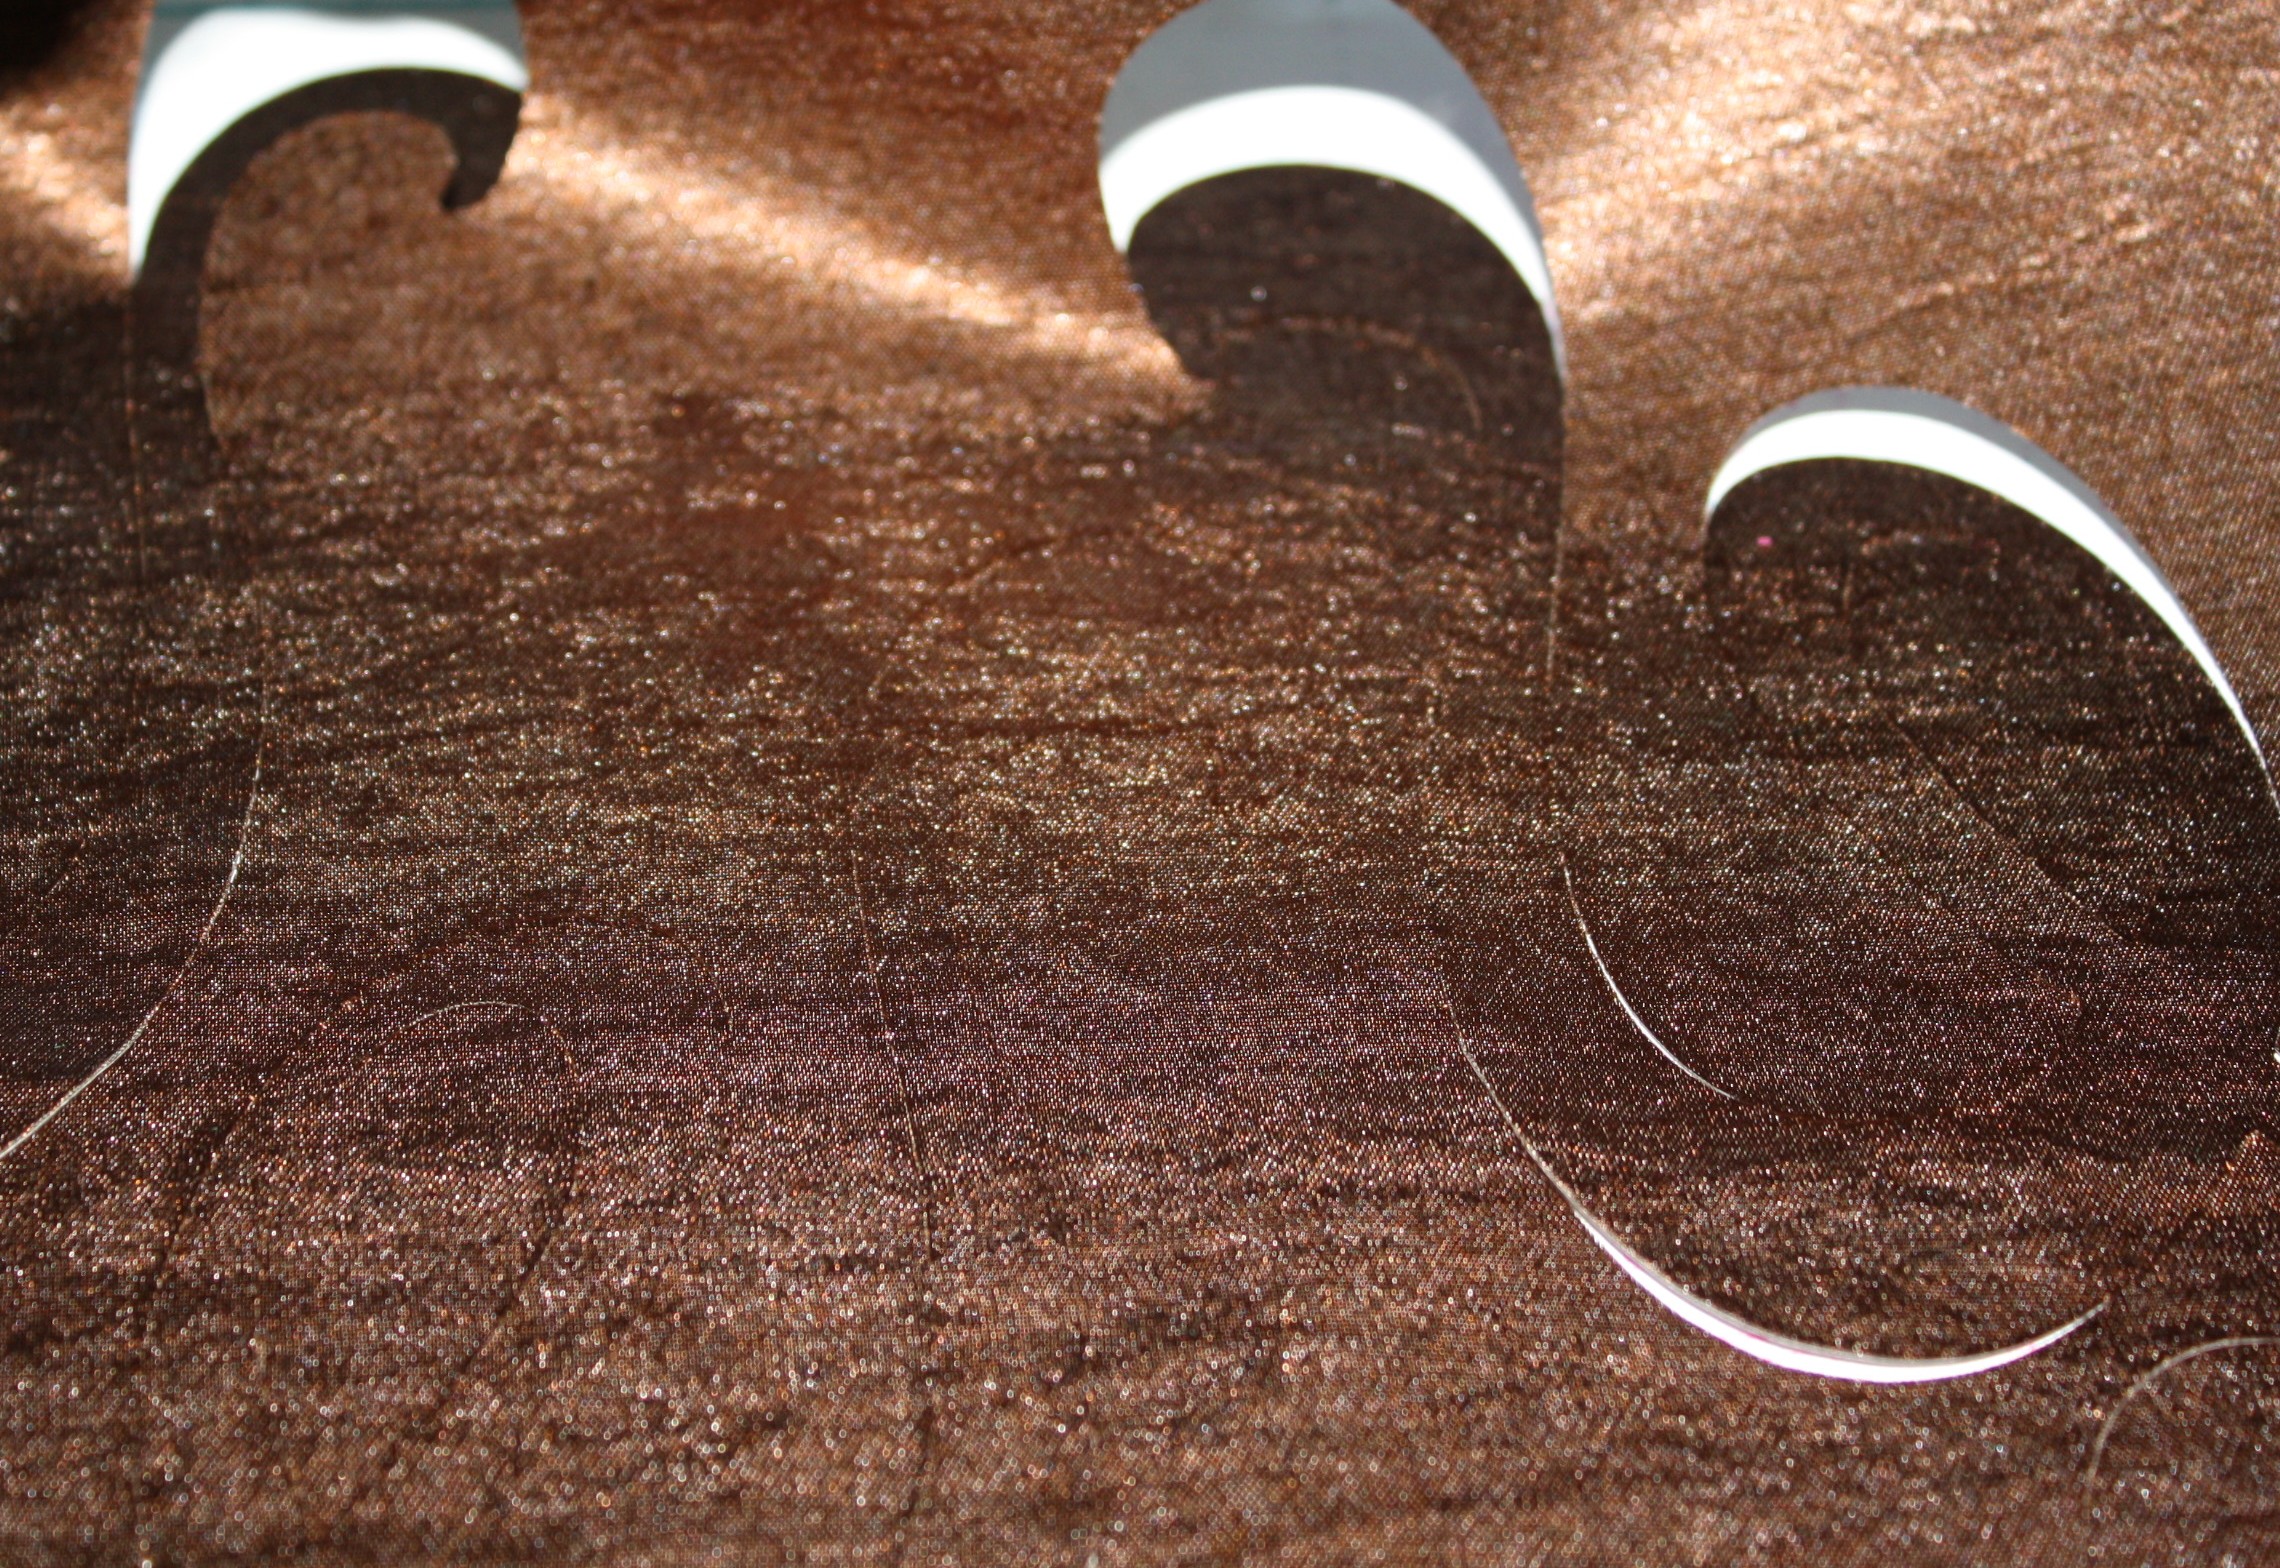
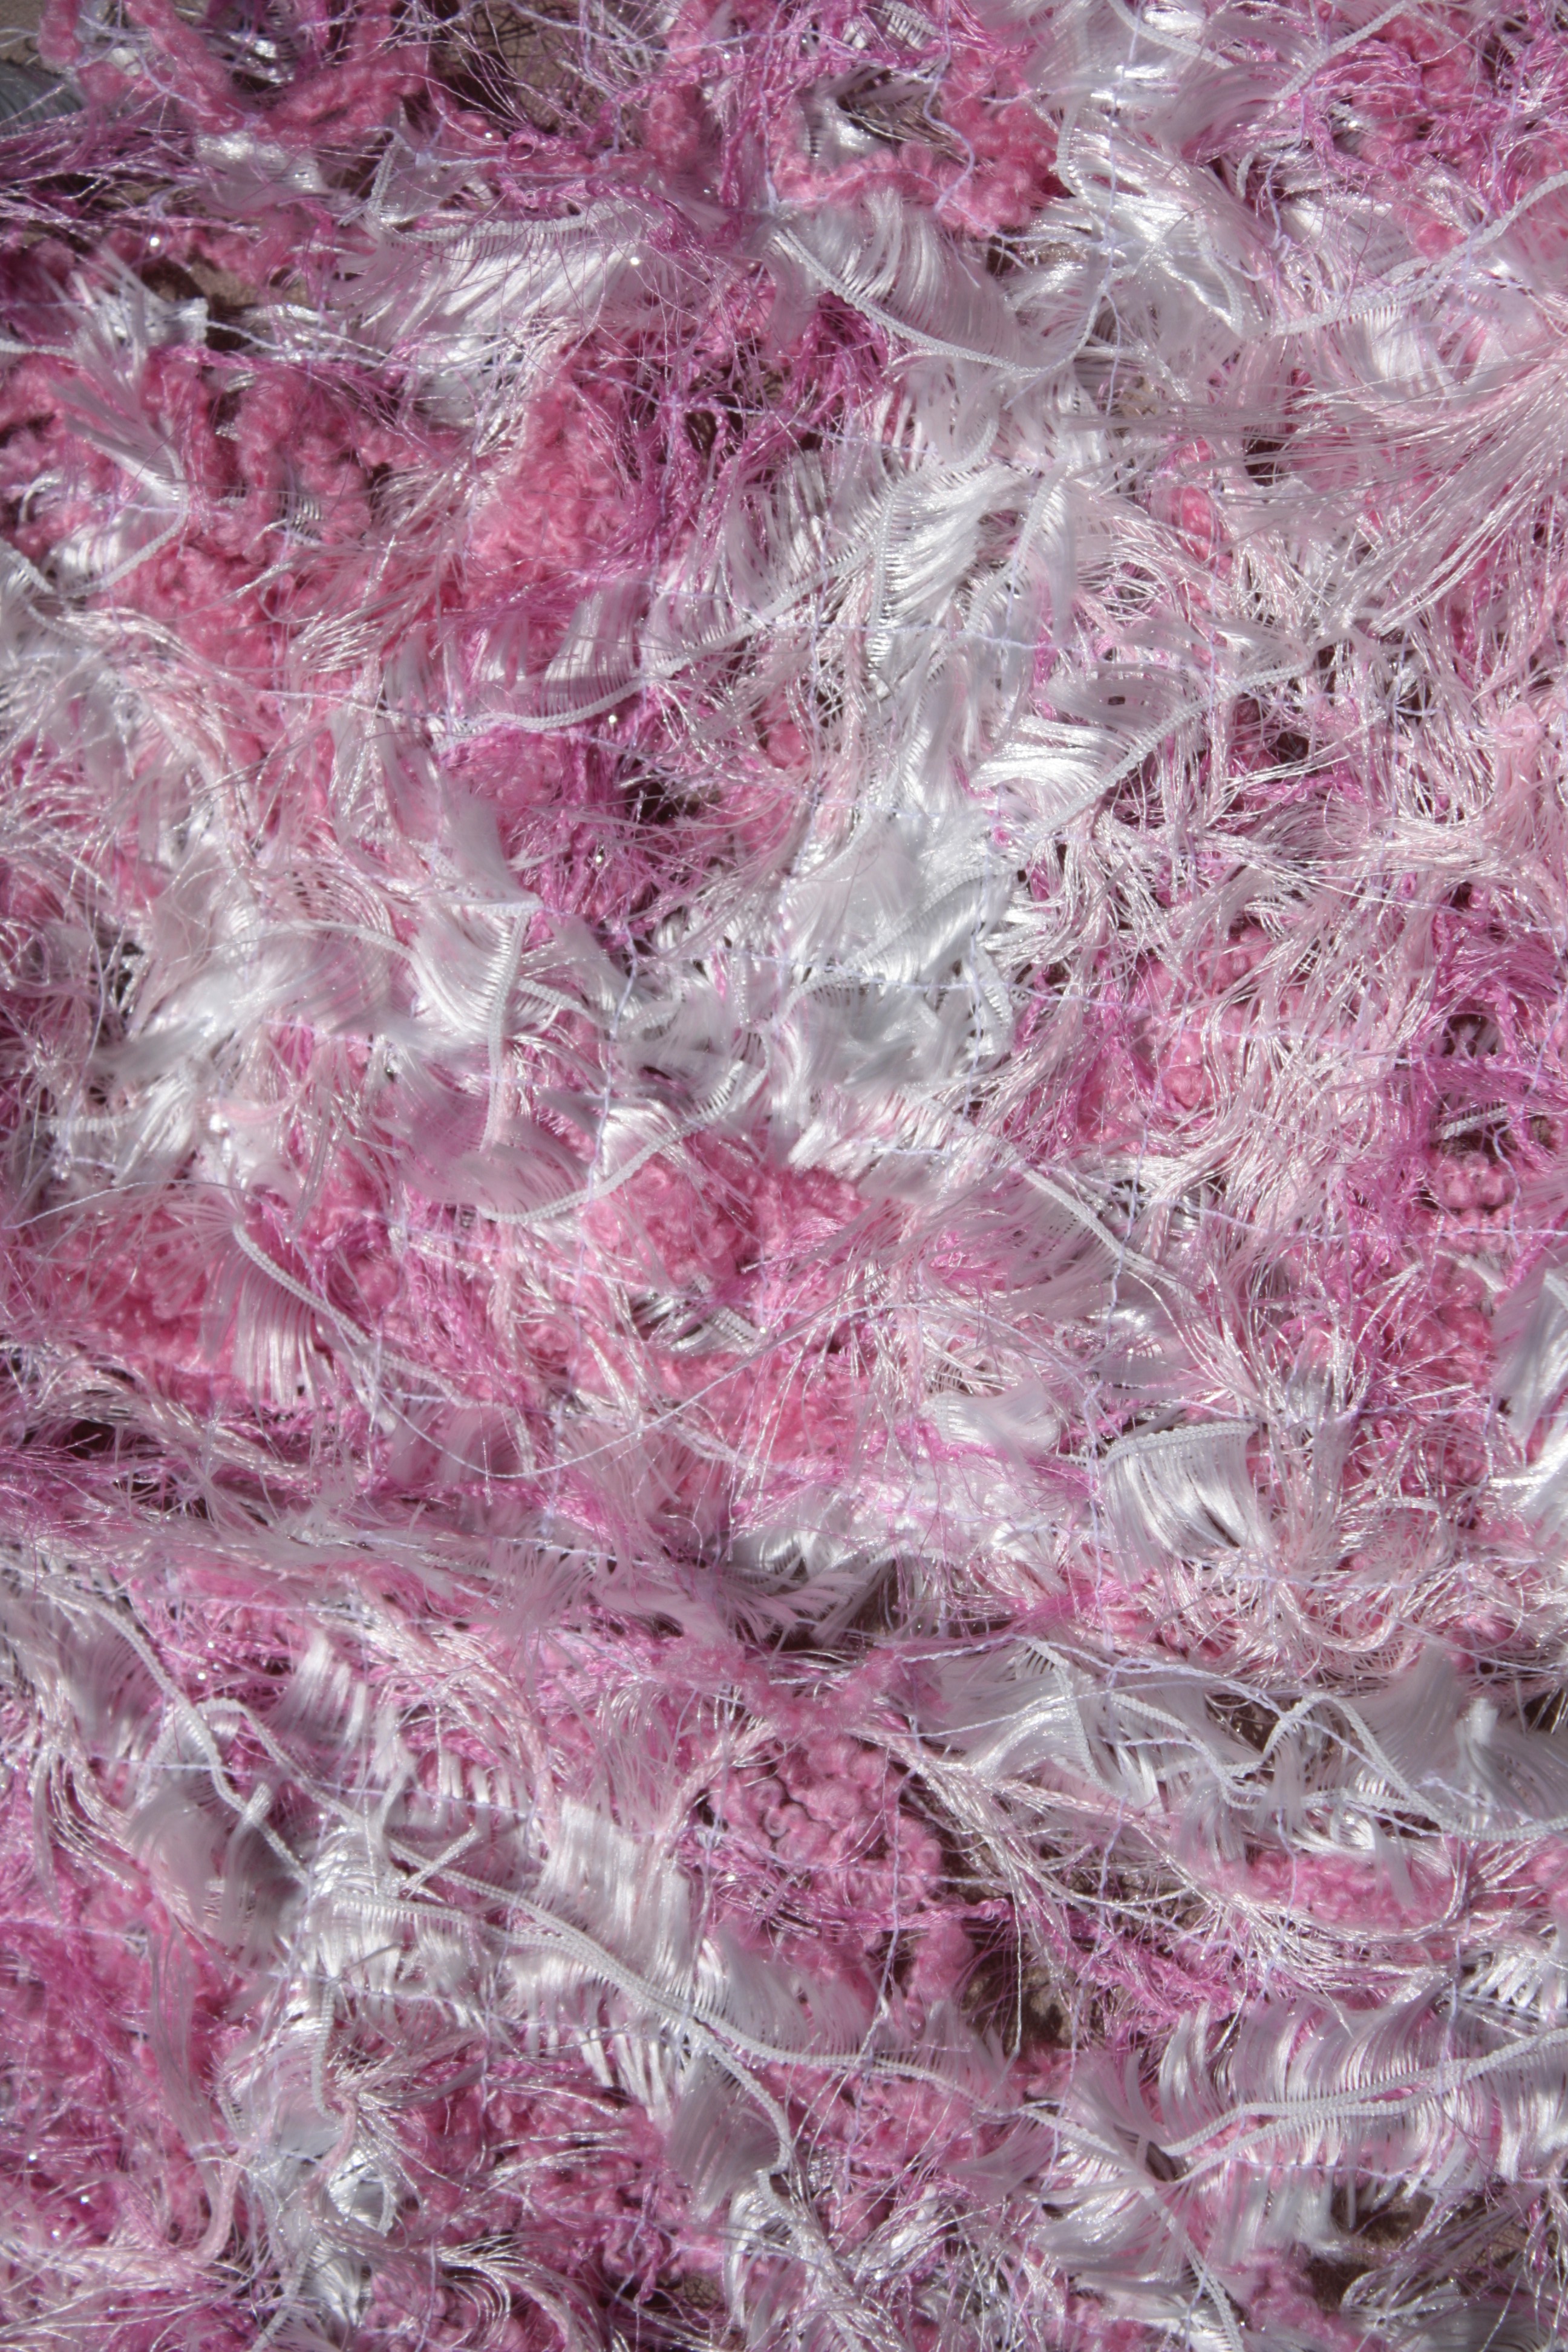
Above you can see the stabilizer has disappeared and I am left with a loosely woven fabric. Notice the stitching lines, this is good to keep in mind when you choose the thread color.
Who would have ever guessed
our scraps
could go so far!
A few more tips:
Throw the fabric in the dryer to soften the hand
The stabilizer and yarns shrink up after washing and drying, keep that in mind if you need a specific length.
The more yarn and scraps, the thicker the fabric
To make an outfit, stitch all the pieces together before washing out the stabilizer
This is a great technique to use for June’s Fabricate Challenge – which I extended the deadline until July 31st.
Have you ever tried this? If so, please share any tips you might have!
That definition pretty much leaves the door open for ultimate creativity, wouldn’t you say? One idea includes designing your own fabric or altering a fabric into something totally different, which is what I did with the above jacket.
The fabric used for the applique trimming is a polyester / satin. A lightweight fabric with fabulous drape, perfect for a blouse or lining (both of which I plan to add to jacket). That fabric, if left alone, would be a nightmare to create appliques or cut-outs, so I fabricated – sounds like a bad word 🙂 !
The trick – Heat N Bond, now available from my favorite placeWAWAK Sewing and comes in 5 yard and 35 yard pieces. At first I wasn’t too sure about this stuff, but basically you iron it to the back of the fabric and it makes it easier for you to cut out an applique – especially if you are using the Brother Scan-n-Cut
This is how easy an applique can be:
Choose a design – for the sleeve I enlarged a design already in the scan-n-cut memory.
Place the bonded fabric onto the cutting mat (the paper backing on the heat –n-bond makes it easy to stick)
Press the start button (told you it was easy!)
Peel off the backing and place the appliques on the garment.
Once you have the perfect placement, use a press cloth and press the applique in place. Notice I attach the appliques before sewing the sleeve together.
Even though the cut of the scan-n-cut prevents the fabric edges from fraying, I still stitch the applique in place. I choose the blanket stitch and stitched around each applique. That took some time, but it looks great. Almost looks like leather!
I followed all those steps for the jacket front and again used a blanket stitch.
Of course I could cut these appliques by hand, but I really like the fact that all the front pieces are exactly the same! By the way, don’t look too closely at my studio – can you tell I have been working 🙂
Well, that’s one fun way to fabricate. Have you ever tried appliqueing apparel?
There are so many sewing machine feet to choose from, it can get overwhelming deciding which foot is best for the job. Why bother, right? If using a specific foot for a specific job could drastically cut the sewing time down and offer professional looking results, wouldn’t you want to try? I sure would.
Home sewing machines usually come with a fabulous manual explaining what each foot is for and a tutorial explaining how to use it. Industrial machines don’t always offer such advice, at least mine didn’t. With a 5 page manual, written in a language I don’t speak, I am surprised I got the thing put together in the first place! I don’t use this machine as frequently as all the others, mainly because it’s loud, doesn’t have a thread cutting feature and I don’t have any accessories for it. I bought it for speed and that it has.
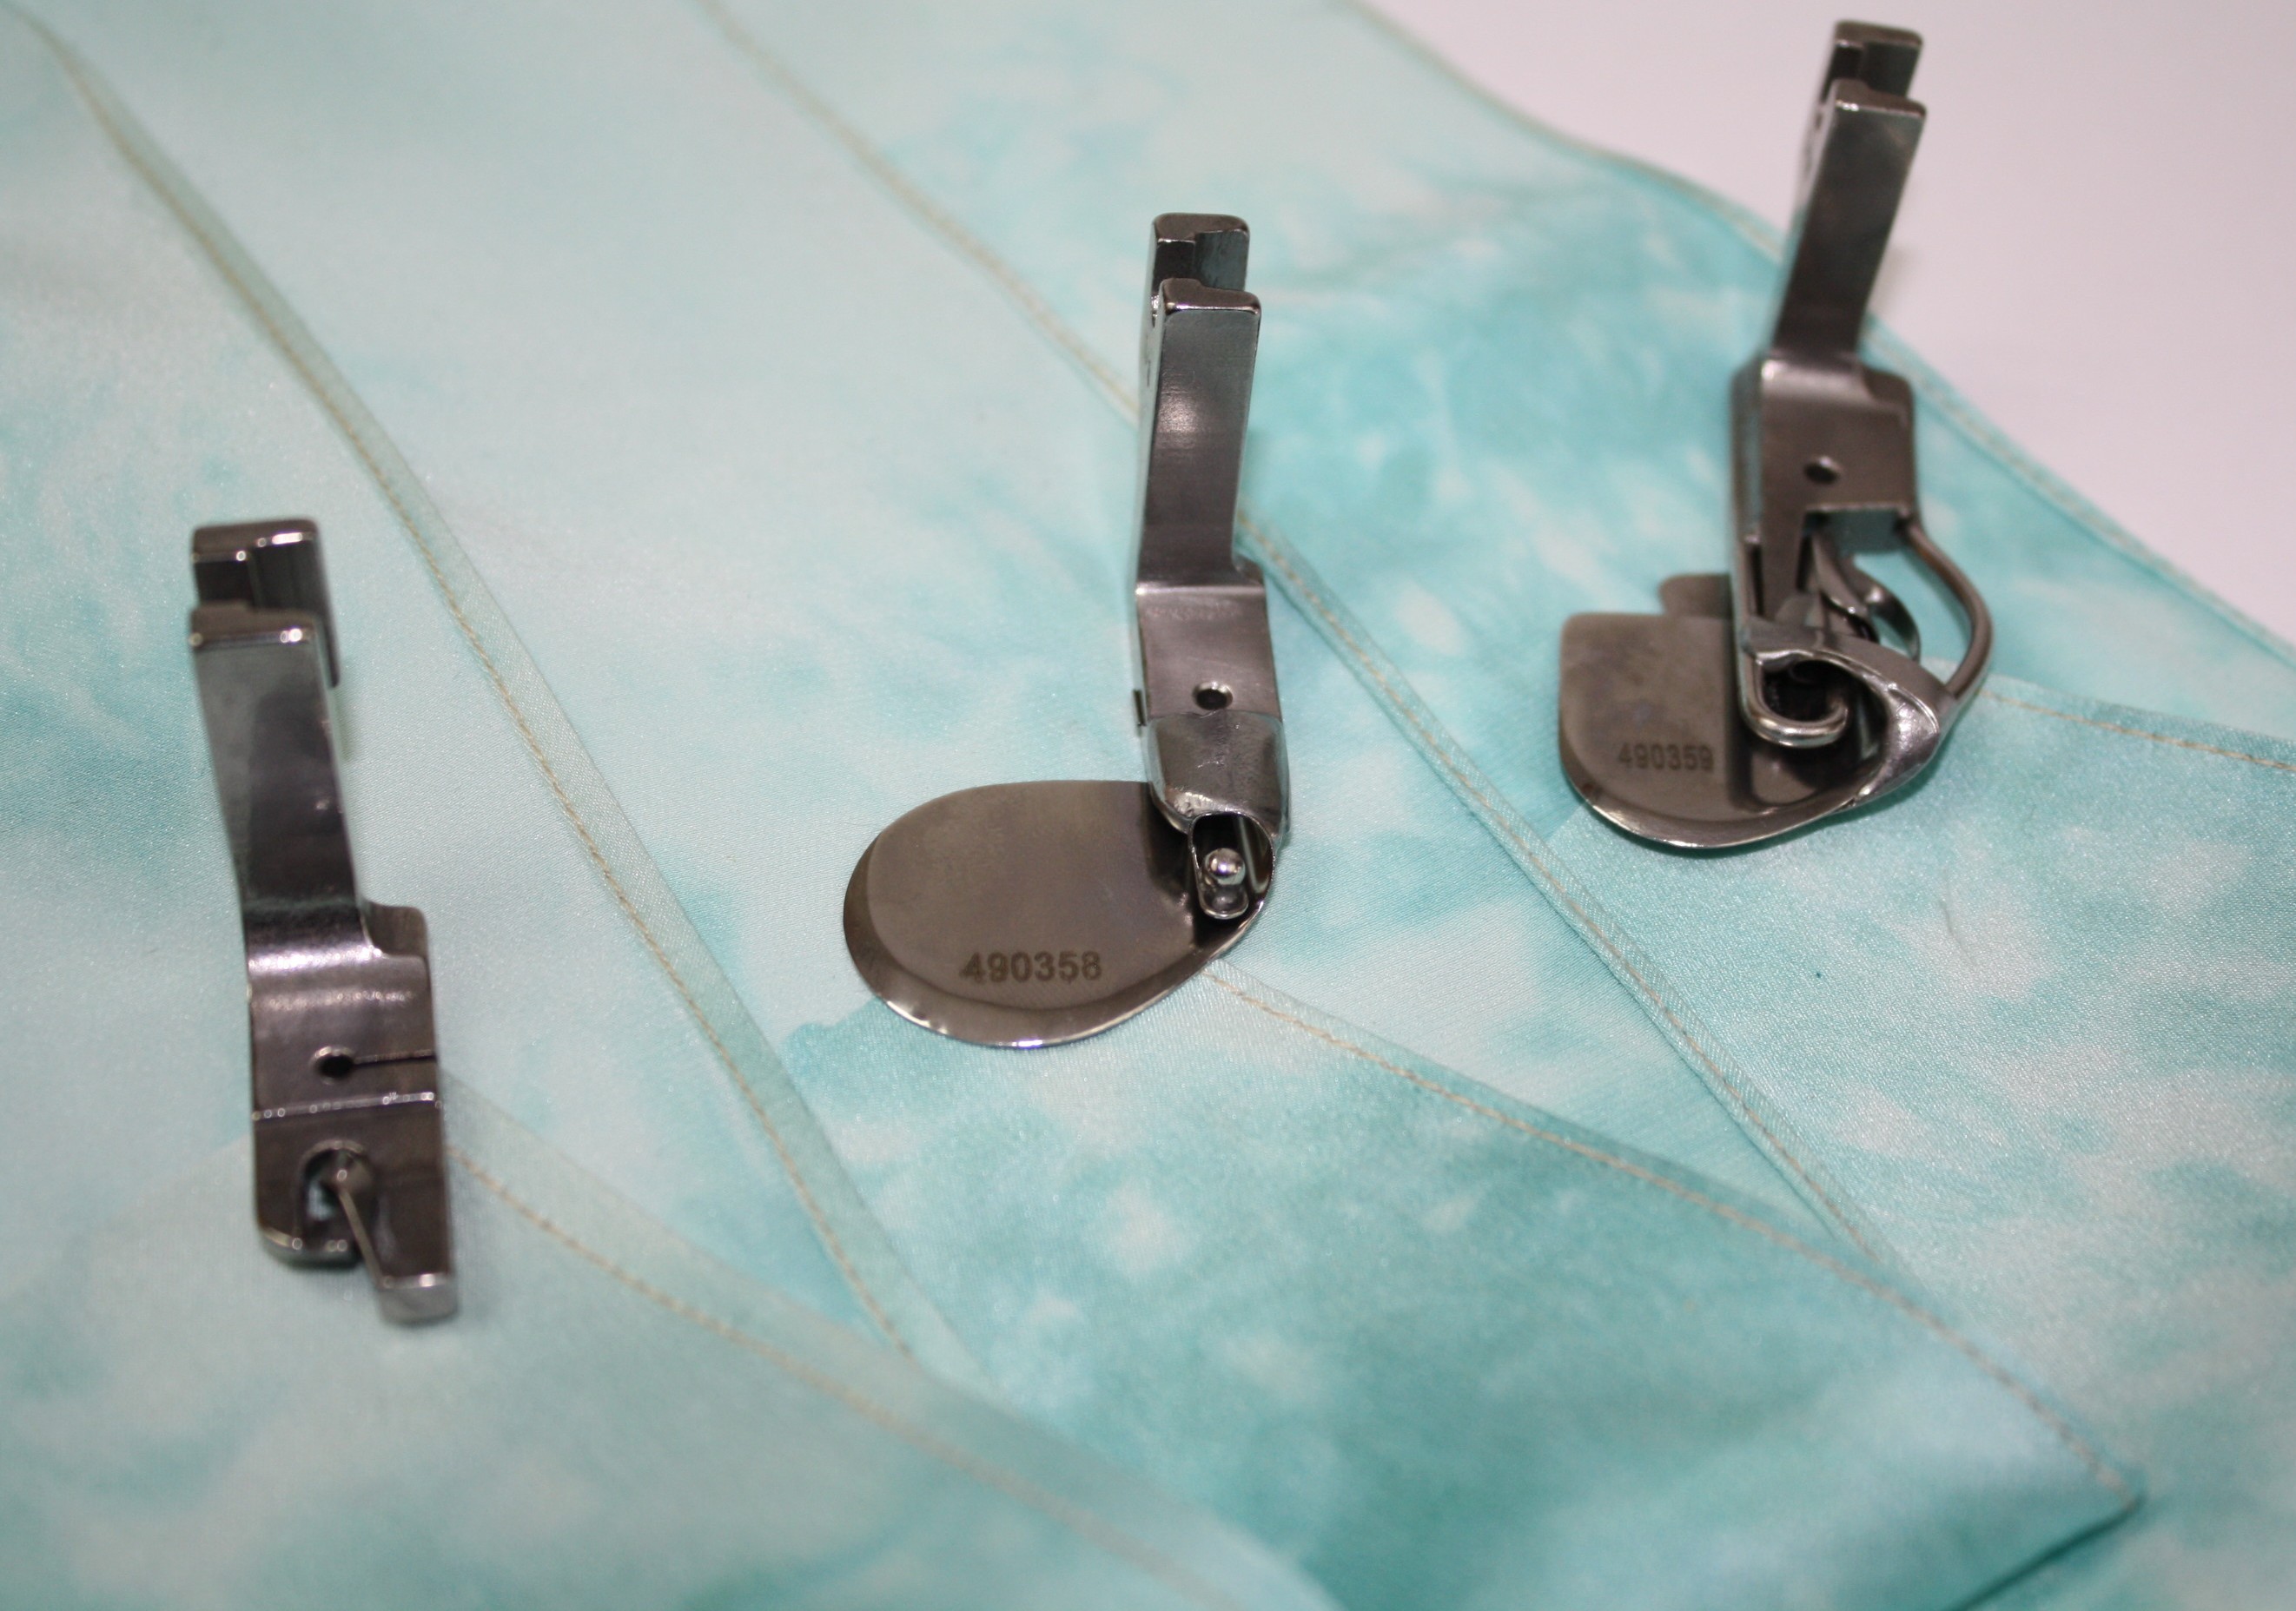
Scanning the list of additional feet for industrial machines, I found the feet to be are very inexpensive, but again I ran into the issue of which foot is the right foot for the job. I thought I would start testing some of these feet and share with you my findings.
A Narrow Rolled Hem
I sew a lot of garments with sheer fabrics (especially this months wardrobe challenge; Dress the Part) and my go-to stitch is usually a narrow rolled hem on the serger – its super fast and looks professional. But sometimes a rolled hem on the sewing machine would be more appropriate. I found 3 different feet for the industrial machine:
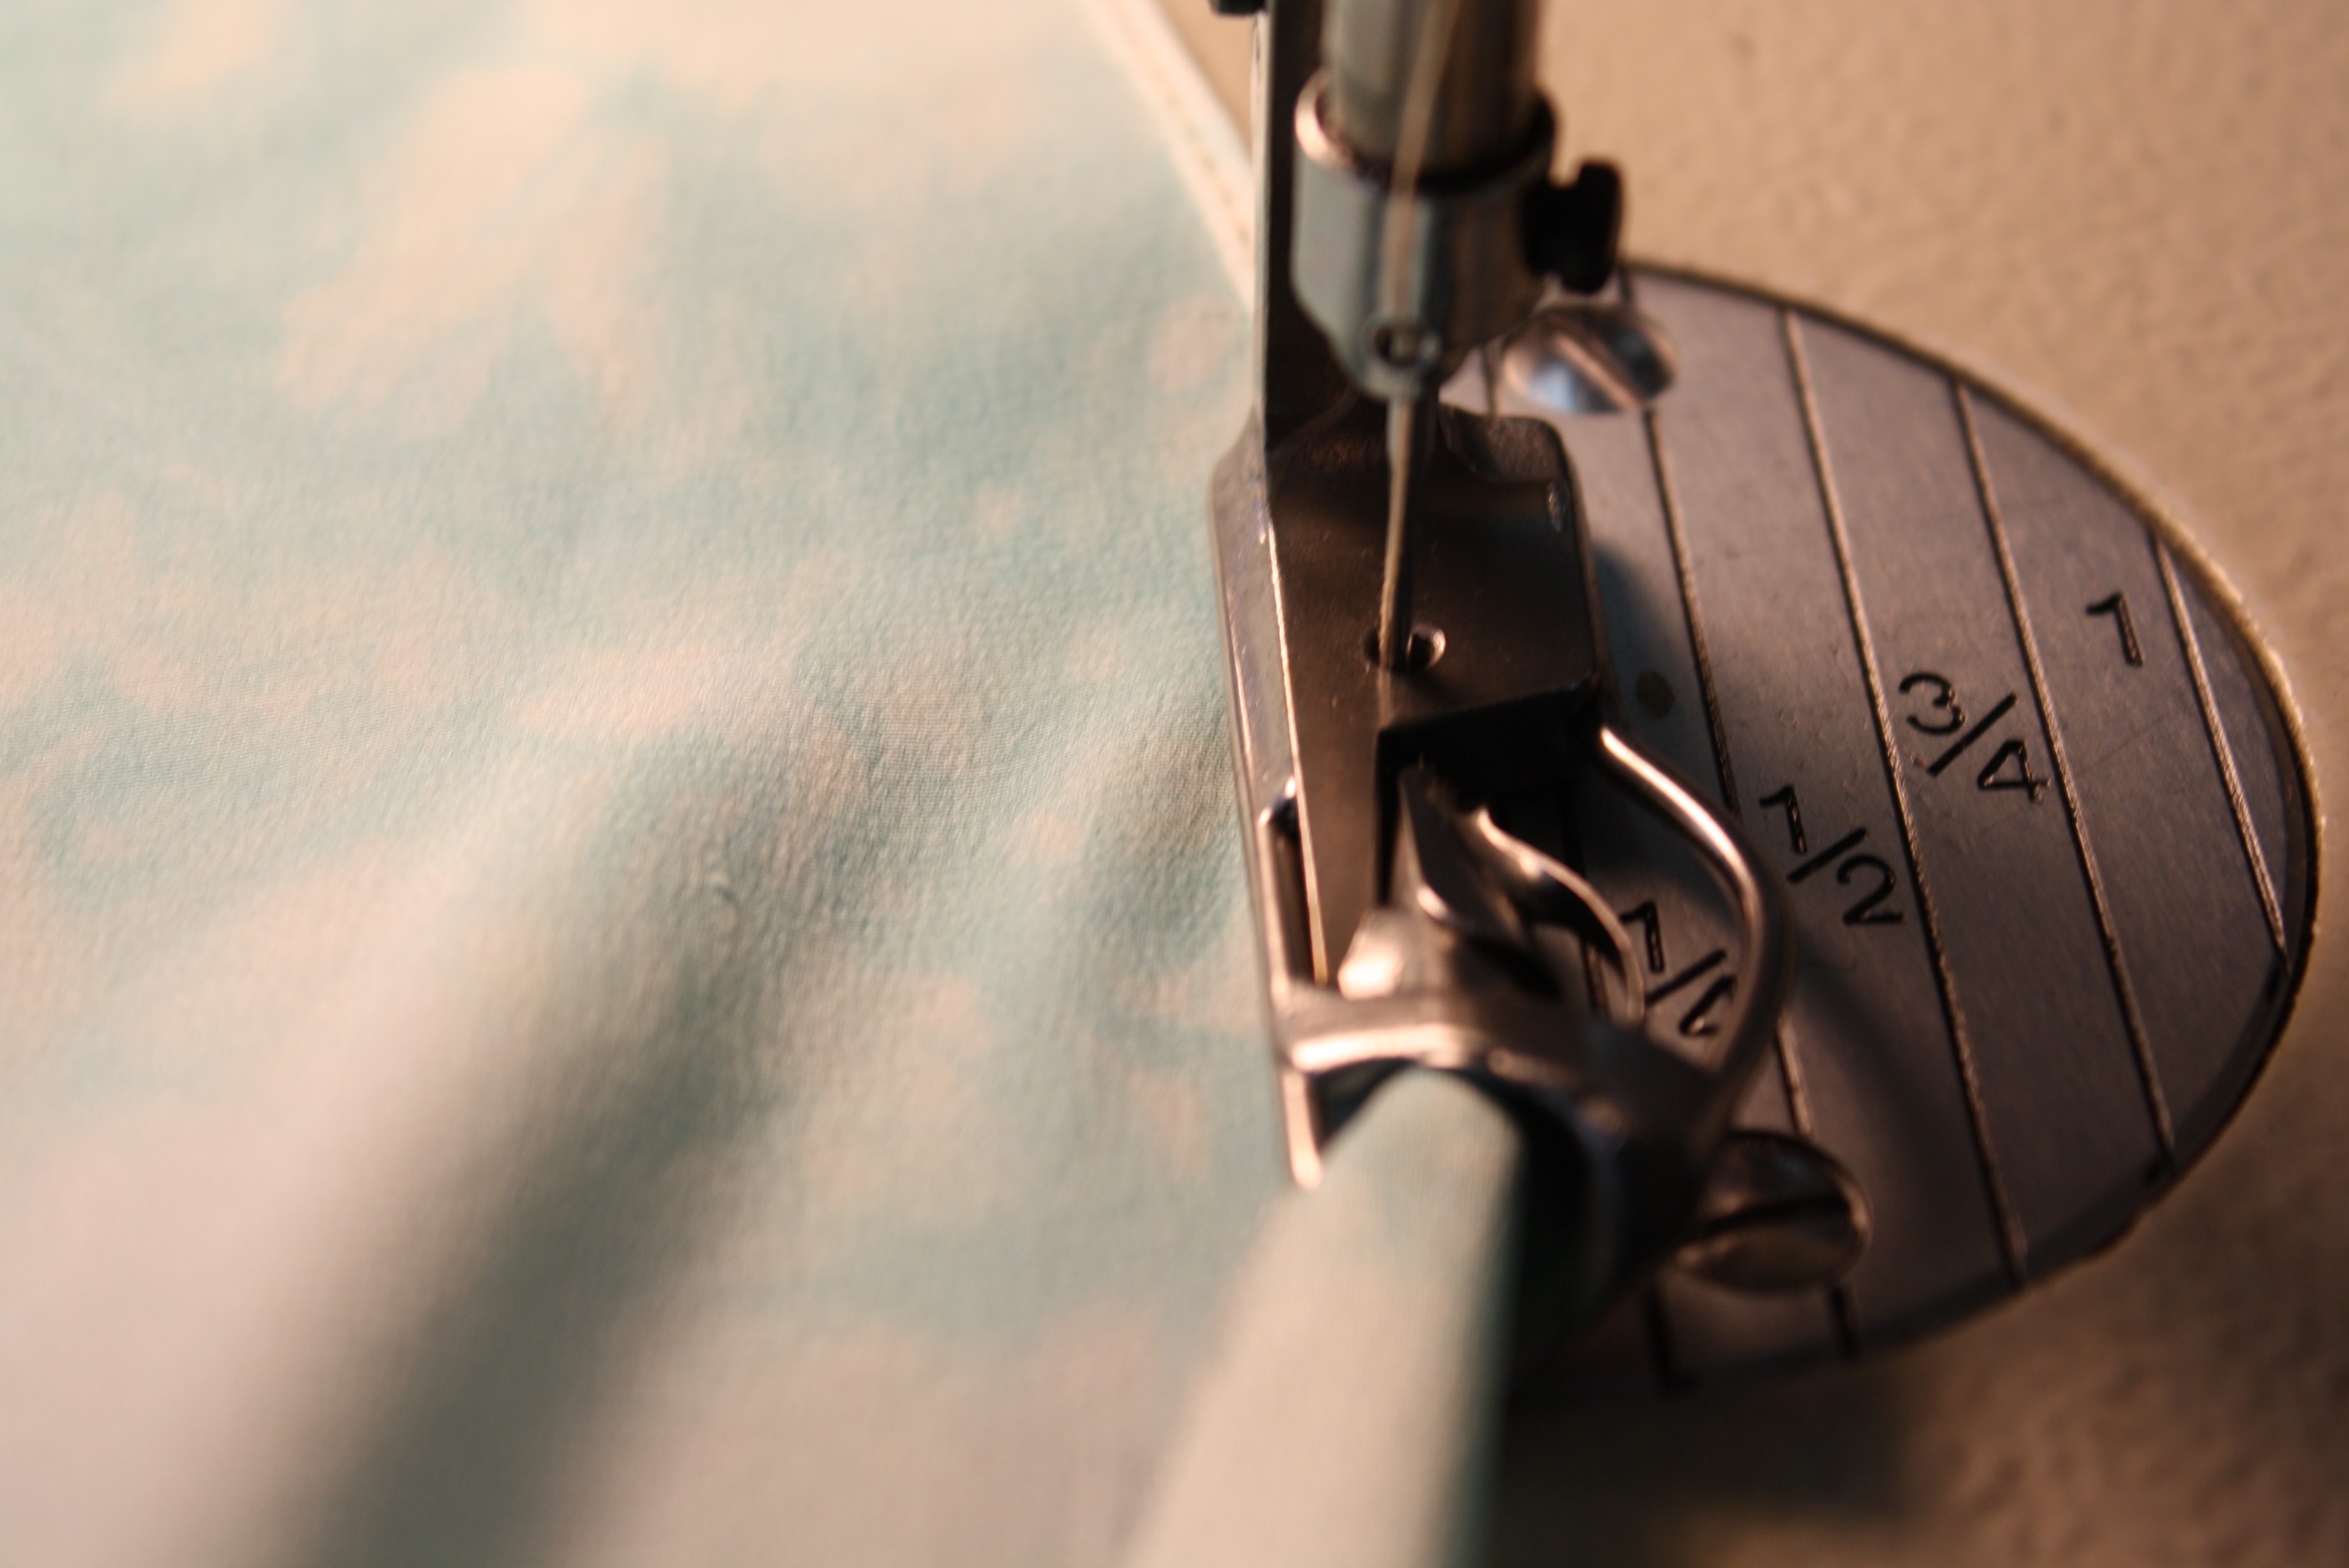
You have probably seen the Rolled Hem Foot, as it comes with most home sewing machines. This is the only foot I had ever seen used for the job. It does make a rolled hem easy, but has its challenges as well. Getting over thick seams can be interesting and sometimes the fabric doesn’t feed evenly. Of course there are tricks:
Hold the fabric to the left side of the foot as it feeds into the machine and trimming seam allowances for less bulk.
Results: A nice rolled hem, I had to use the tweezers to get the fabric started and the rolled hem is a little uneven. With practice this foot will work.
If you have an industrial machine, you have more options and each offers different results:
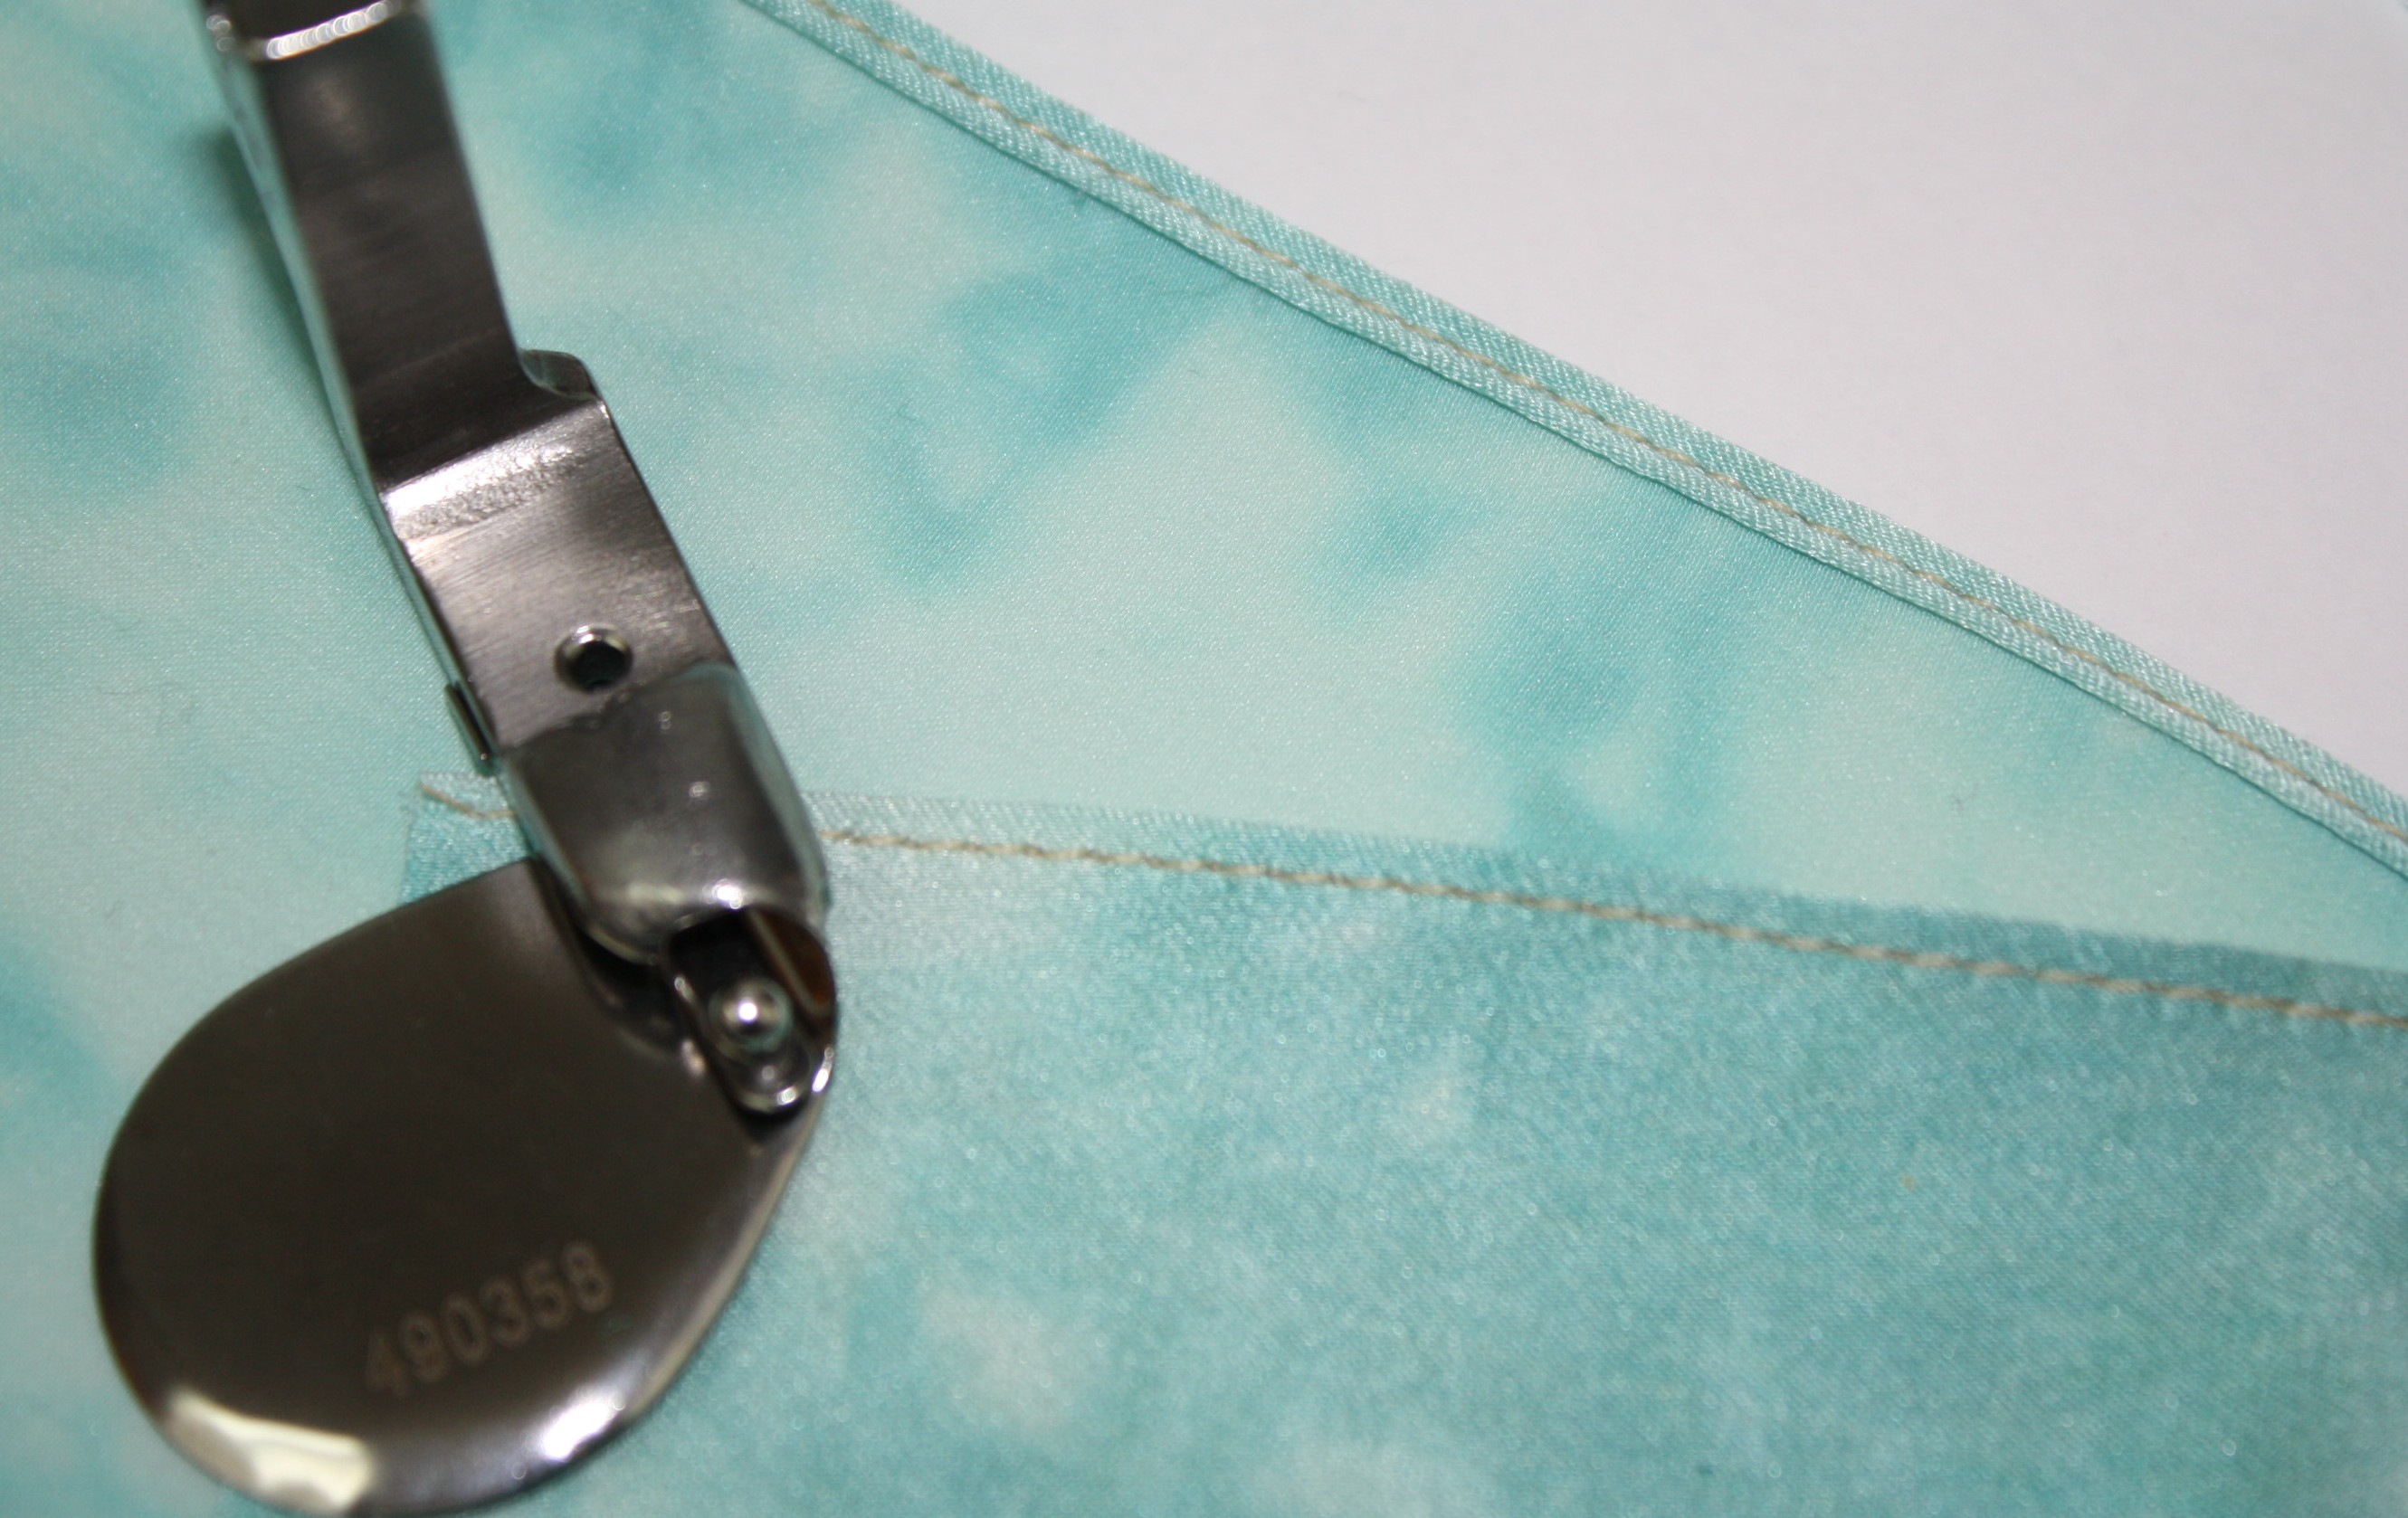
This foot has a plate that covers the front feed dogs allowing the fabric to feed perfectly. You can see the ball at the tip of the foot, the fabric will roll over that ball as it double folds into a narrow hem. I must say, I love this foot! This is how it works:
Feed the fabric into the foot, above the plate. Notice how the place covers the front feed dogs. Insert the fabric the same way you would for the rolled hem foot.
The fabric folds over the ball.
Hold the fabric a little to the left side of the foot as the fabric feeds into the foot (as shown above). Stitch.
Results: A perfect narrow hem! This foot offers the easiest rolled hem I have ever tried! I hardly had to do anything with the fabric except guide it into the foot. I even sewed at a high-speed and the rolled hem is perfectly even. A definite A+++++
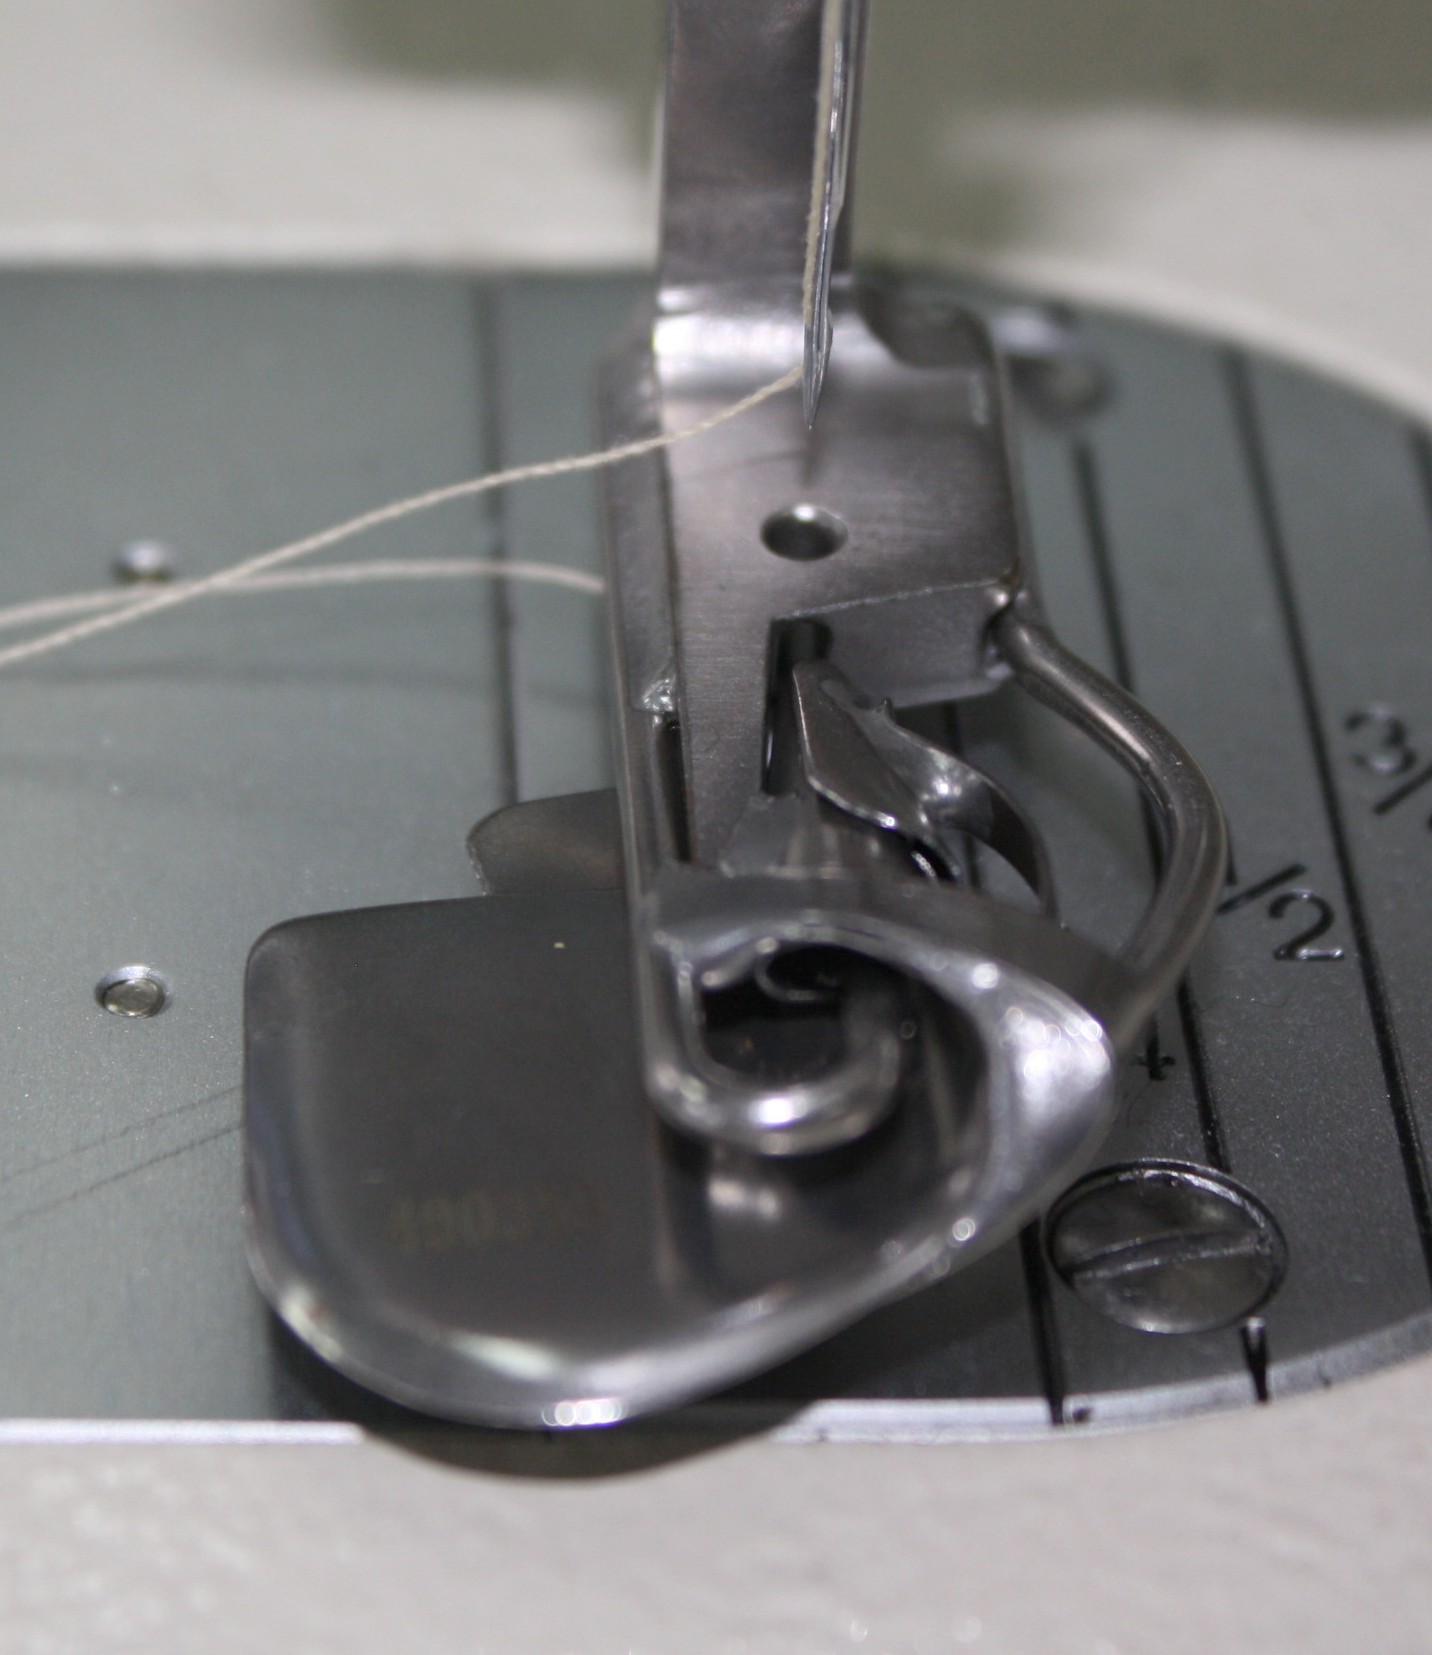
The “spring” part is what intrigued me about this foot. You can see the foot looks very similar to the Ball Hemmer Foot, yet there is not a ball. Instead, there is a movable area that the fabric will go through. Look closely, this is the back of the foot:
Looking at the left photo first: see the corner touching my finger tip. When I do nothing with that corner, the opening on the foot remains unchanged (see opening at yellow arrow).
Take a look at the right photo: Here I have pushed that corner in and the opening gets larger (see yellow arrow).
Now we know what the “spring” means. This opening adjusts for the thickness of fabric as the fabric flows through.
There is a plate protecting the fabric from the front feed dogs, just like the ball hemmer. Slide the fabric on the top of the plate.
Again, feed the fabric into the foot and stitch.
Results: Another perfect rolled hem! Just as easy as the ball hemmer foot.
My favorite foot for the rolled hem on silk charmeuse is the Ball Hemmer Foot. The rolled hem was a little thicker than the other two and perfect!
What about crossing seams and thicker fabrics? I will test these and more, and let you know the results. So far both feet are winners!
I also have to check to see if these feet will work on my Brother PQ1500. The PQ1500 straight stitch machine is just like an industrial machine with speed and ease of use, plus it’s not attached to a large table and easy to move around. Fingers crosses on that one! Otherwise, I have my eye on the Brother Industrial Machine used on Project Runway. Do you have an industrial machine? Have you tried these rolled hem feet?
The serger can do so much more than simply finish fabric raw edges. Using crochet thread or yarn in the upper looper can create an entirely different look! This is a great way to restyle or embellishment fabric or a garment.
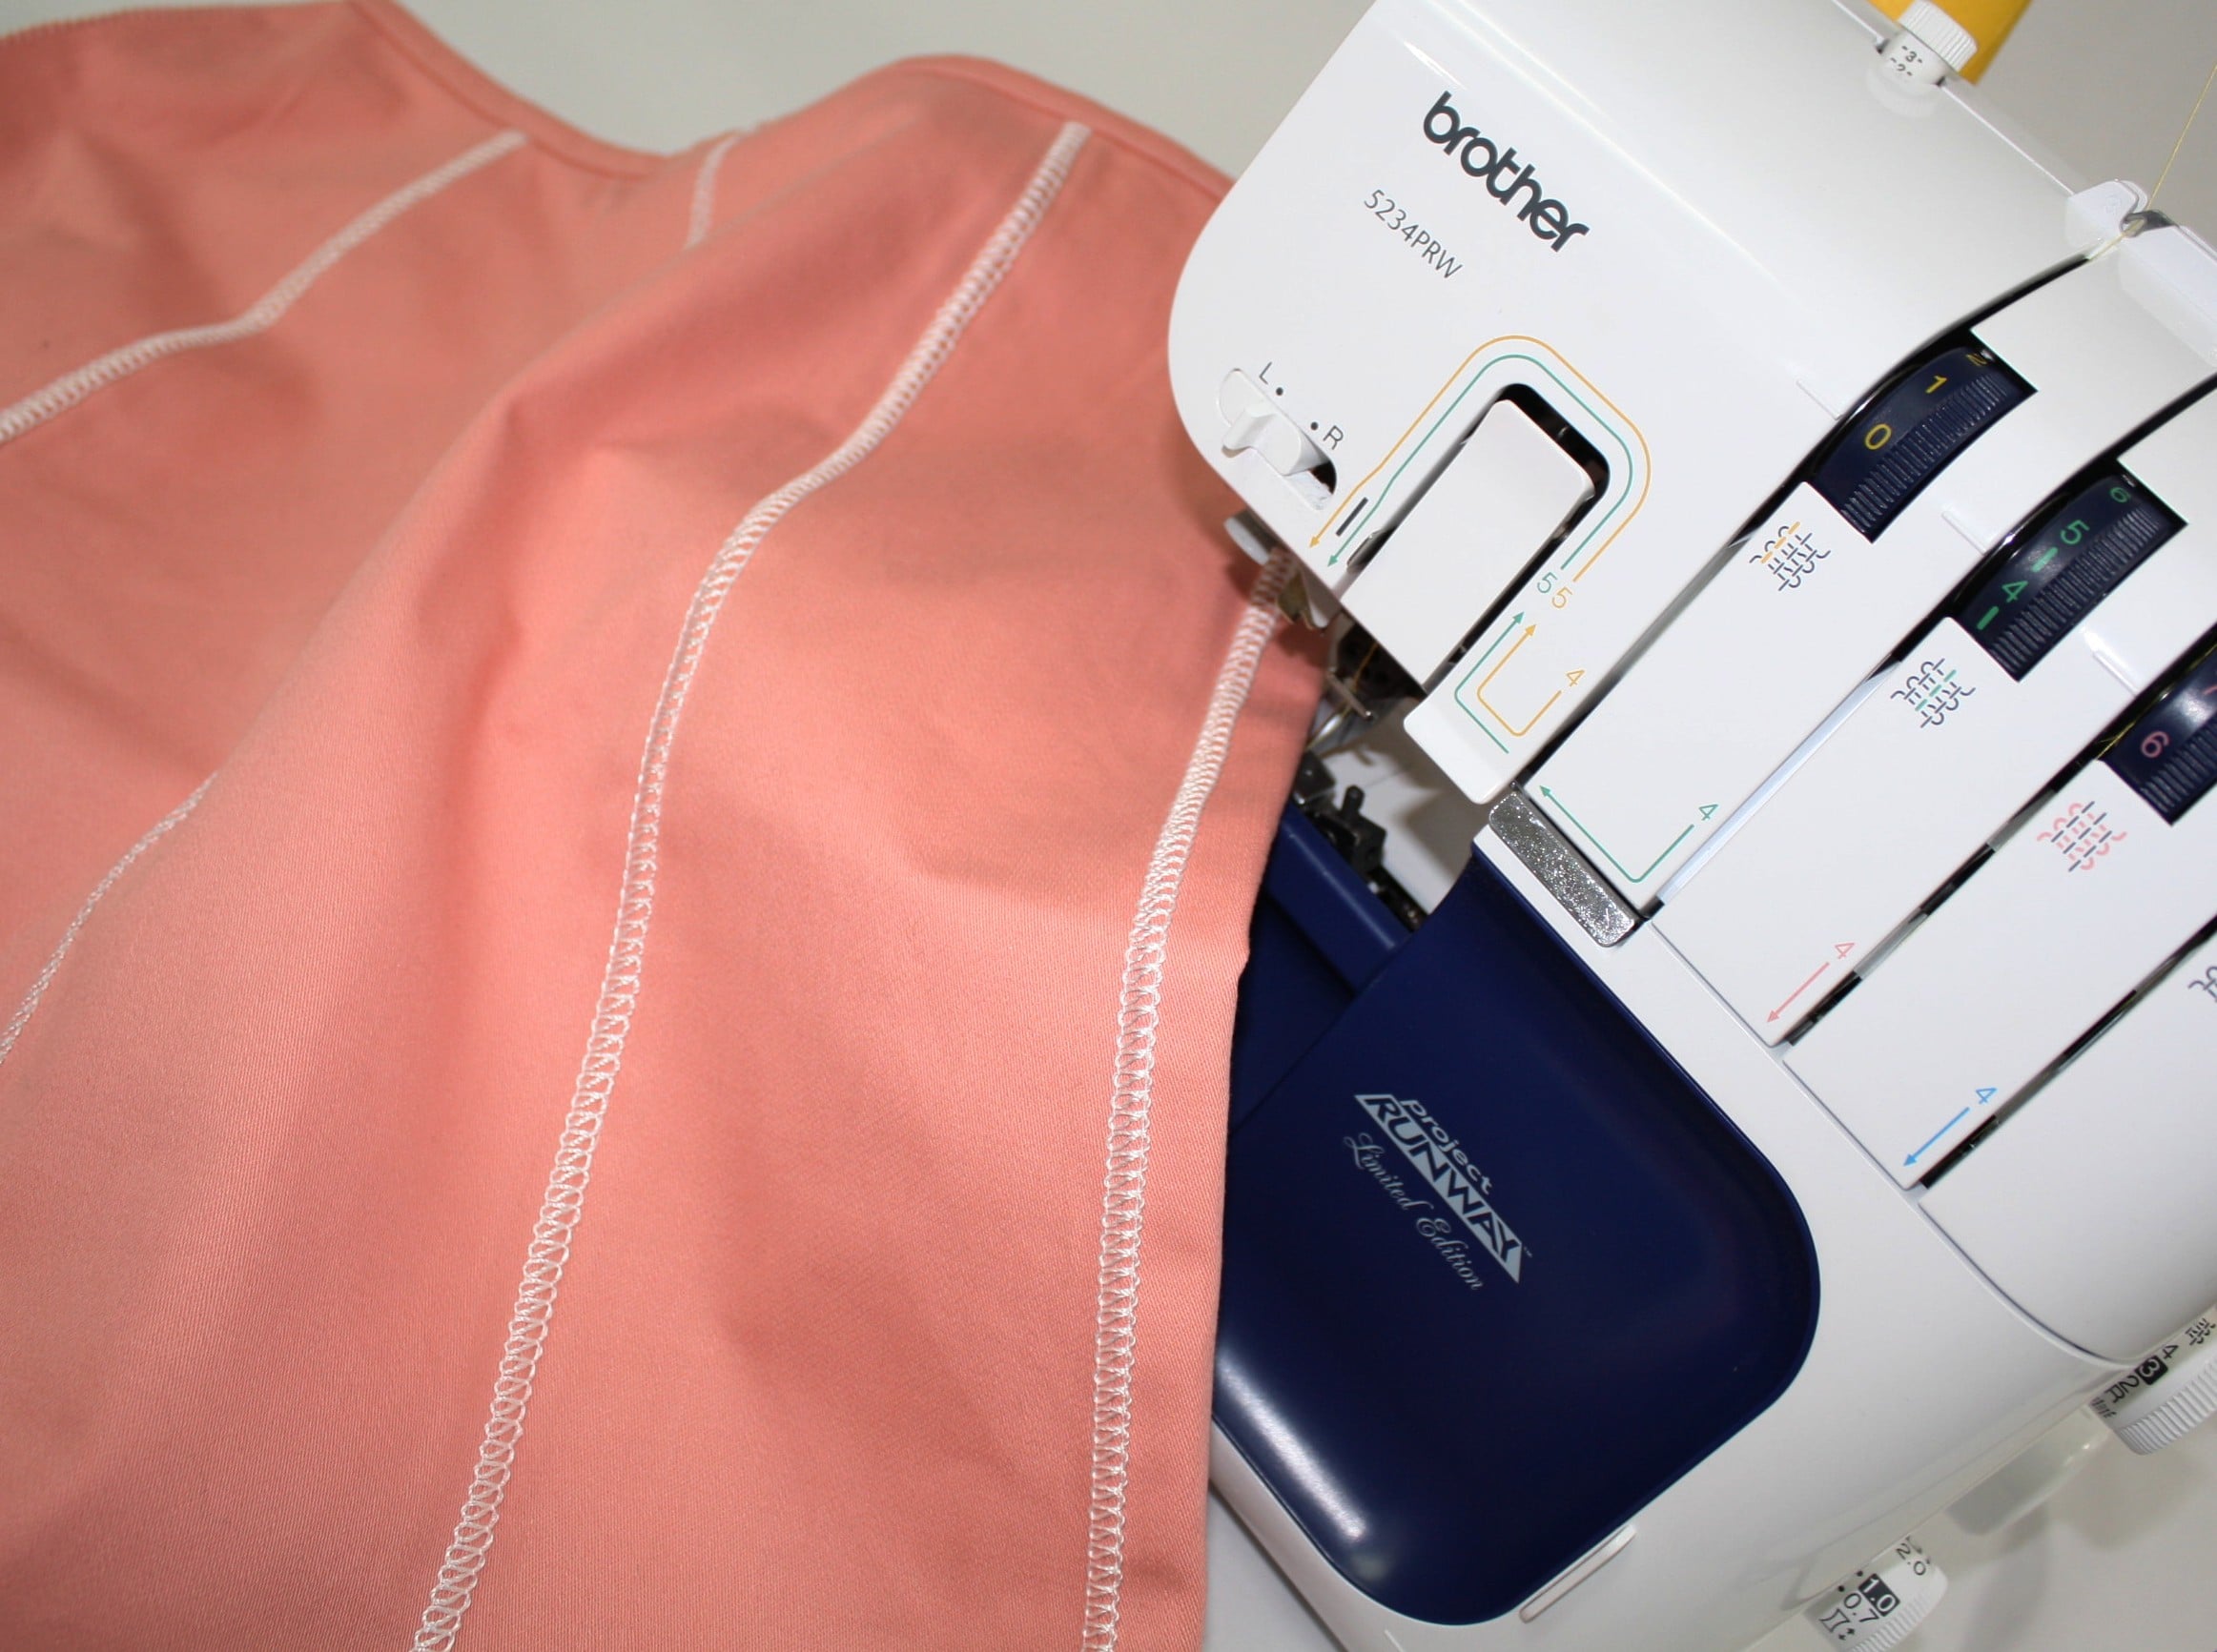
I am using the Brother Serger: 3-thread flatlock stitch with a decorative crochet thread in the upper looper. The left needle and lower looper have a similar color polyester thread. The photo above shows the front of the flatlock stitch and the backside. The backside looks like a ladder stitch. (the peach thread is just the serged edge of the seam).
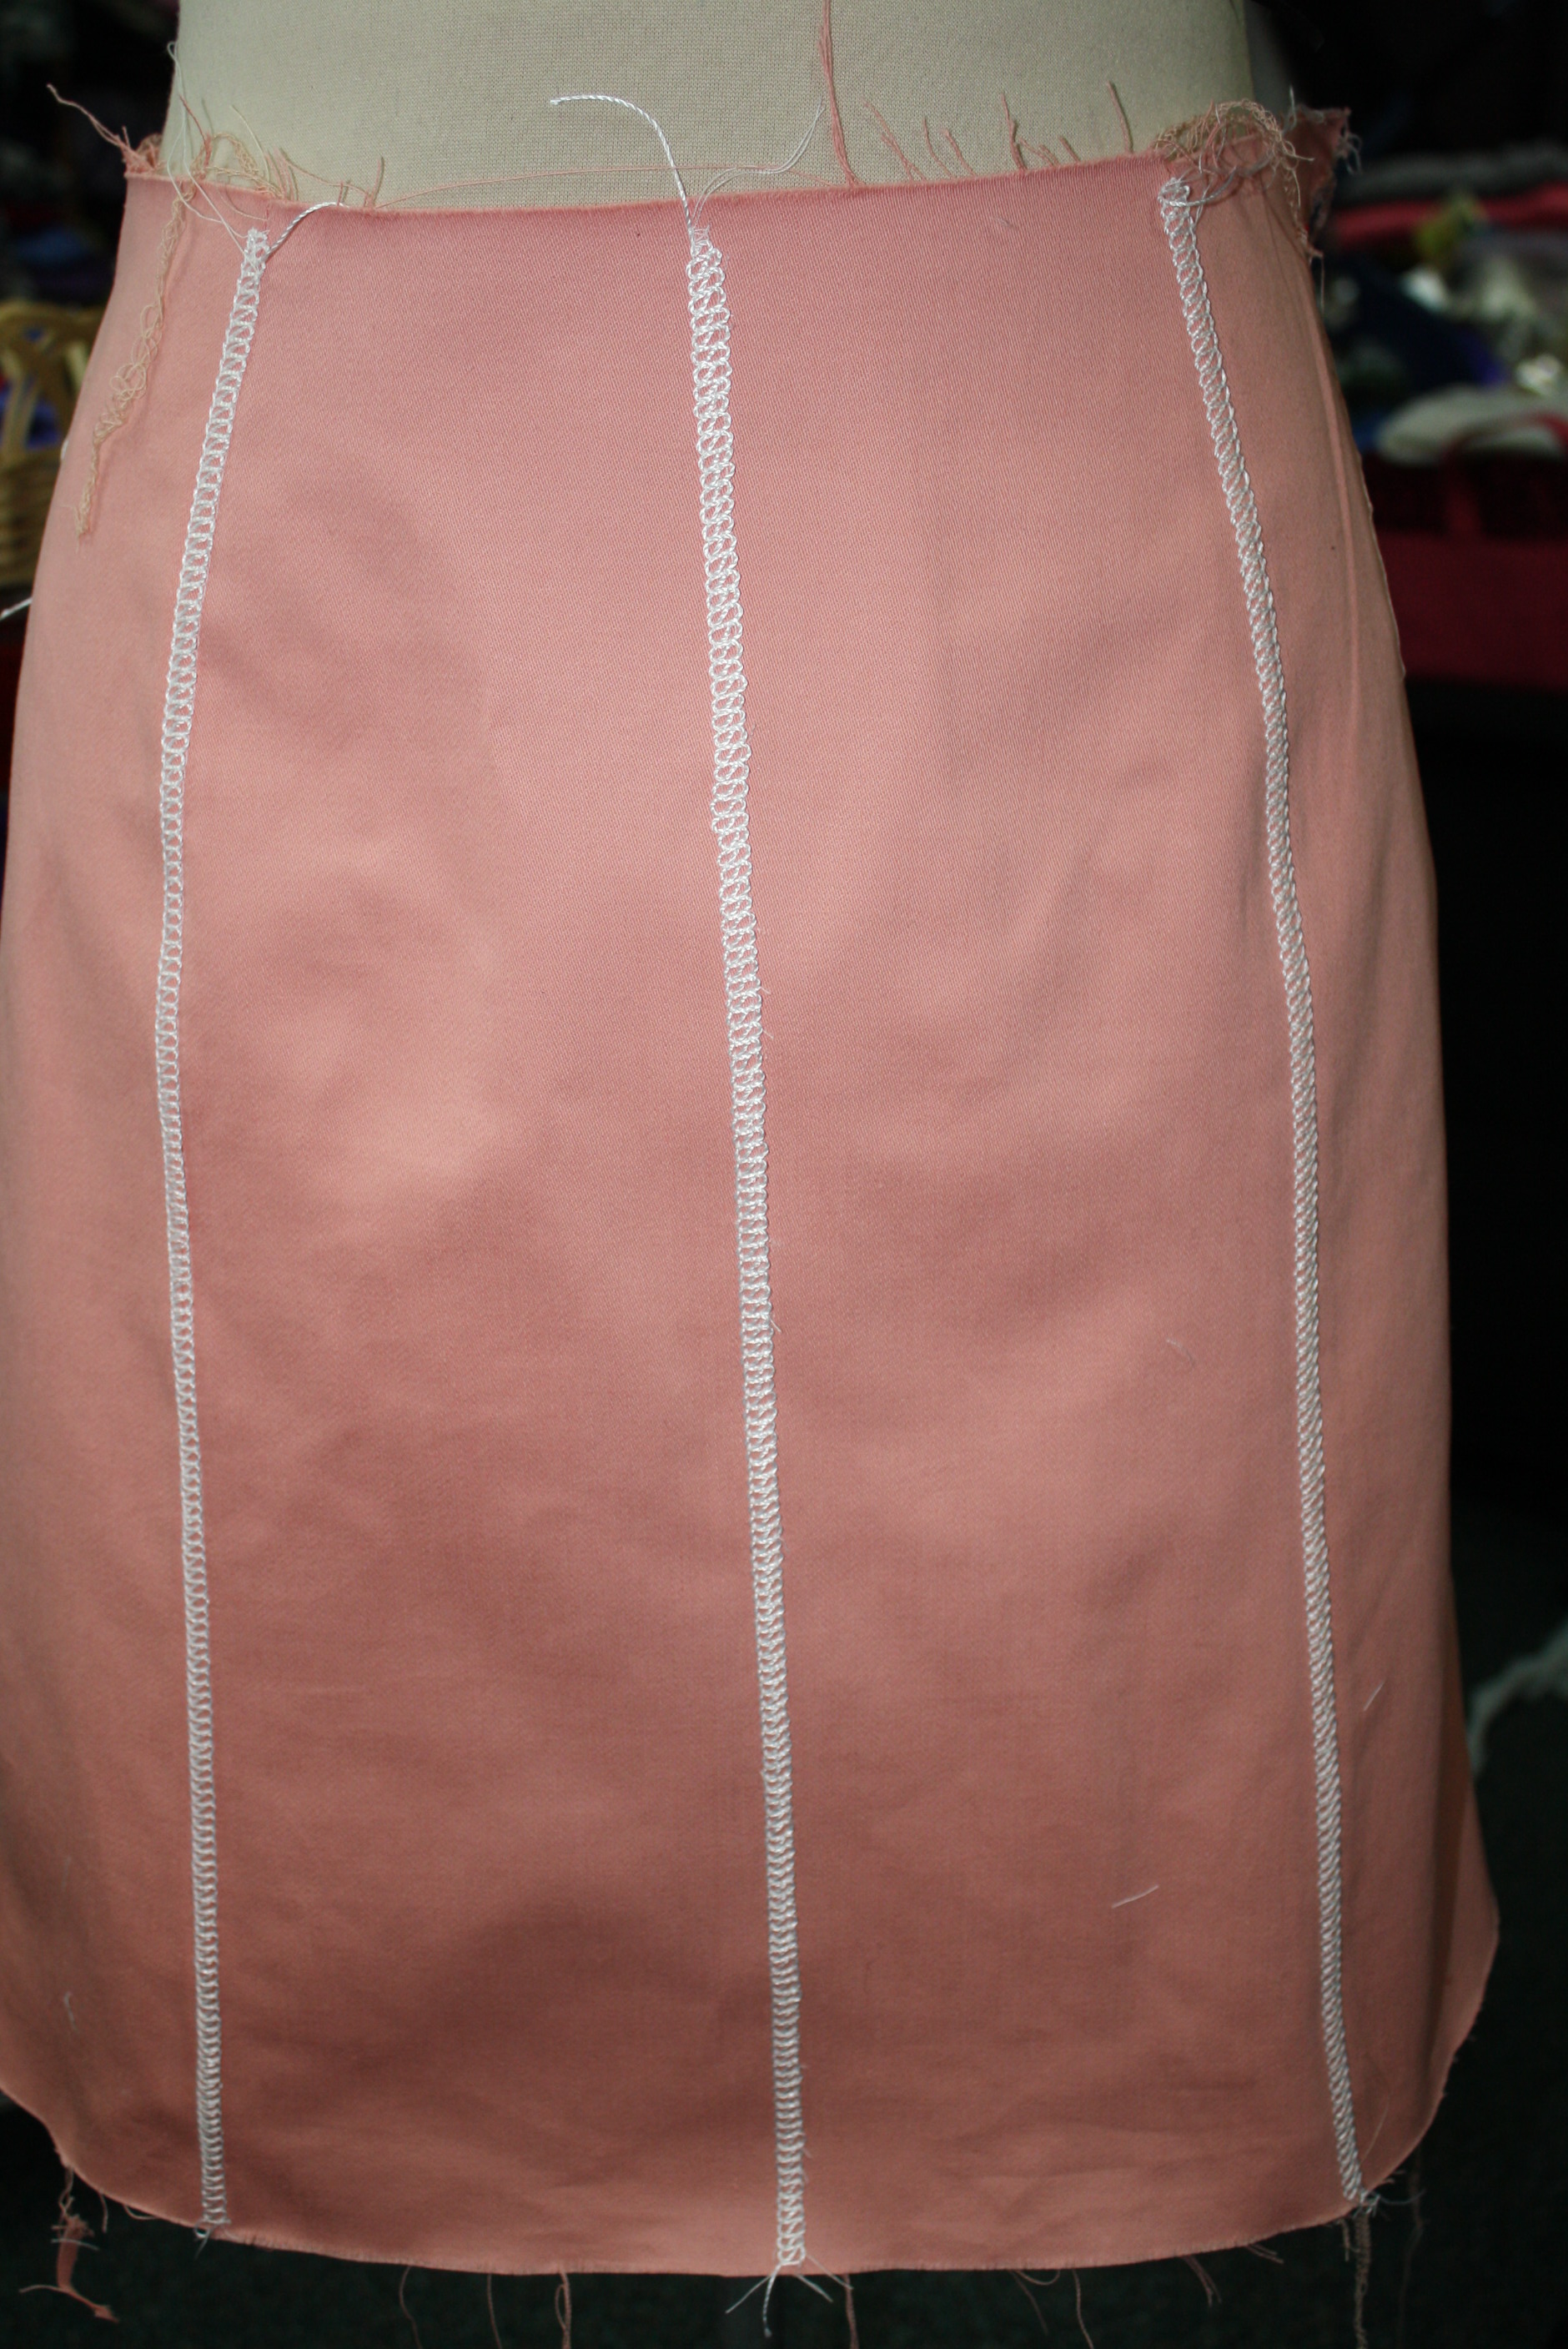
I started with the Kate Skirt Pattern. I added seams to the front and center back, but you could just pencil in a line with tailors chalk – it doesn’t need to be a seam to add the flatlock decorative stitch.
Here is the back view. Again there are 2 seams on each side back and this time there is a seam down the center back with a hidden zip. In order for this stitching to look even (with the zipper), I stitched the flat-felled embellishment down the edge of each center back seam, then added the zipper and closed the seam. That part got a little tricky and you can see the stitches are not perfectly even. I haven’t decided if I am going to rip it out and start again or hope nobody is looking at my tush that closely to notice 🙂
Setting up the Serger:
Set your serger up for a 3-thread overlock: I am using a serger from Brother and the standard setting for the needle and looper tensions are 4. When I give you new tension numbers you can compare this with your serger, if your serger has manual tension dials. If you are serging with an air-threading serger, like this Babylock, set up your serger for the 2-thread flatlock – wide.
Thread the upper looper (or the only looper for the 2-thread flatlock) with a decorative thread. Use standard poly serging thread in the needle and lower looper.
Next, there are a few changes to the serger settings:
Stitch Width: 5mm
Stitch Length: 2-4mm
Needle Tension: Decrease to 0 -3 (remember my standard setting is 4 so adjust for your serger)
Upper Looper Tension: Decrease to 2 – 3
Lower Looper Tension: Increase to 6 – 9
Disengage the knife
These setting serve as a guide. It will depend on the fabric and thread you end up serging with.
See if your serger had aBlind Hem Foot, if not you can use the standard foot.
There is a setting on the foot that moves to the plastic or metal piece to right and left, allowing the needle to pierce more or less of the fabric. Test the stitch on your fabric to determine the setting.
Fold the fabric in half or if you are embellishing a seam, fold along the seam line. Align the fabric along the shield on the blind hem foot (if using a standard foot, mark a spot to align with).
The idea is for the needle to pierce the fabric – half the stitch is on the fabric and half is off the fabric. In fact the stitch looks really messy coming out of the serger!
Stretch out the folded fabric to lie flat and press.
Pretty simple, but so fun! Have you ever tried this before? I would love some more ideas for decorative threads or yarns to use with this stitch.
Be sure to share photos of your creative serged project 🙂 #angelawolf
Episode 302 🧵 Behind the Scenes with Angela Wolf We are onto part 2 in the Delila sew along! We have cut our fabric and ready to sew. Did you have any questions about fitting? If so, be sure to take your photos with questions to the Angela Wolf Patterns Facebook...
Episode 301 🧵 Behind the Scenes with Angela Wolf Getting into summer and looking for stylish tops to wear with jeans, shorts, or skirts and one of my fist patterns always shows up ... The DelilaDelila Pattern has 9 Options I designed this pattern to be able to sew...
Episode 260 🧵 Behind the Scenes with Angela Wolf ~ Sew the Shirley Wrap with a Sweater Knit The Shirley Wrap pattern is so versatile and this time we will use a thicker, sweater knit fabric. You can find the Shirley pattern in PDF and paper patterns in size XXS -...
Spring is such a great time to clean and organize … two of my least favorite terms :) One of the biggest clutter issues in a sewing room is thread, I want to share a few ideas for organizing:
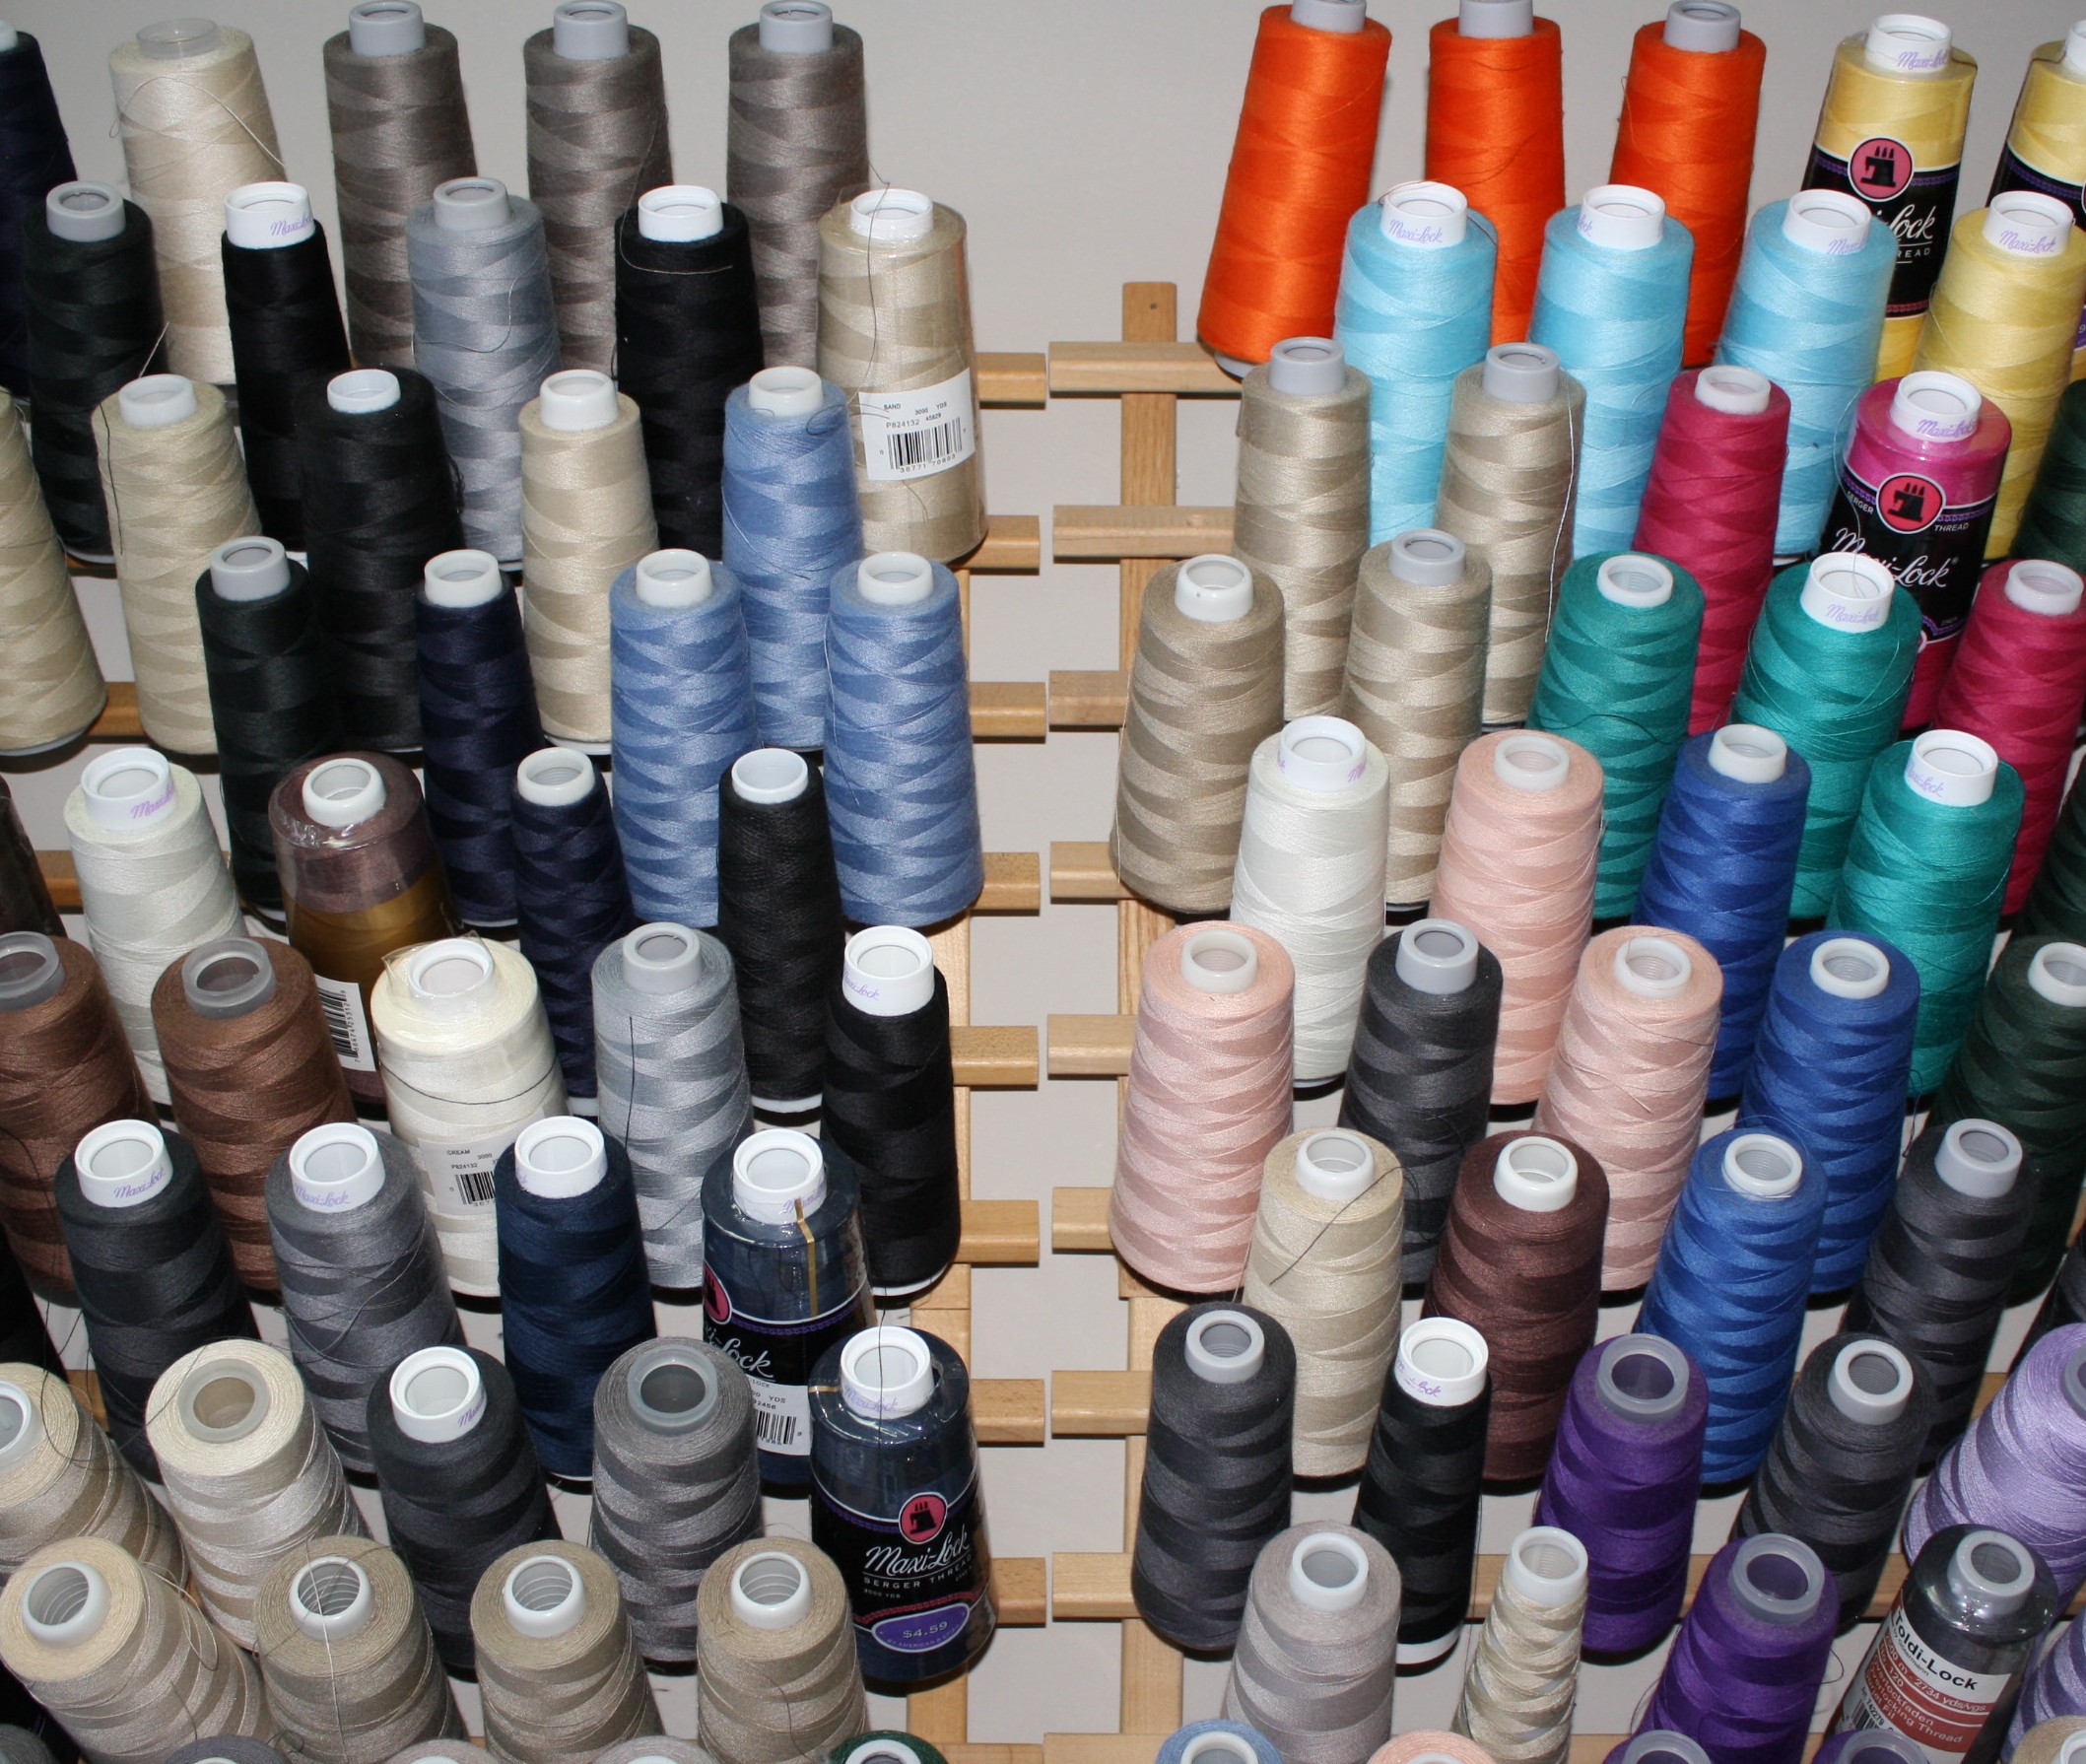
Hang numerous thread racks on different walls to organize spools of thread by color and content. Although you can’t tell by this photo, I organize the neutral colors in one area, green and blues in another, red, yellow and orange in another, etc. I also use the top row for topstitching and other specialty threads.
There is a separate section for serger thread. When I run out of pegs on the rack, I hang one cone of a specific color with a sticker that lists the quantity. Then I store the other cones in a cabinet below.
Speaking of serger thread, I leave one serger thread rack on the table with the sergers and coverstitch machines. This is a quick way to hold the spools I am using and prevent them from cluttering the sewing area and rolling off the table!
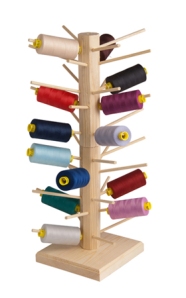
Here is a fun spool holder! The base rotates so it’s easy to find a thread and the pegs are long enough for serger cones. Another option is coordinating the bobbin and the thread color together, both fit perfectly on one peg.
You have to assemble this rack, which only takes a few minutes, but that offers additional options for organizing.
I find myself only using the bottom half of the rack. With the lower half I can load up on weight with heavy spools and the rack is not tippy. Another idea is to use the thread spools at the bottom and smaller spools or bobbins on the top half.
Speaking of bobbins, I always order an extra 50 for each machine. There are so many colors I use frequently and I don’t enjoy unspooling the bobbin so I can use a new color. Not only is that a waste of thread, that extra thread attaches to my clothes for the day! To organize all the bobbins, I use a plastic container with a lid. These stack neatly and the lid keeps the dust out.
Check out this magnetic bobbin holder. I keep one of these next to my Brother PQ1500 and one next to my commercial machine since those are the only machines I have with metal bobbins.
For the machines that have plastic bobbins, I either use the turning thread holder shown above, the plastic thread container, or a smaller thread rack free-standing on the table.
In case you haven’t seen WAWAK Sewing’s April magazine with the sale of the month, ALL the thread racks are $5 off (and don’t forget shipping is free if you spend over $100 – which is easy to do with all the great items they have :))
Now, back to writing the serging book. I do have a serging technique I think you will like, I hope to share that with you tomorrow. How are you doing on April’s wardrobe challenge Simply Serged?


 I love sweaters and shawls, especially since I am always cold in the air-conditioned restaurants (not that we have needed air conditioning in Michigan this summer!). Thinking of the wardrobe challenge, sweaters are one of the items that I end up buying. Yes I do know how to crochet, yet trim on a jacket is about as far as that usually ends up. A small knitting machine sits in the corner of the studio (on my bucket list to learn how to use 🙂 ).
 I was recently sewing a fringe skirt and the tweed scraps falling on the floor reminded me of meeting a women wearing a really cute, long, loosely woven (sweater looking) vest. It was at the annual conference for ASDP, so I had to ask the question that only sewer’s are allowed to ask each other “did you make that?”. She had indeed! I was really intrigued when she mentioned using water-soluble stabilizer and scraps from her last sewing project – yes, scraps!


