First off, I want to wish you a Happy New Year and I hope you are off to a great start in 2015! So far so good on this end J
I started the year with a mini-vacation up north. Although, the snow didn’t arrive until after the mini-vacation, which resulted in another mini-vacation at home, not all bad J
yes, I took this fuzzy photo and it’s on the new years list to get better
I am not big into New Year’s resolutions, as I would hate to set myself up for failure – that being said I still have a very long list, as I do every year: work out, eat healthier, go to bed early and get up early, take more time for friends and family, get organized, get rid of clutter, and on and on …… I have to ask, why not just take time each month and re-evaluate life – wouldn’t it be so much easier to try changing and improving on things one month at a time versus an entire year? What a novel thought, that ultimately has become my New Year’s Resolution!
Resolutions #1: Get in Better Shape
To start, I bought Jillian Michaels ripped in 30 workout DVD and a slew of new workout clothes. You can’t work out properly without the proper clothing, right? (even if I am working out in my own living room … and yes, I bought them as I didn’t have time to sew them)
Day 1: REALLY?!? Have any of you tried this workout?!? I really thought I was in pretty good shape – she had no problem proving that different! First day, thought I would die in the middle (remember this only 30 minutes – longest 30 minutes of my life!)
Day 7: Let’s just say, this is going to be re-evaluated at the end of the month – as I am SO out of shape! And thank heaven’s I can do this in my own house and no one is taping me!!!! Oh – and by the way – I will not be offering before and after photos! J
Resolution #2: Learn How to Cook
As many of you already know, cooking is not my forte. I am not ashamed of that, as those of you that have read my book already know, for the first years out of college – my custom apparel business was my main focus and the kitchen cabinets were only to be used for fabric storage – they made excellent storage if I might add. My last cooking attempt was 7 years ago, 3 days of it and it was catastrophic, so let’s give it a go in 2015. What the heck, don’t they call it the 7 year itch J
First, let me just say, I have the best husband ever! Winn, loves to cook and he is really good at it, so I am a bit spoiled. In order to not starve the man the death, I will attempt cooking while he is away:
1st Recipe: Cooking Light Magazine – Parmesan and Pine Nut – Crusted Oven-Fried Chicken (Winn’s up north ice fishing, perfect opportunity!)
Take 1: Spent 2 hours in the grocery store trying to find all the ingredients, got home and was way too tired to attempt.
Result: Dinner served is cottage cheese and triscuits.
Take 2: Ready to go … everything went well until the “sauté the chicken for 3 minutes” and mine turned black instantly!
I will just give you a hint, Tyler (the cat) is more like a dog and love’s people food. Last weekend, my husbands chicken dish:
My dish? He snubbed, in the kindest way:
In fact, if it wasn’t for Ranch dressing (which makes anything taste good) Tyler’s dinner was even looking a bit enticing.
Cooking is just like Sewing!
This is when I realized cooking is so much like sewing! When I teach a class, I assume you know how to do certain things, just like these recipes:
2 TBSP Pine nuts, toasted (for us beginners, how do you toast these – in the toaster LOL J )
Sauté for 3 minutes or until brown – well, mine turned black so fast, there wasn’t a brown option! (Maybe the author had a better quality pan?)
Cook for 10 minutes or until chicken is done: what if my oven is hotter than yours? What if I use convection cook?
As I am pulling a blackened chicken breast out of the oven, two things occurred to me. Sewer’s have this same problem. For example: interfacing – What is it? What kind? Where do I put it? How do I press it in place?
I can just picture a new sewer in Joann fabrics staring at the rack of interfacing, as I am in the grocery store staring at the spice rack – totally lost!
And then the comparison of sewing machines and sergers to stoves and ovens. They are all different. I read the recipe and followed by the book, but maybe the person writing it has a gas stove, did they bake with a convection oven, or were they using a different pan?
After botching my dinner, I sat down to answer my online class questions and had to laugh when I got to one of my serging class questions: my gathering foot doesn’t gather like you showed. WOW! This is exactly what I am experiencing with cooking! My serger is different and all serger’s don’t offer the same stitch quality or feet accessories. See where I am going? There are so many factors to creative learning.
And to help my fellow beginner sewers, I have fun plans for you this year! I can’t tell you them all yet, but my blog will feature a “Back to the Basics” section to help you learn the basics of sewing as I am learning to cook! Let’s learn together J For my advanced sewing fans, don’t worry, I have a lot in store for you too!
Wardrobe Challenge
How can I ever thank you all for participating in my wardrobe challenge of 2014, the response in email, flickr, and pinterest was phenomenal. My wardrobe challenge started with the idea to inspire you to fill your closet with clothes sewn by you! The best part was getting sponsors to offer great gifts to inspire you even further: Brother, WAWAK sewing,Threads and SewStylish Magazines, Coats & Clark, It’s Sew Easy Tv, and myself. As you know, I extended the deadlines into 2015 for many reasons and look forward to awarding the final winners. This contest was an inspiration of mine to get you all to fill your closets with your own sewn clothes! I will be announcing a slew of past winners this week and giving you the last challenge for the grand prize, don’t worry the last challenge is the easiest J
Happy New Year! Can you share some of your resolutions for 2015? I would love to hear J
Leather is a major trend this season and continues on into the spring, yes leather for spring and summer! Here are a few tips to get you started:
TIP 1. FABRIC
Check the fabric for flaws, especially in faux leather you might find scratches or cuts that you will need to work around when cutting out the pattern pieces.
Consider the weight and feel of the fabric for the design. For example a biker jacket will need a thicker fabric than say a peplum style jacket. Also, squeeze the fabric in your hand and if it has deep creases or wrinkles, that is how it will look after wearing it (better to know now :))
TIP 2. NEEDLES
Use a Leather Needle in the sewing machine. Start with a size 12 or 14 for light to medium weight fabric.
Go up to a 16 or 18 for heavier fabric, but be sure to CHECK your sewing machine as to what is the largest size needle it will accommodate. One of my older machines will only allow up to a size 14.
For sewing faux leather I prefer using a Jean Needle size 14. If you are having a problem with skipped stitches try this needle.
When it comes to hand-stitching, standard needles have a difficult time piercing the fabric. Instead use a Leather Hand Needle, this needle has a triangular point that pierces the fabric. Just be careful, the tip is REALLY sharp!
TIP 3: NO PINS
Just as difficult as it is to pierce leather / faux leather, once you do pierce the fabric the hole is there forever! Use fabricclips to hold the fabric instead of pins. They are lightweight and don’t damage the fabric.
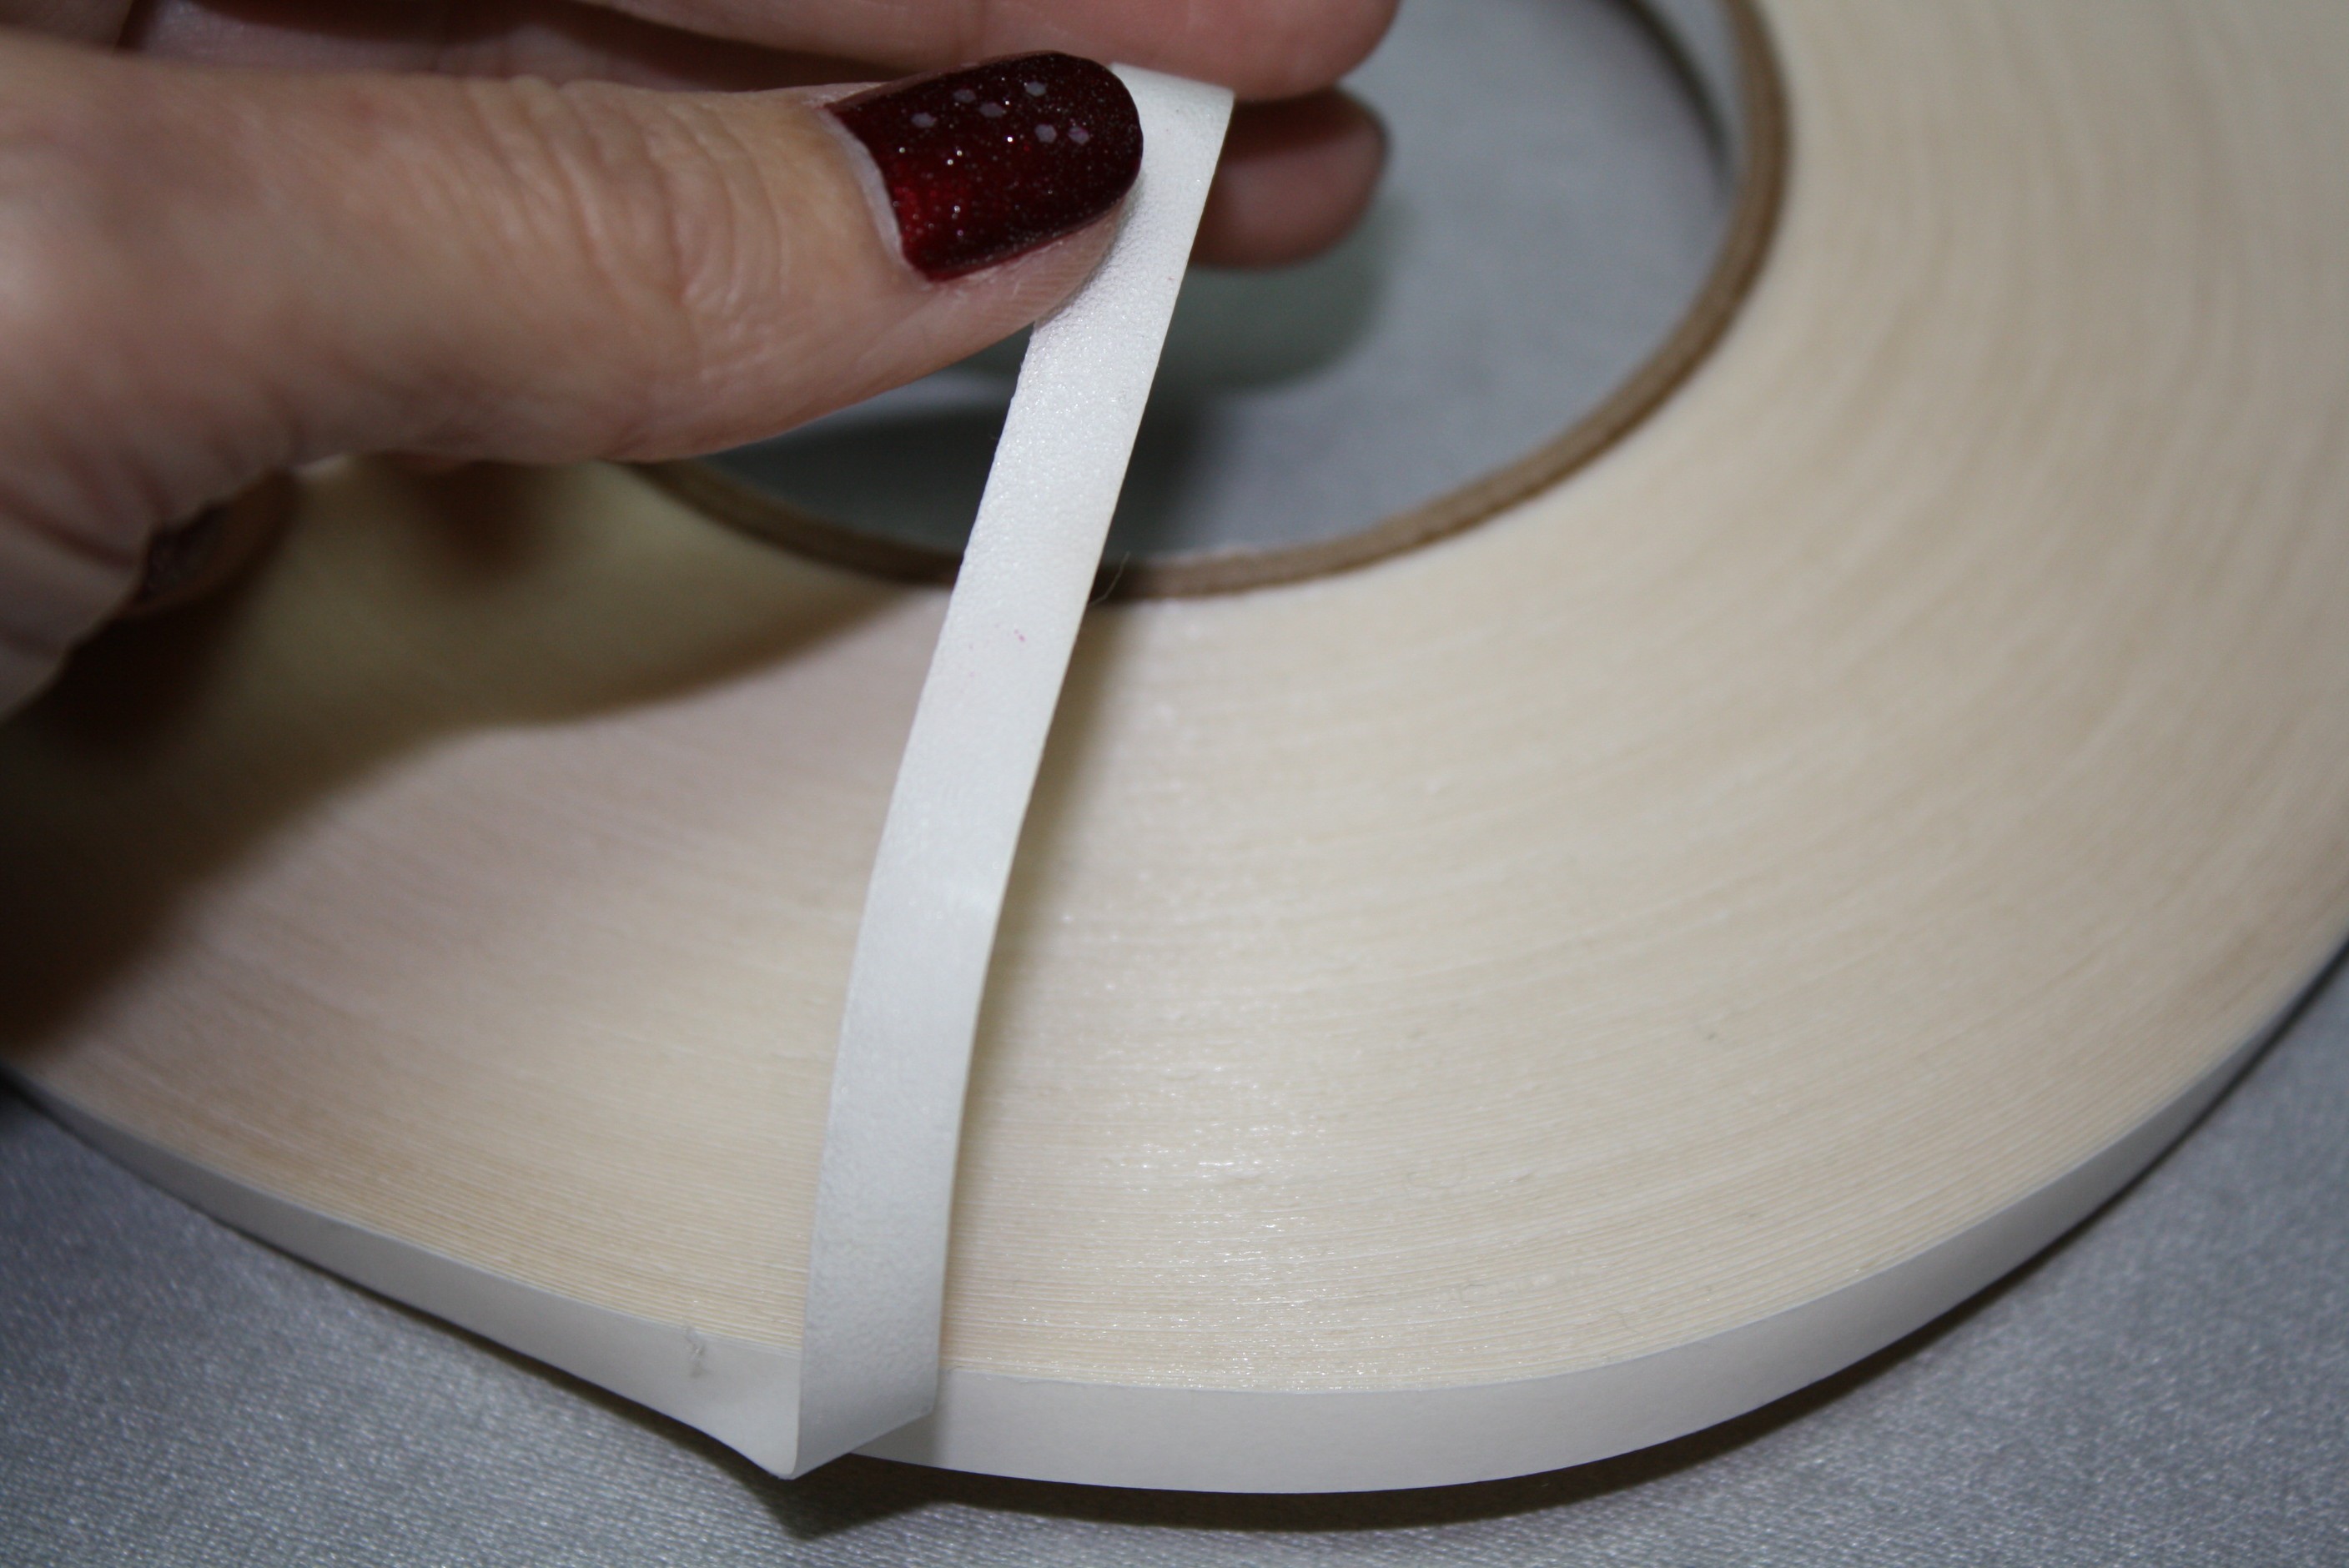
TIP 4: TAPING SEAM ALLOWANCES
When sewing garments, pressing the seam allowances open with a Tailor’s Clapper is the best option. Unfortunately with leather, faux leather, vinyl, and suede, even if you safely press the fabric with an iron shoe, the seam allowance will not stay open. The best solution for securing seam allowances and hemming is either topstitching or leather tape (a special double-sided tape).
This is how easy it works:
1. Place a strip of LEATHER TAPE in the seam allowance with the sticky side down.
2. Remove paper backing, revealing the other side of the tape.
3. Fold back the seam allowance or hem allowance.
I use the 1/4″ wide tape for seam allowances and 1/2″ wide tape for hems.
The Lacy Knit Top Sewing Pattern The design for the Lacy Knit Top was a result of our everlasting Covid lockdown! Whether lounging at home, working in the studio, or working out in our home gym ~ this top hit the mark. Semi-fitted in the bust area, looser thru the...
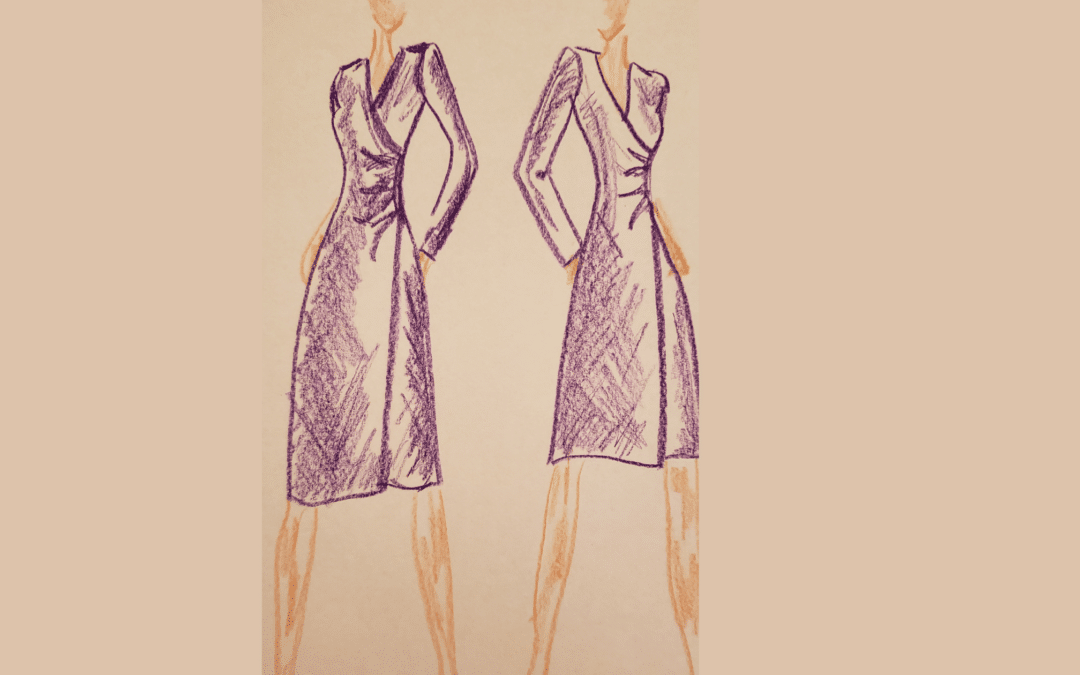
The Shirley Faux Wrap Dress & Top I designed this pattern as one of the wrap style dresses and tops for season 19 of It's Sew Easy tv. The Shirley wrap can be sewn as a top or a dress. Because the style must pullover the head, this top must be sewn with a...
#SEWCIALHOP2020 CONGRATULATIONS TO ALL THE WINNERS! CATCH THE REPLY AND MEET OUR FABULOUS SPONSORS Day 18 #SEWCIALHOP2020 and a Special THANKYOU to ALL the SPONSORS!!! Stay up to date with new tutorials, giveaways, and more - follow...
Day 17 #SEWCIALHOP2020 Today we feature my good friends at Allbrands!!! Allbrands.com has spent four decades focused on one thing above all others, unparalleled customer service. Our owners, John and Annette Douthat, were very careful when they chose our name,...
Day 16 #SEWCIALHOP2020 Features the fabulous Holly & Steve Cobb and The Sewing Shop in Shreveport, Louisiana. I featured Steve and Holly in my live show back in May, checking in on their store during the start of the covid-lockdown. They are a Brother dealer and...
Day 15 #SEWCIALHOP2020 Our special guest is my good firend Reen Wilcoxson owner of Embroidery Garden! Embroidery Garden is filled with embroidery designs, applique files, and so many other creative projects! GIVEAWAY Reen knows how much we love embroidery and she is...
There are so many sewing machine feet to choose from, it can get overwhelming deciding which foot is best for the job. Why bother, right? If using a specific foot for a specific job could drastically cut the sewing time down and offer professional looking results, wouldn’t you want to try? I sure would.
Home sewing machines usually come with a fabulous manual explaining what each foot is for and a tutorial explaining how to use it. Industrial machines don’t always offer such advice, at least mine didn’t. With a 5 page manual, written in a language I don’t speak, I am surprised I got the thing put together in the first place! I don’t use this machine as frequently as all the others, mainly because it’s loud, doesn’t have a thread cutting feature and I don’t have any accessories for it. I bought it for speed and that it has.
Scanning the list of additional feet for industrial machines, I found the feet to be are very inexpensive, but again I ran into the issue of which foot is the right foot for the job. I thought I would start testing some of these feet and share with you my findings.
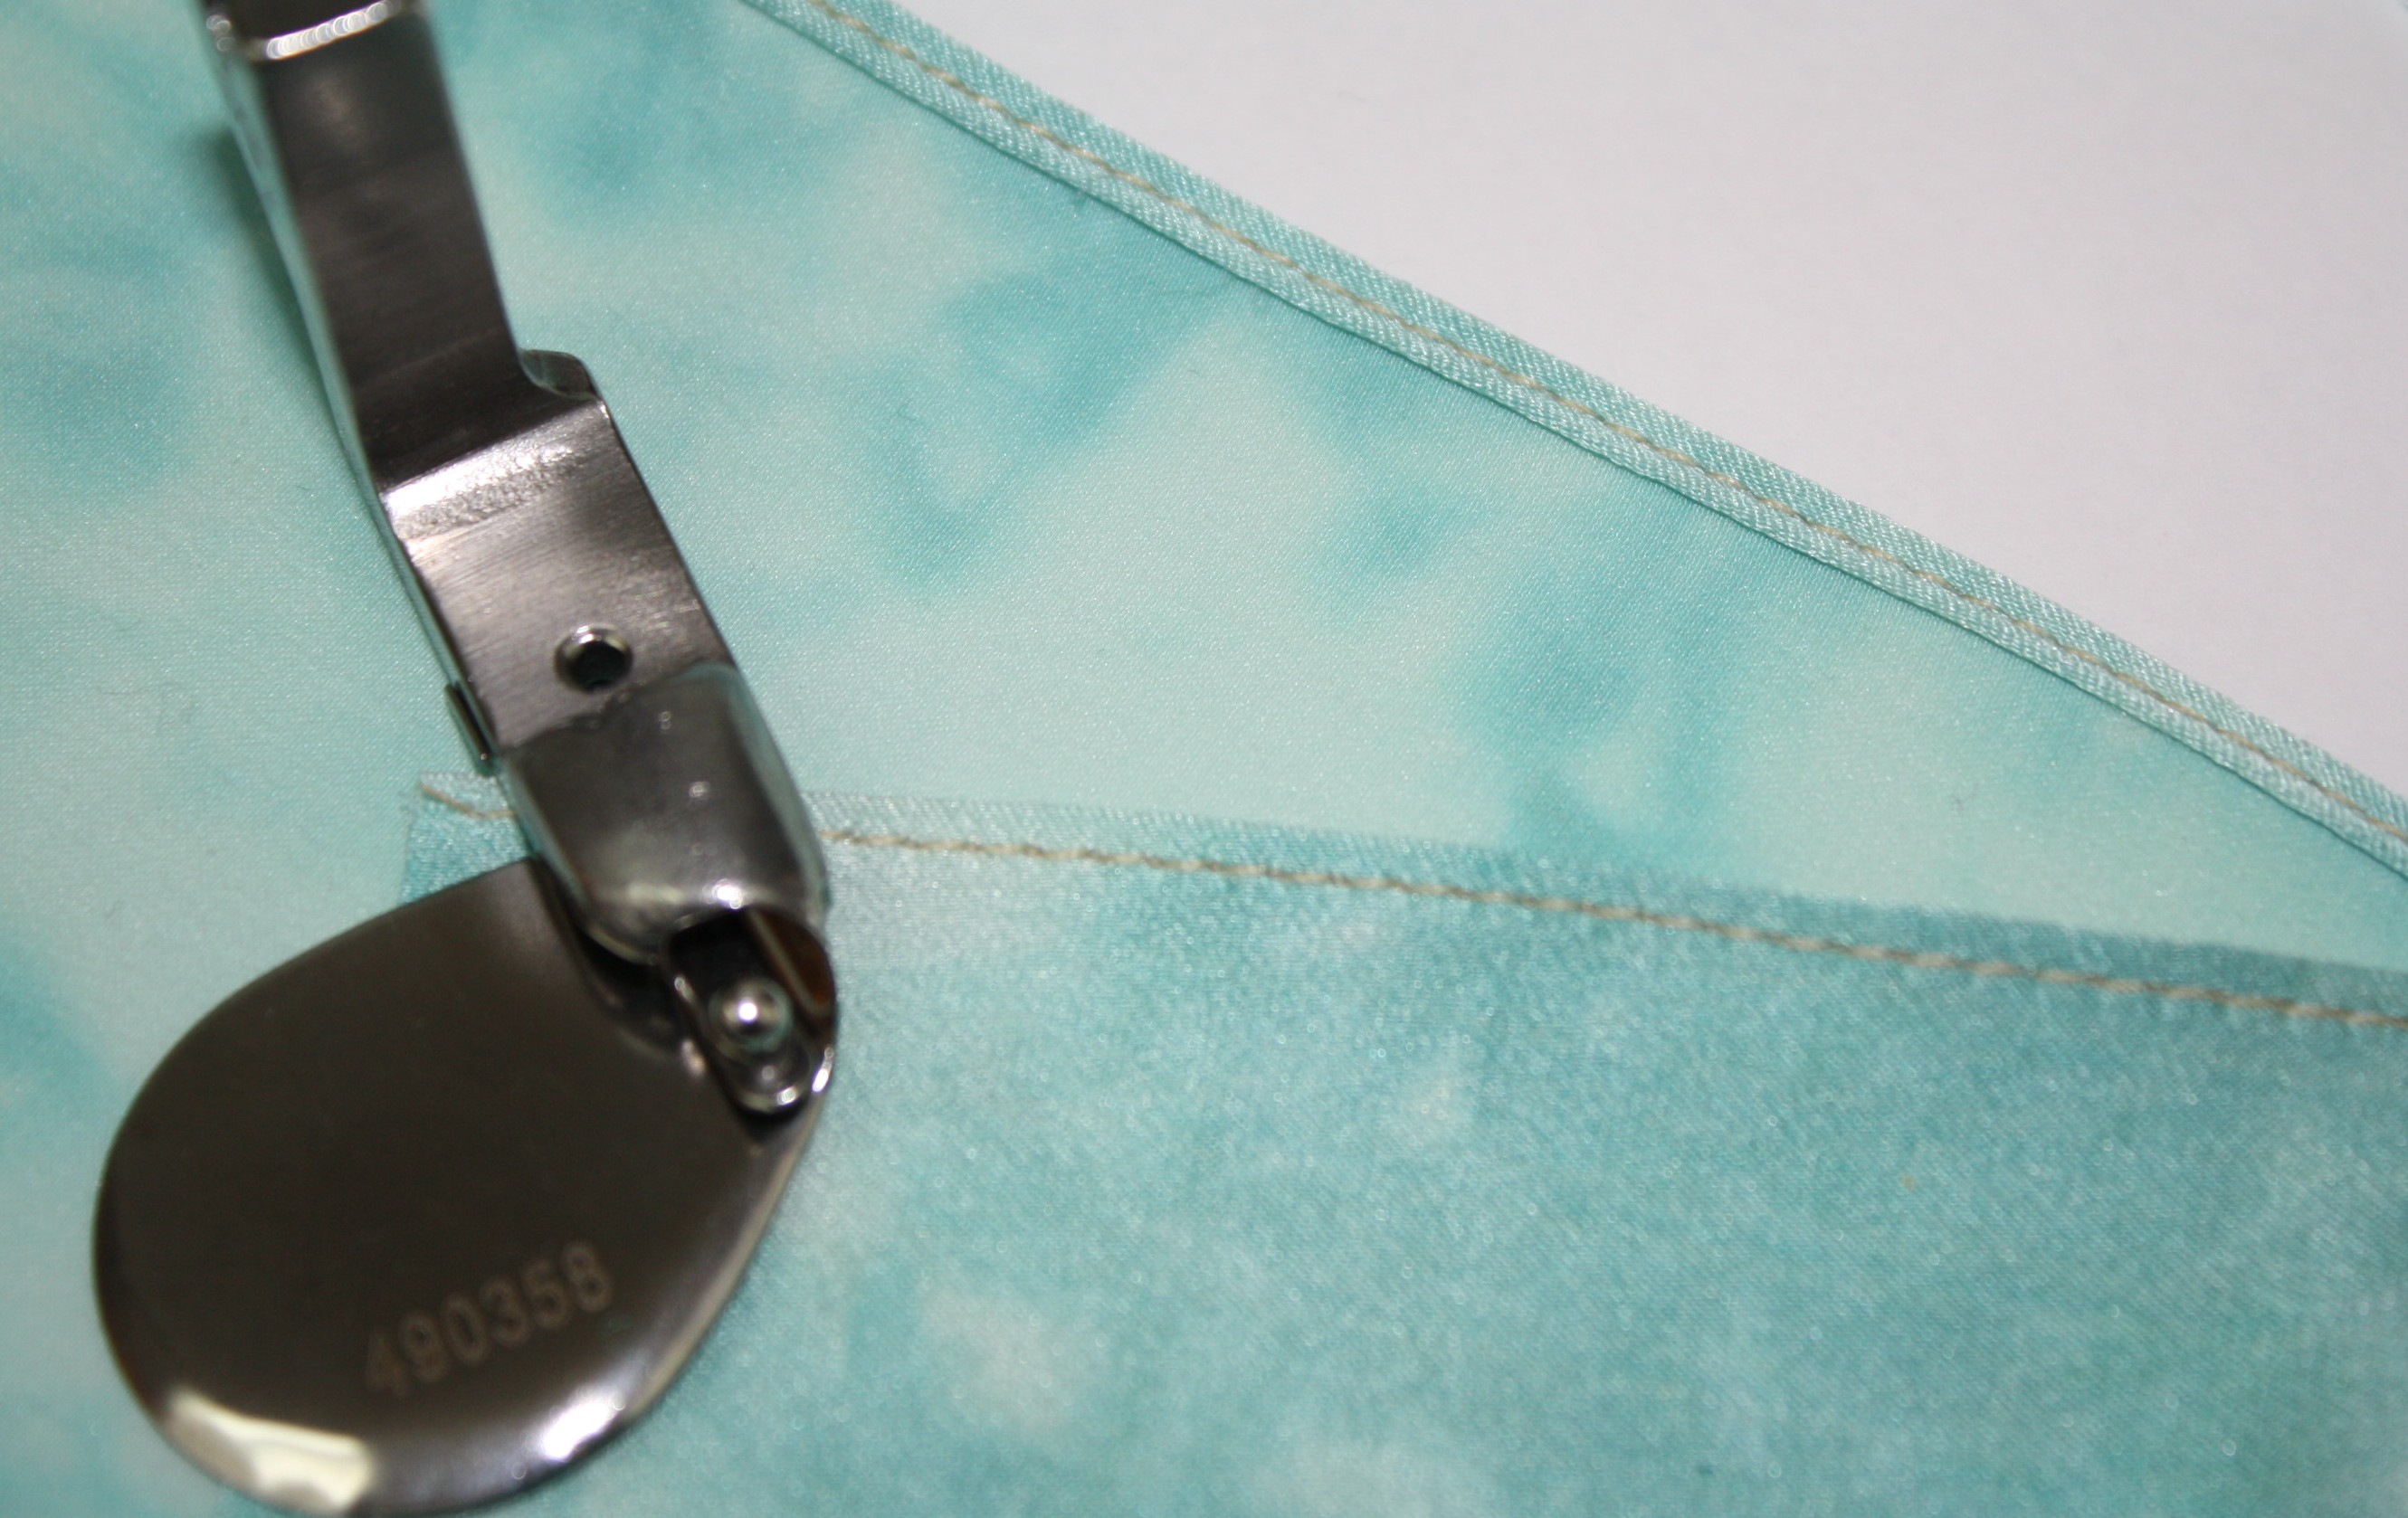
A Narrow Rolled Hem
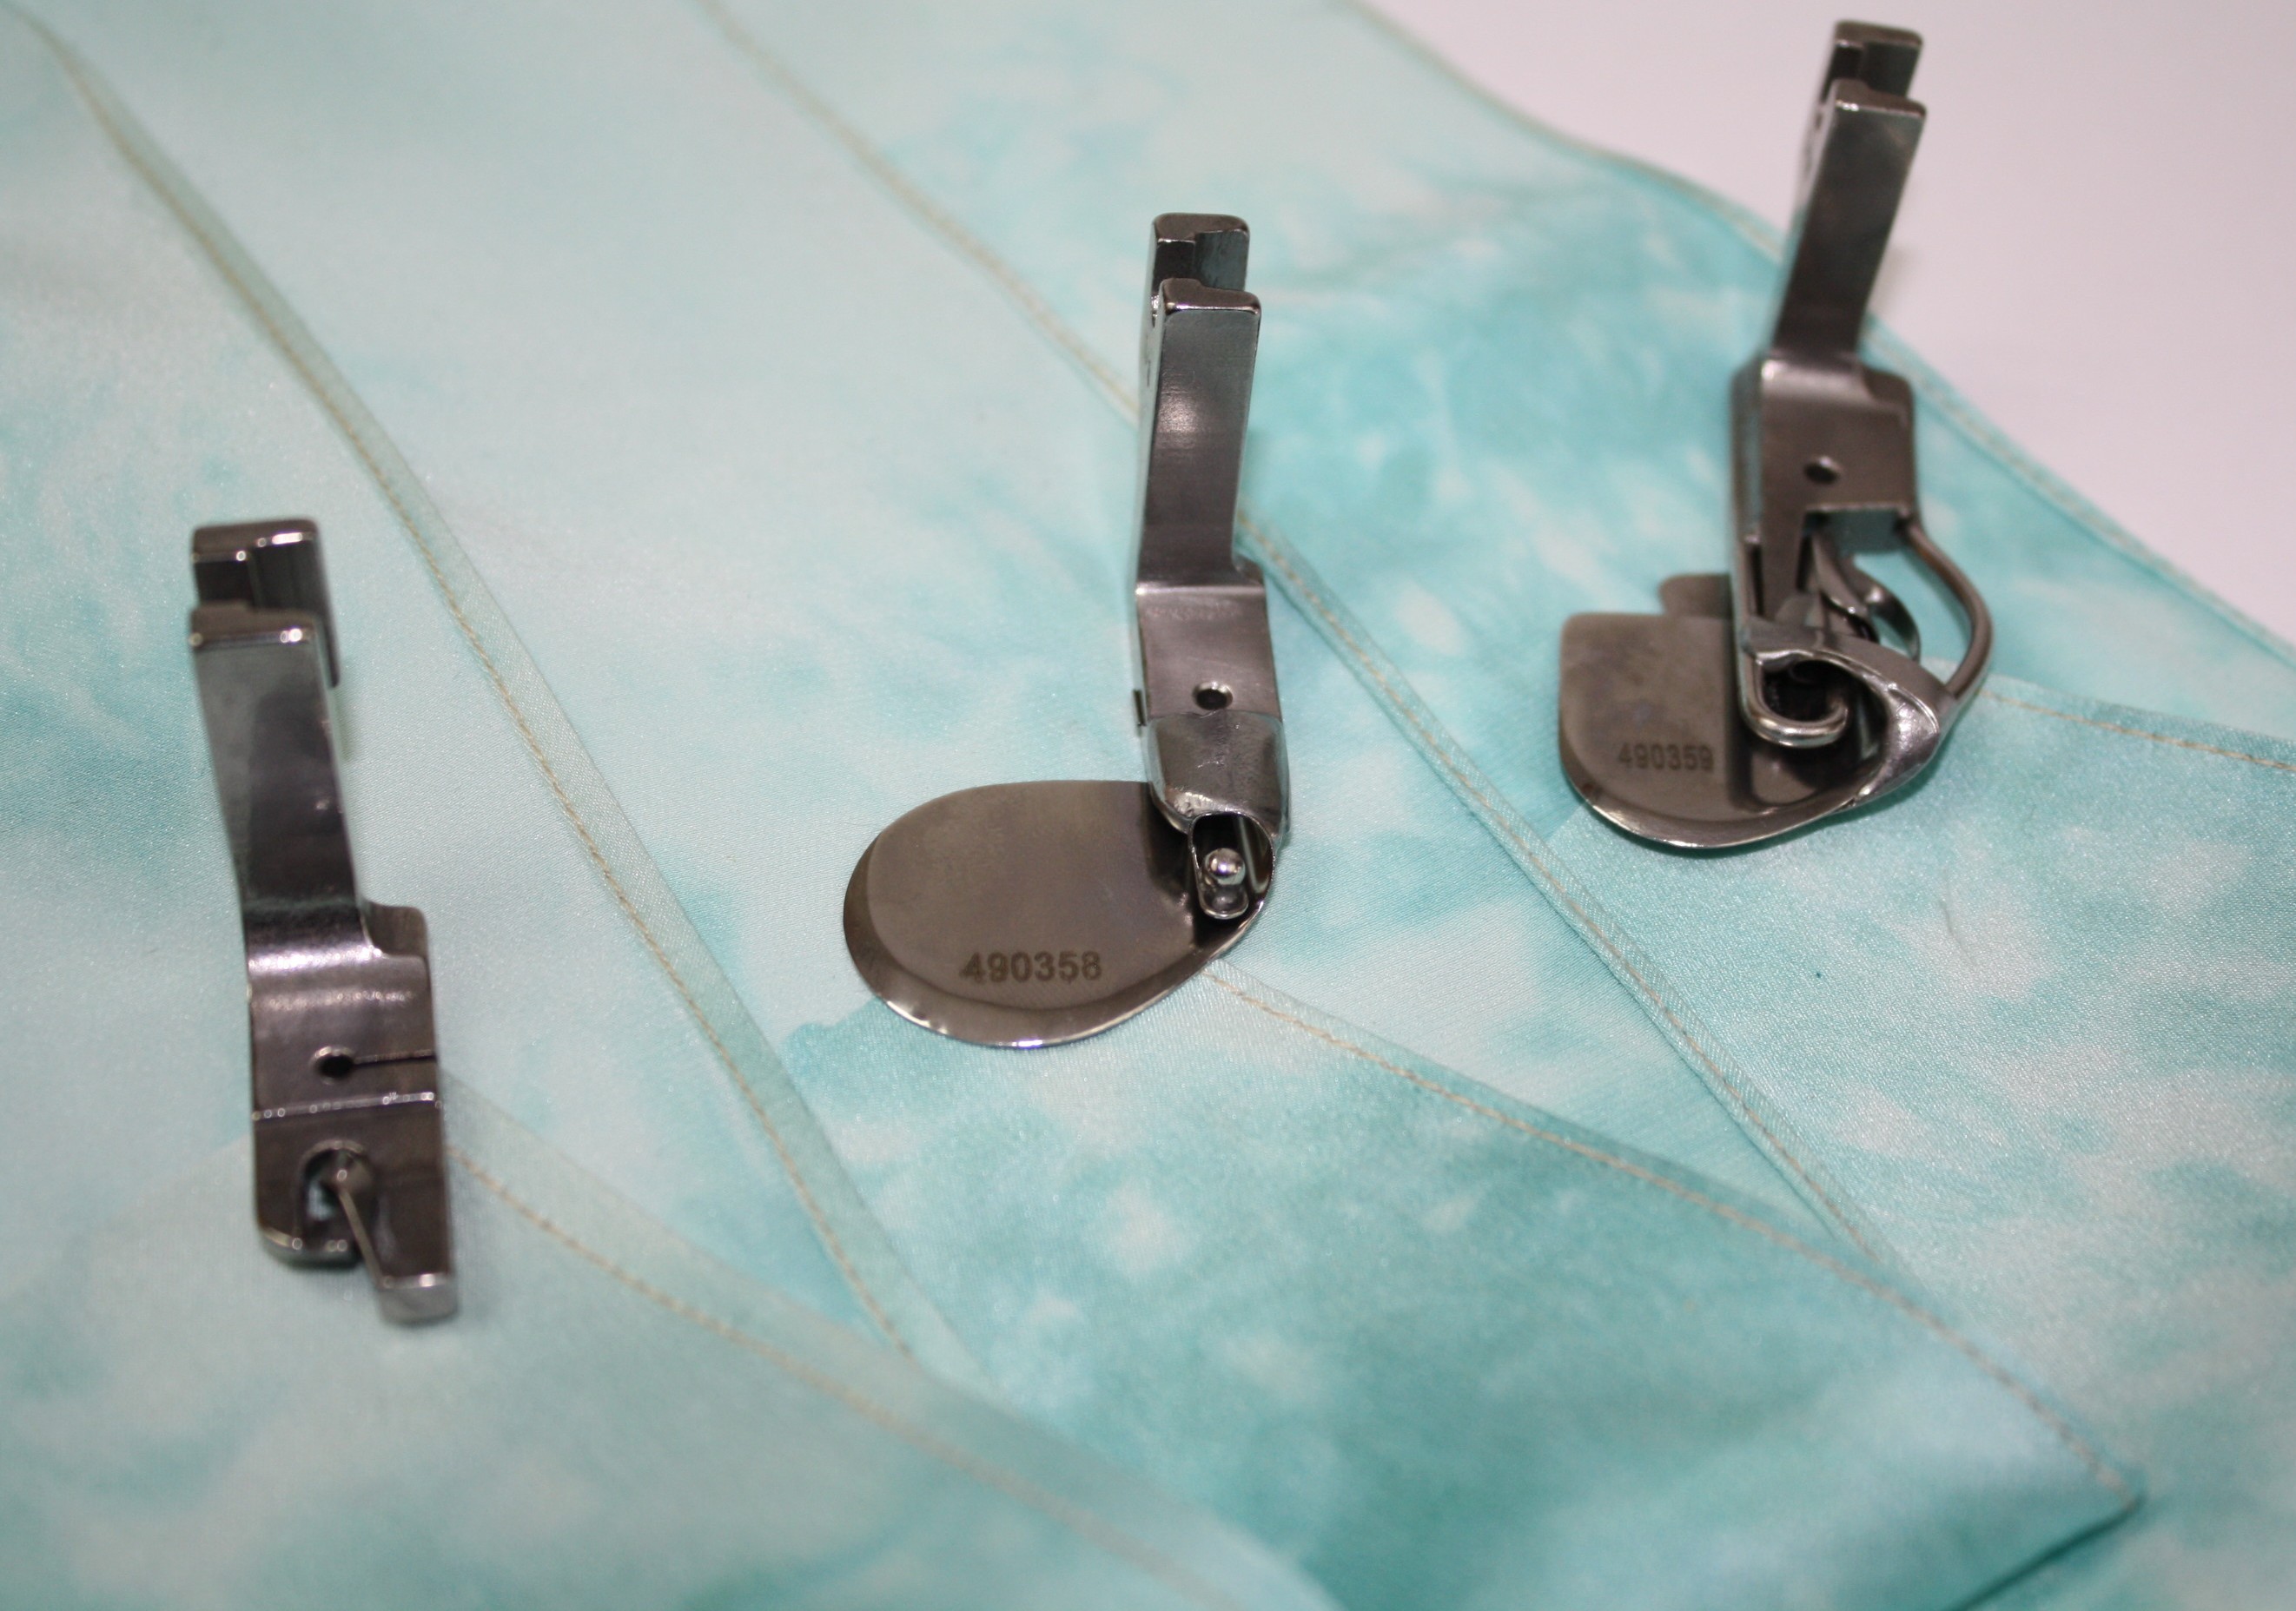
I sew a lot of garments with sheer fabrics (especially this months wardrobe challenge; Dress the Part) and my go-to stitch is usually a narrow rolled hem on the serger – its super fast and looks professional. But sometimes a rolled hem on the sewing machine would be more appropriate. I found 3 different feet for the industrial machine:
You have probably seen the Rolled Hem Foot, as it comes with most home sewing machines. This is the only foot I had ever seen used for the job. It does make a rolled hem easy, but has its challenges as well. Getting over thick seams can be interesting and sometimes the fabric doesn’t feed evenly. Of course there are tricks:
Hold the fabric to the left side of the foot as it feeds into the machine and trimming seam allowances for less bulk.
Results: A nice rolled hem, I had to use the tweezers to get the fabric started and the rolled hem is a little uneven. With practice this foot will work.
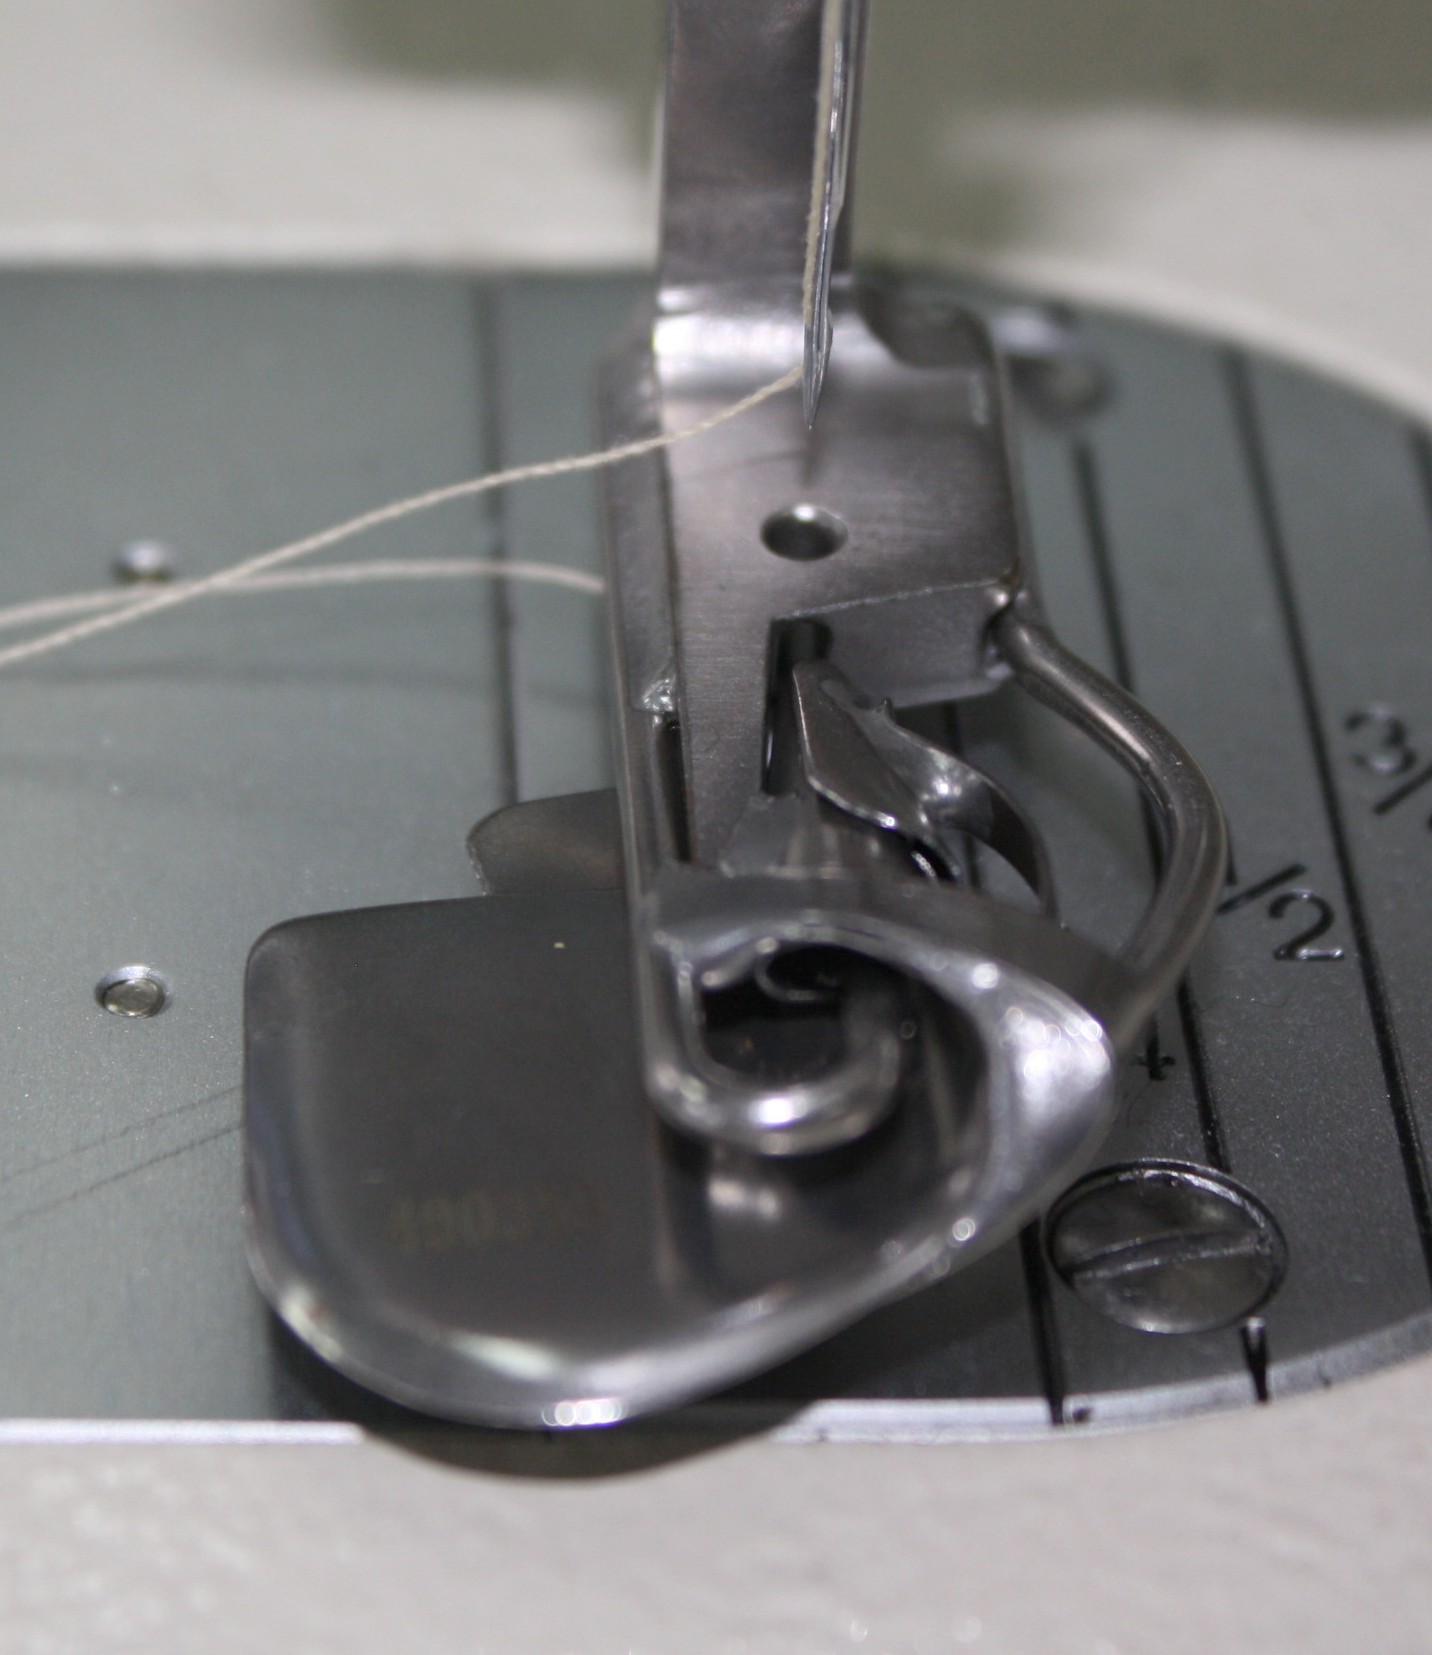
If you have an industrial machine, you have more options and each offers different results:
This foot has a plate that covers the front feed dogs allowing the fabric to feed perfectly. You can see the ball at the tip of the foot, the fabric will roll over that ball as it double folds into a narrow hem. I must say, I love this foot! This is how it works:
Feed the fabric into the foot, above the plate. Notice how the place covers the front feed dogs. Insert the fabric the same way you would for the rolled hem foot.
The fabric folds over the ball.
Hold the fabric a little to the left side of the foot as the fabric feeds into the foot (as shown above). Stitch.
Results: A perfect narrow hem! This foot offers the easiest rolled hem I have ever tried! I hardly had to do anything with the fabric except guide it into the foot. I even sewed at a high-speed and the rolled hem is perfectly even. A definite A+++++
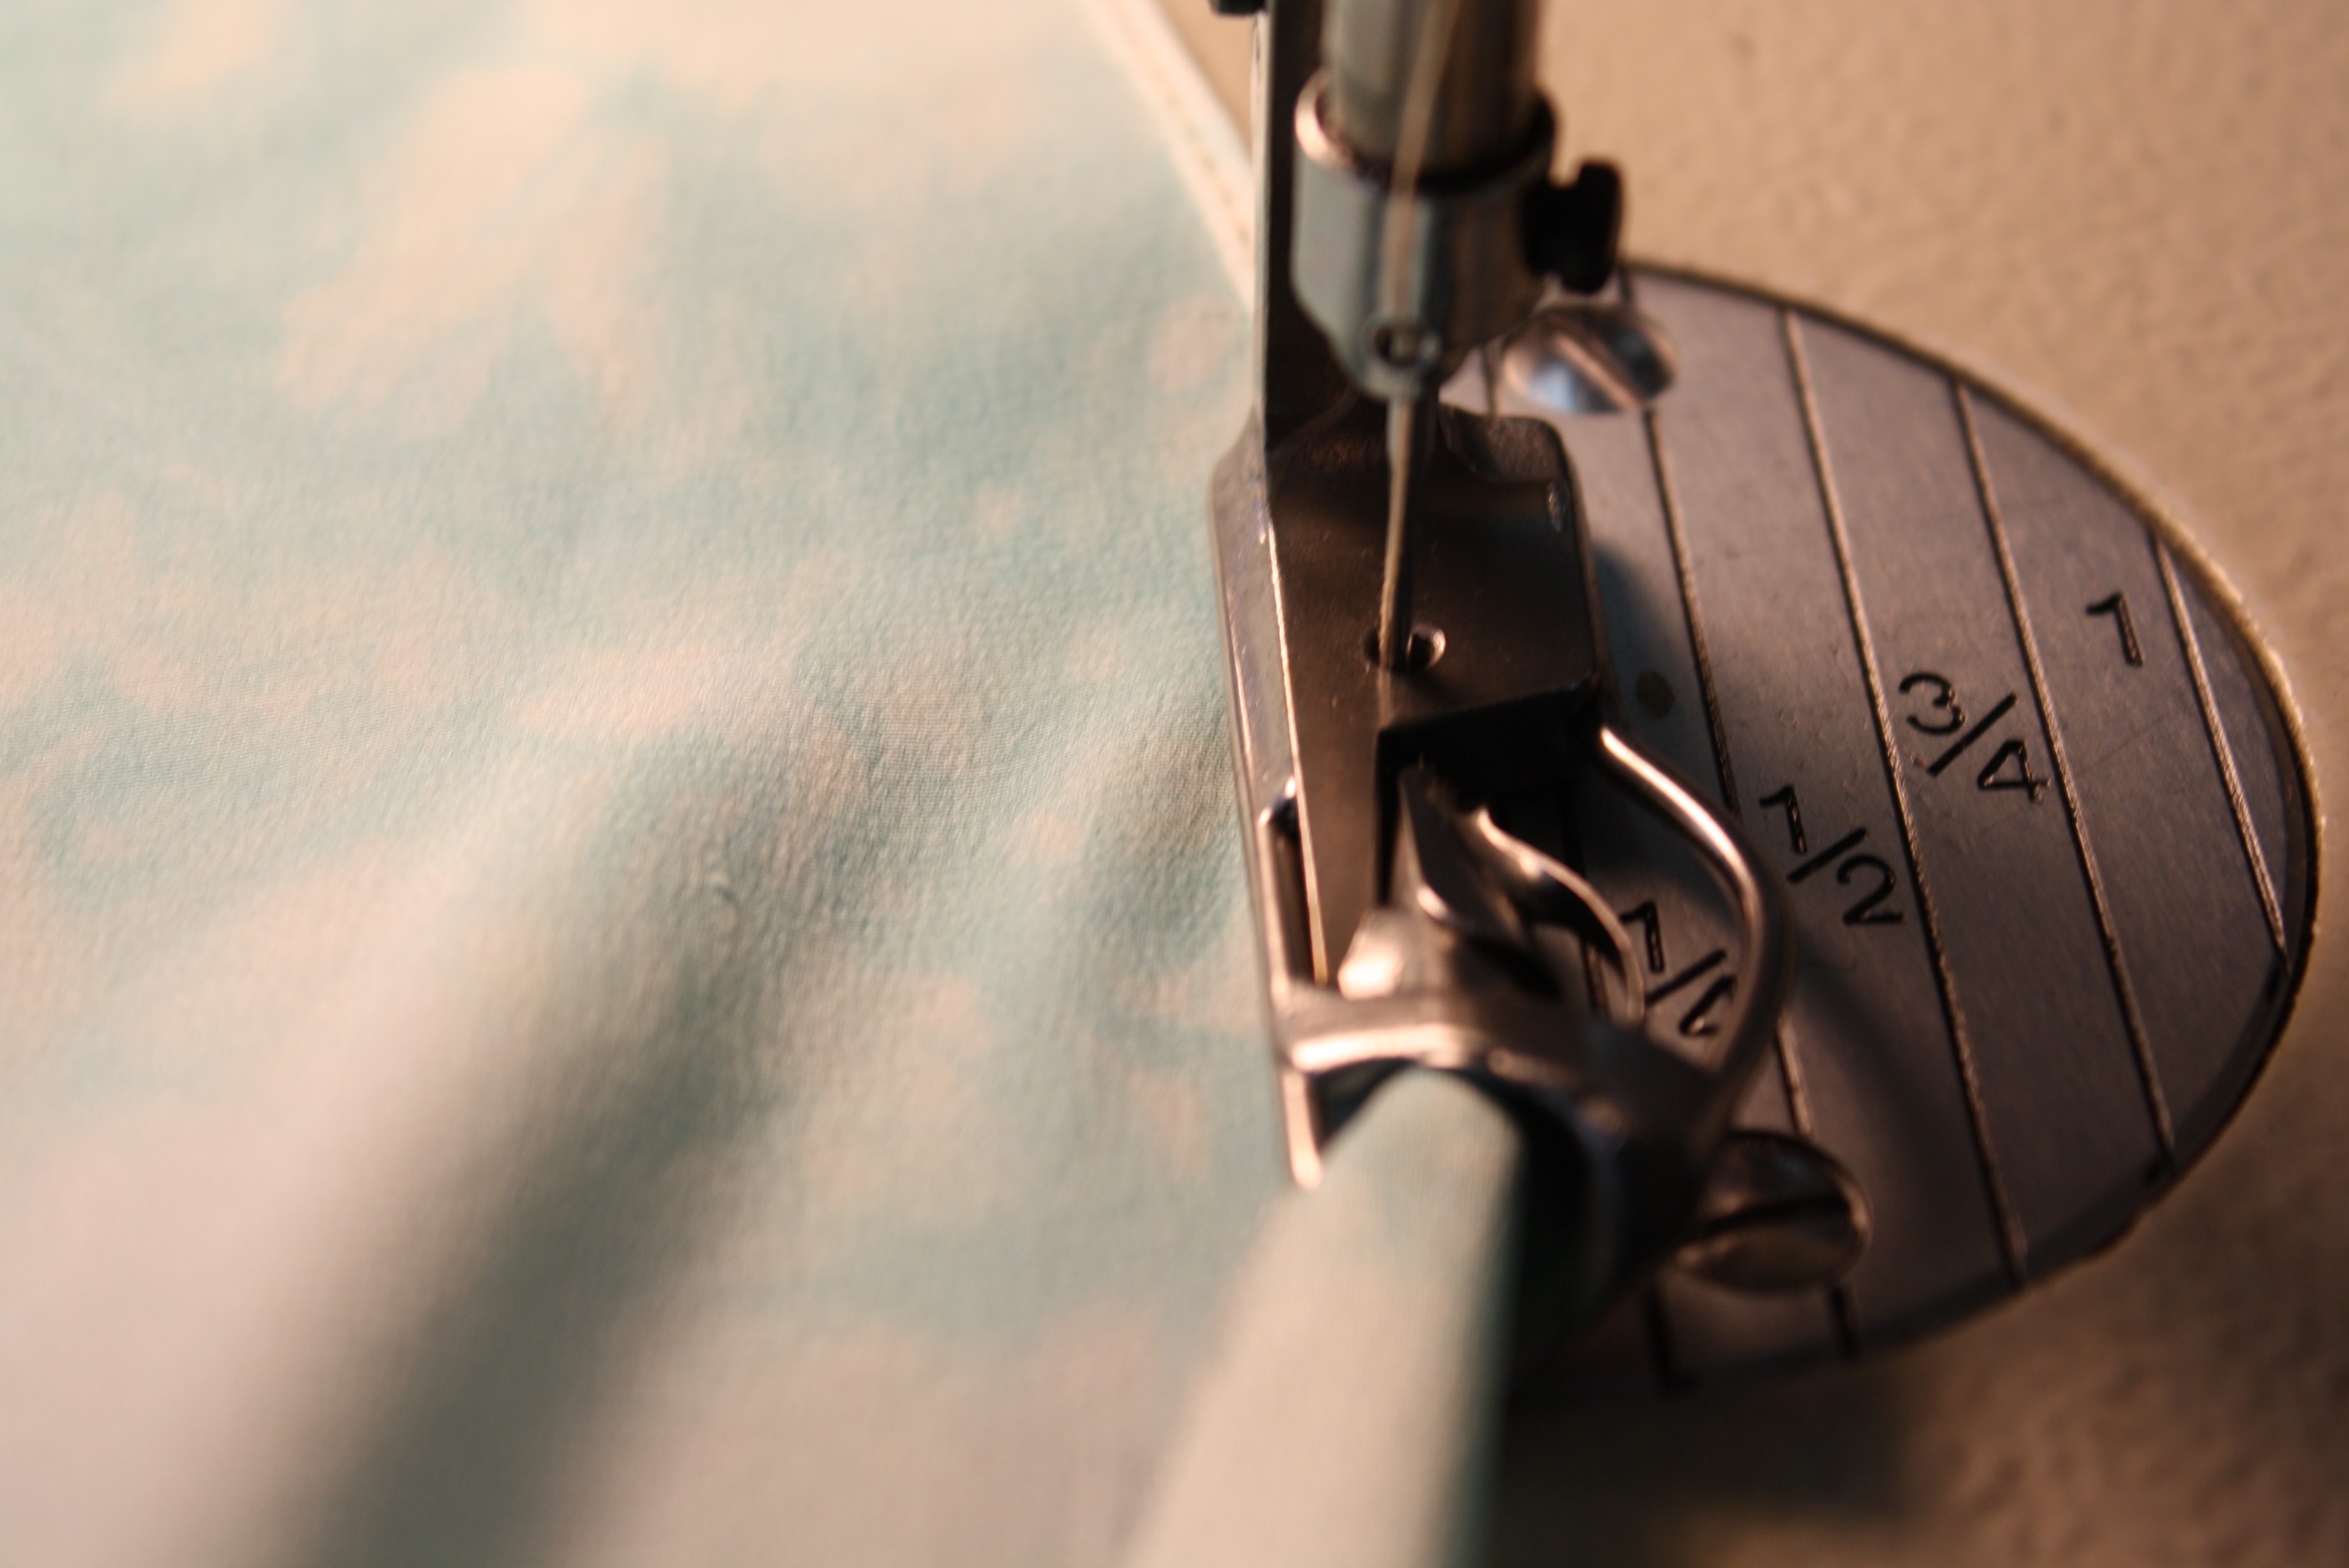
The “spring” part is what intrigued me about this foot. You can see the foot looks very similar to the Ball Hemmer Foot, yet there is not a ball. Instead, there is a movable area that the fabric will go through. Look closely, this is the back of the foot:
Looking at the left photo first: see the corner touching my finger tip. When I do nothing with that corner, the opening on the foot remains unchanged (see opening at yellow arrow).
Take a look at the right photo: Here I have pushed that corner in and the opening gets larger (see yellow arrow).
Now we know what the “spring” means. This opening adjusts for the thickness of fabric as the fabric flows through.
There is a plate protecting the fabric from the front feed dogs, just like the ball hemmer. Slide the fabric on the top of the plate.
Again, feed the fabric into the foot and stitch.
Results: Another perfect rolled hem! Just as easy as the ball hemmer foot.
My favorite foot for the rolled hem on silk charmeuse is the Ball Hemmer Foot. The rolled hem was a little thicker than the other two and perfect!
What about crossing seams and thicker fabrics? I will test these and more, and let you know the results. So far both feet are winners!
I also have to check to see if these feet will work on my Brother PQ1500. The PQ1500 straight stitch machine is just like an industrial machine with speed and ease of use, plus it’s not attached to a large table and easy to move around. Fingers crosses on that one! Otherwise, I have my eye on the Brother Industrial Machine used on Project Runway. Do you have an industrial machine? Have you tried these rolled hem feet?
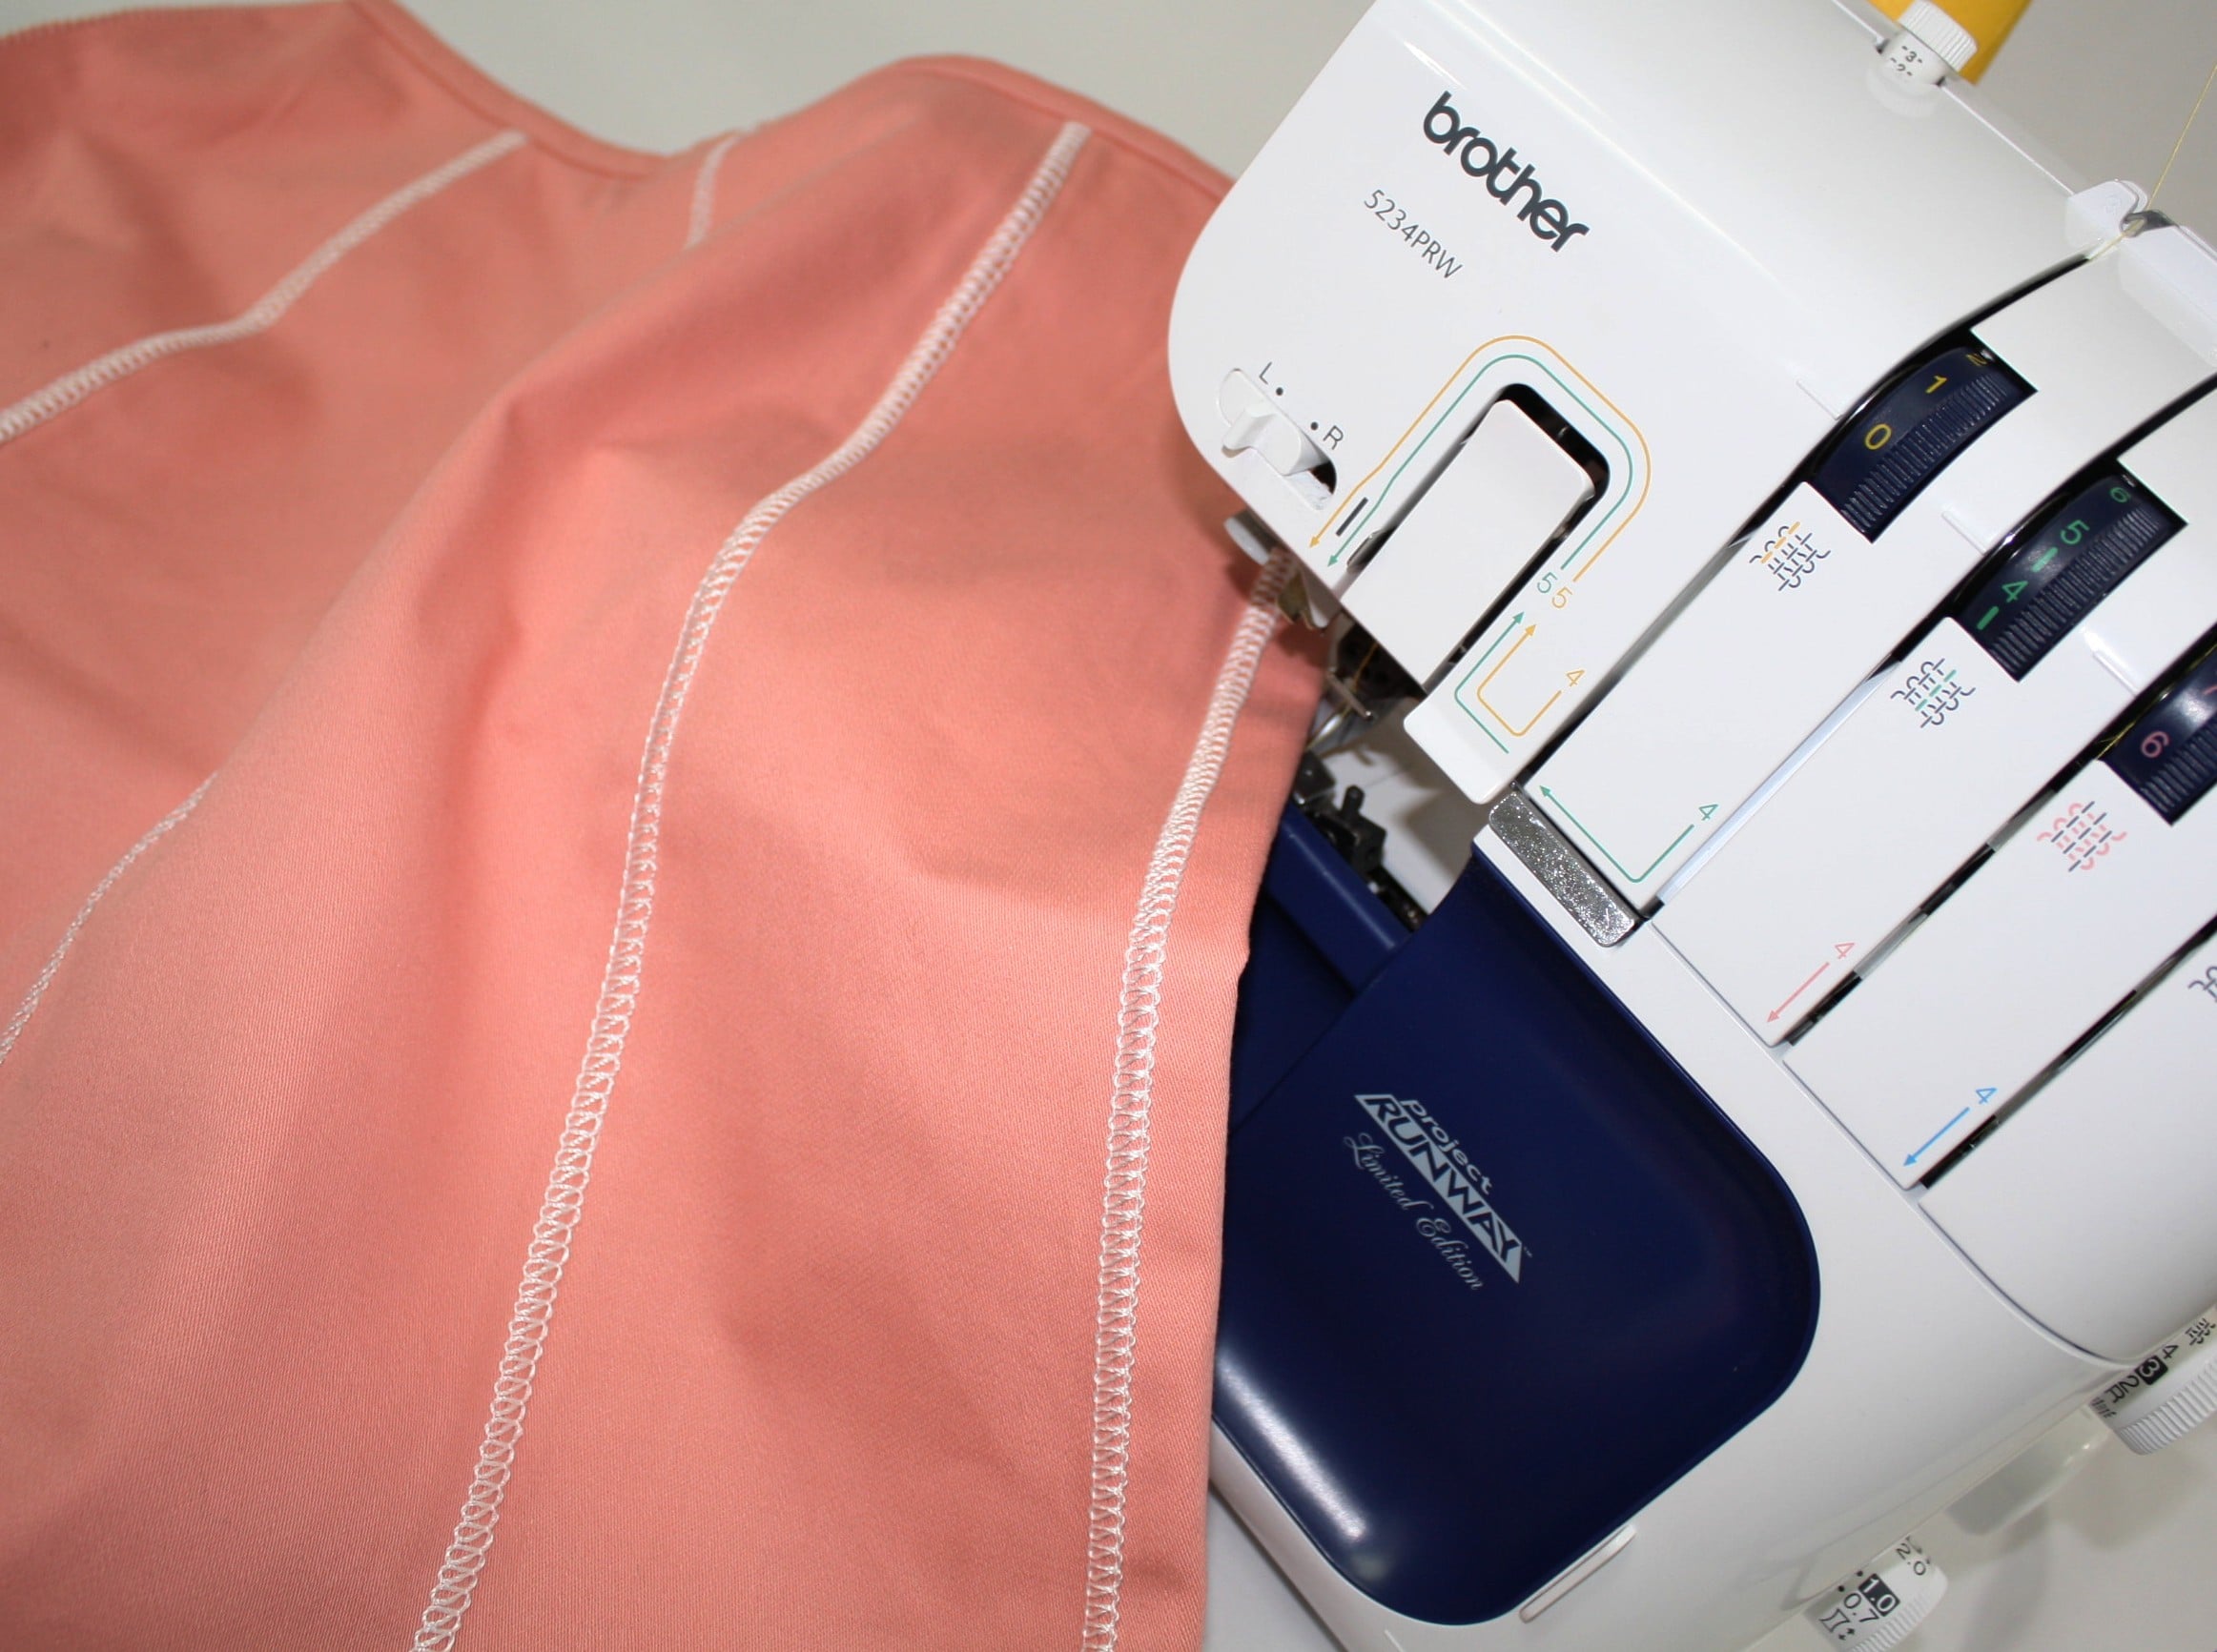
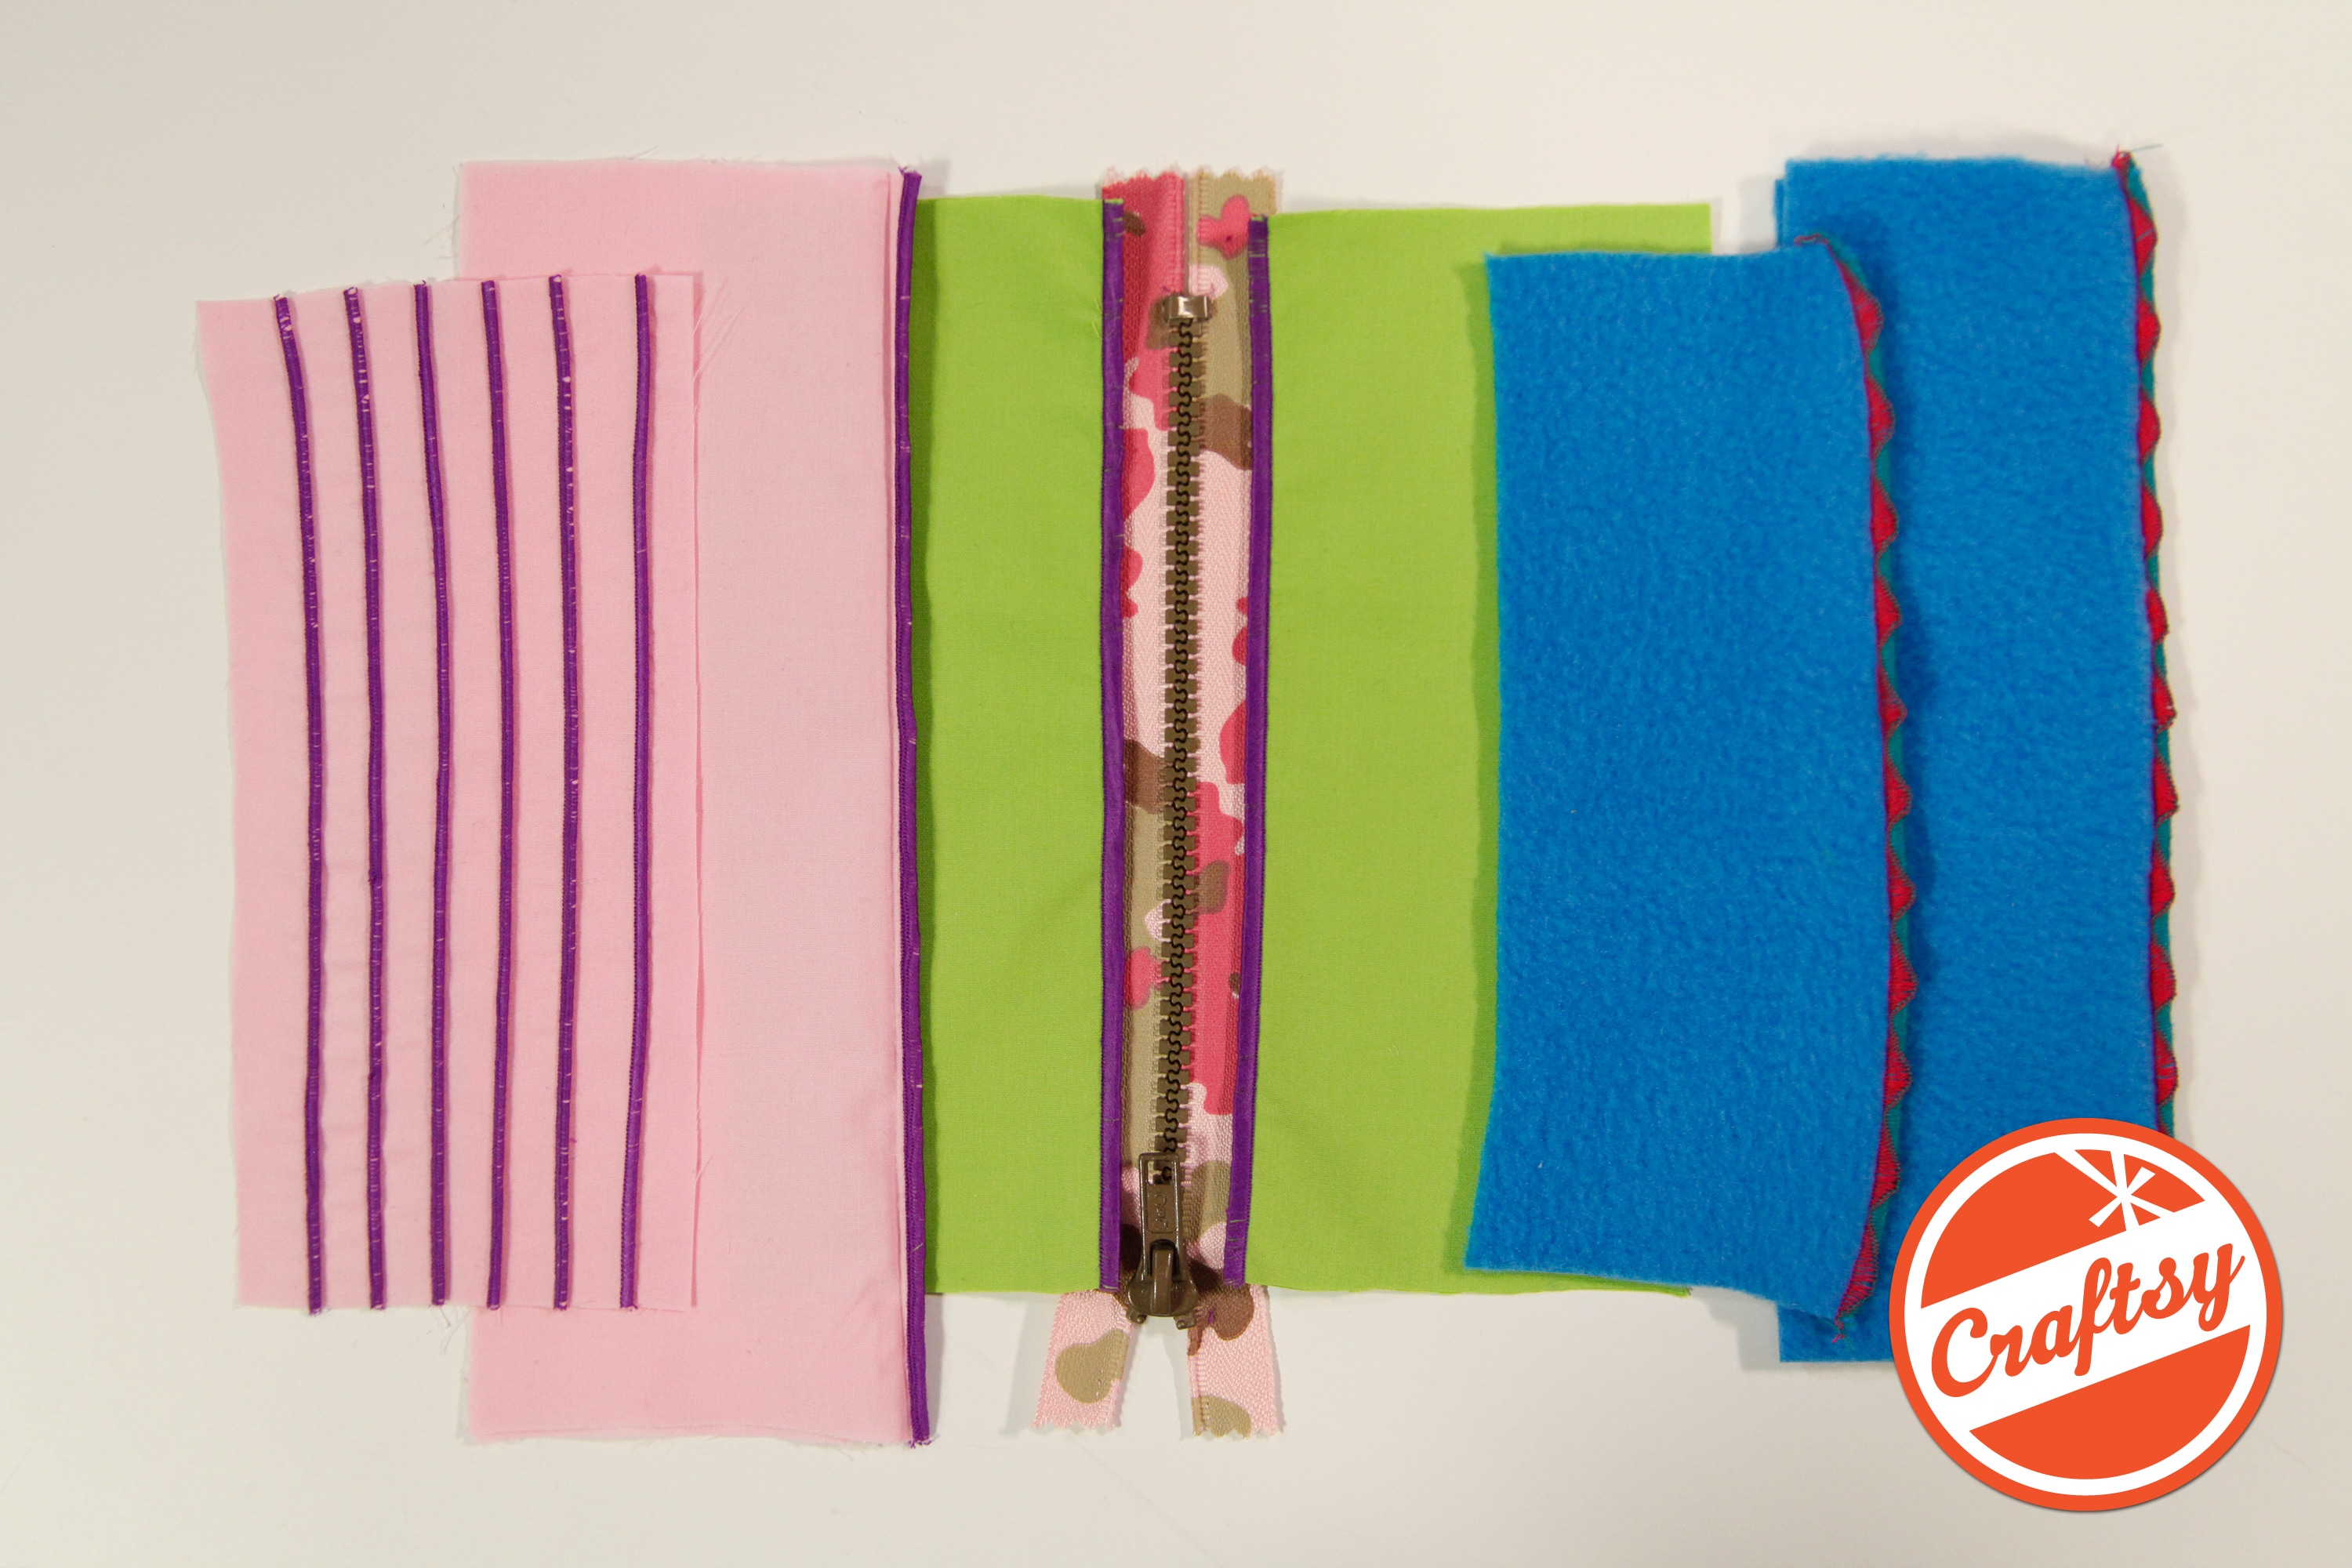
The serger can do so much more than simply finish fabric raw edges. Using crochet thread or yarn in the upper looper can create an entirely different look! This is a great way to restyle or embellishment fabric or a garment.
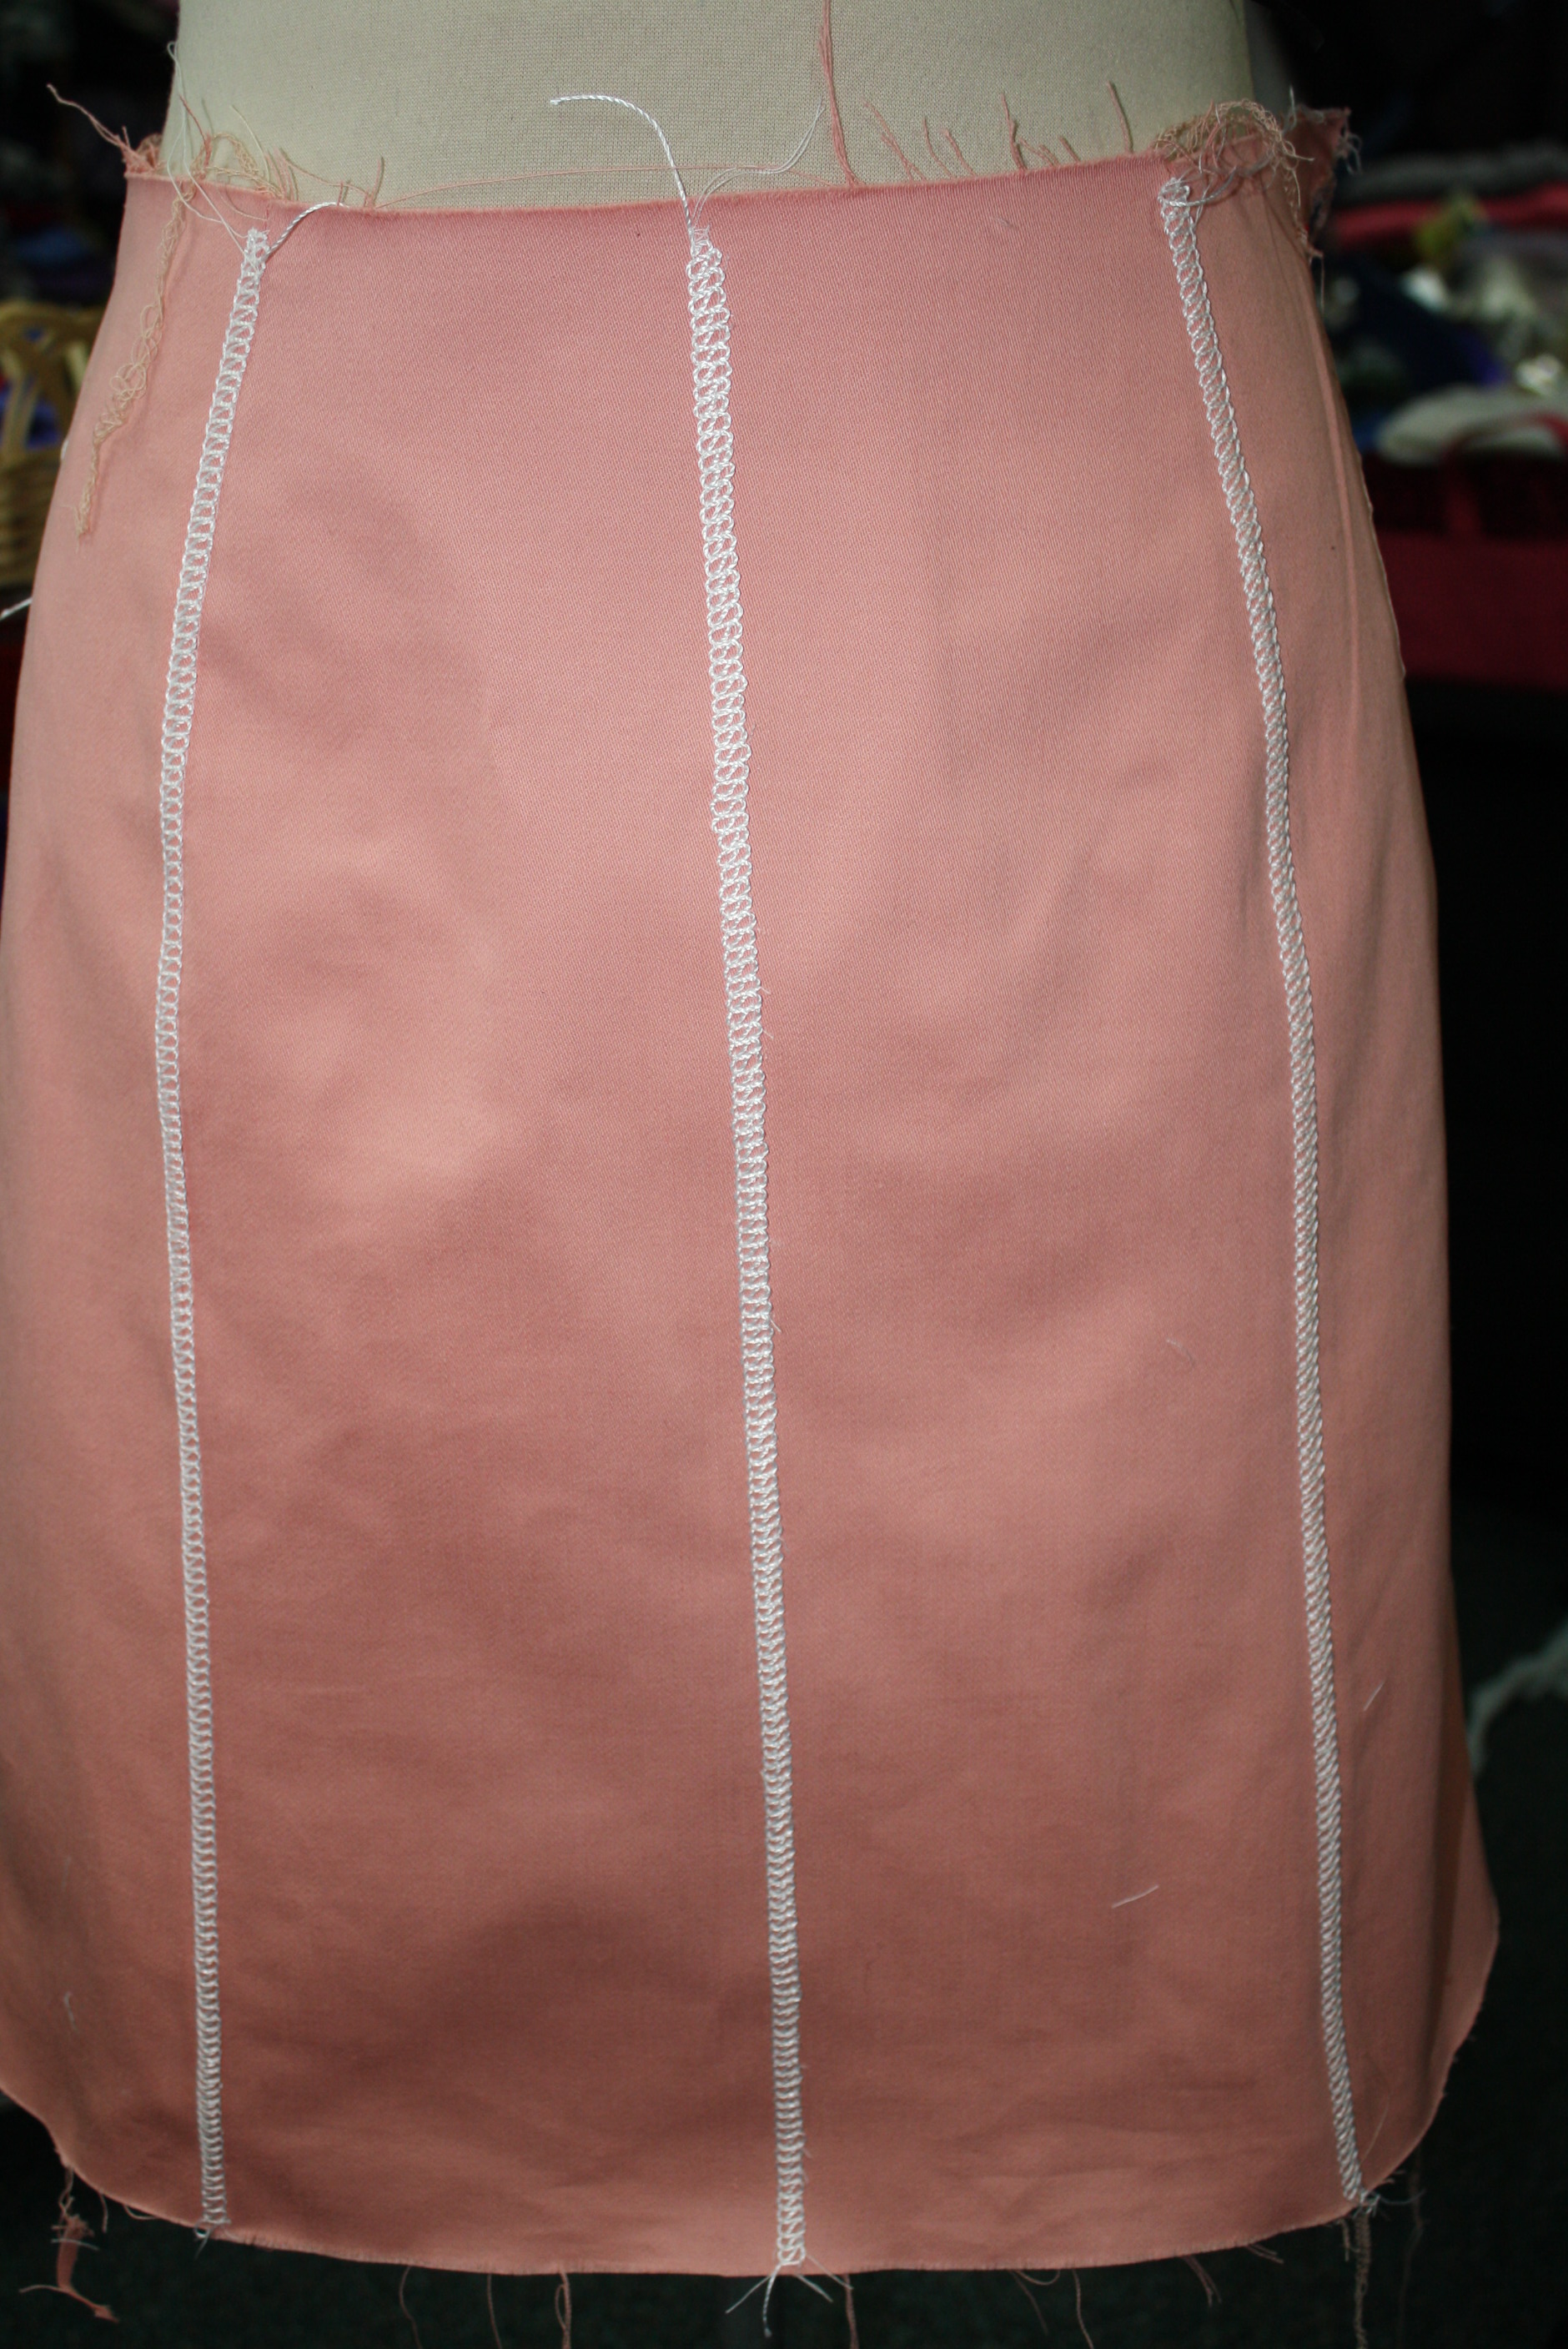
I am using the Brother Serger: 3-thread flatlock stitch with a decorative crochet thread in the upper looper. The left needle and lower looper have a similar color polyester thread. The photo above shows the front of the flatlock stitch and the backside. The backside looks like a ladder stitch. (the peach thread is just the serged edge of the seam).
I started with the Kate Skirt Pattern. I added seams to the front and center back, but you could just pencil in a line with tailors chalk – it doesn’t need to be a seam to add the flatlock decorative stitch.
Here is the back view. Again there are 2 seams on each side back and this time there is a seam down the center back with a hidden zip. In order for this stitching to look even (with the zipper), I stitched the flat-felled embellishment down the edge of each center back seam, then added the zipper and closed the seam. That part got a little tricky and you can see the stitches are not perfectly even. I haven’t decided if I am going to rip it out and start again or hope nobody is looking at my tush that closely to notice 🙂
Setting up the Serger:
Set your serger up for a 3-thread overlock: I am using a serger from Brother and the standard setting for the needle and looper tensions are 4. When I give you new tension numbers you can compare this with your serger, if your serger has manual tension dials. If you are serging with an air-threading serger, like this Babylock, set up your serger for the 2-thread flatlock – wide.
Thread the upper looper (or the only looper for the 2-thread flatlock) with a decorative thread. Use standard poly serging thread in the needle and lower looper.
Next, there are a few changes to the serger settings:
Stitch Width: 5mm
Stitch Length: 2-4mm
Needle Tension: Decrease to 0 -3 (remember my standard setting is 4 so adjust for your serger)
Upper Looper Tension: Decrease to 2 – 3
Lower Looper Tension: Increase to 6 – 9
Disengage the knife
These setting serve as a guide. It will depend on the fabric and thread you end up serging with.
See if your serger had aBlind Hem Foot, if not you can use the standard foot.
There is a setting on the foot that moves to the plastic or metal piece to right and left, allowing the needle to pierce more or less of the fabric. Test the stitch on your fabric to determine the setting.
Fold the fabric in half or if you are embellishing a seam, fold along the seam line. Align the fabric along the shield on the blind hem foot (if using a standard foot, mark a spot to align with).
The idea is for the needle to pierce the fabric – half the stitch is on the fabric and half is off the fabric. In fact the stitch looks really messy coming out of the serger!
Stretch out the folded fabric to lie flat and press.
Pretty simple, but so fun! Have you ever tried this before? I would love some more ideas for decorative threads or yarns to use with this stitch.
Be sure to share photos of your creative serged project 🙂 #angelawolf
Episode 198 ~ At your side 🧵 Virtually! Create a Thread Catcher & Pin Cushion with Jerry GranataSupply List & Instructions for Thread Catcher • Brother Stellaire XP2 or comparable machine to embroider and sew, or both• Feet you will need: - Embroidery foot, J...
SHANNON FABRIC GIVEAWAY! Are you looking for an amazingly SOFT fabric?!? SHANNON FABRICS was a sponsor on It's Sew Easy tv and continues to inspire us with gorgeous fabrics. This new batch of fabric is called LUXE CUDDLE and the colors are so fun! If you look...
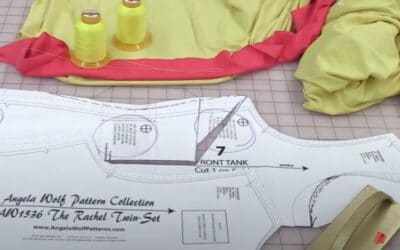
Behind the Scenes with Angela wolf VLOG 220 is the fourth in a series of sew-a-longs featuring the Rachel Twin Set. Today we start cutting out the tank top!
I am thrilled to see all of the excitement for my 2014 Wardrobe Challenge! The month of January is so full of new years resolutions, crazy weather and catching up from the holidays, I wanted to make this month’s challenge simple and fun. All you have to do is create a Pinterest board “wardrobe challenge 2014” and pin photos that inspire you. This is not a trick, just post anything that inspires you to design and sew, this can be absolutely anything. Ideas: colors, animals, architecture, food (that is the downfall of pinterest, everyone posts such fabulous looking food, I swear I can smell it through the computer screen!) Pin something from each sponsor – that can be a repin from their pinterest board or pin something from their website and leave a comment here or on my pinterest board with a link to your new board. In case you need the links to the sponsors here they are again: Brother, Threads and Sew Stylish Magazines, WAWAK sewing, It’s Sew Easy, Angela Wolf Patterns, and some of you couldn’t find my pinterest page. Again, if you need an invitation to pinterest email me info@angelawolf.com. For more details on January’s Challenge, there is still a week to enter, then we move on to February’s challenge! Good Luck 🙂
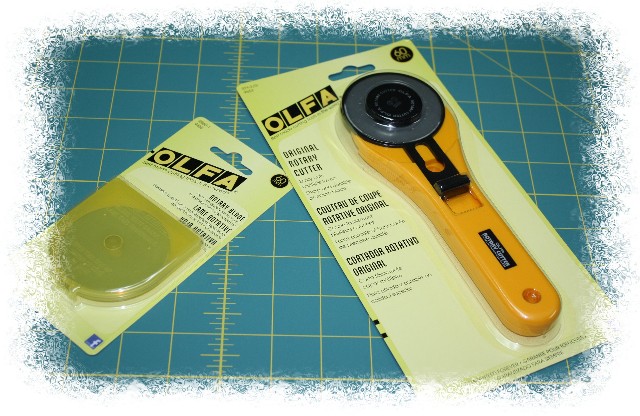
Olfa 60mm Rotary Jumbo Cutter, Replacement Blade, and Cutting Mat from WAWAKsewing.com
Now, onto a quick time-saving tip. When I sit down to sew, there are a few items that I quite often need and I find it faster to prepare these in advance. One example is fusible interfacing: hemming jacket sleeves, plackets, zipper placement, bound button holes, these are just the first few areas I need the interfacing and to get up, unfold the interfacing and cut 1 strip is a total “time sucker”, my new word for the year! For jacket hem’s I typically use 3″ to 4″ wide strips of interfacing and for the zipper placement 1″ to 1-1/2″ strips.
This is light-weight fusible interfacing (HTC fusi-knit) and with two layers you can still see through the interfacing to line up the 1″ grid on the Olfa cutting mat.
Keeping the grainlines and stretch of the interfacing in mind:
cut strips parallel to the selvage 28″ long by 1 1/2″ wide. The most common use for these strips is to support the center back seams on a dress when inserting a hidden zipper (I am hooked on sewing dresses lately!) and it is rare that I would need longer than 28″ for a zipper.
cut strips perpendicular to the selvage 4″ long by the width of the interfacing (in this case 22″ wide). These strips are perfect for re-hemming jackets and sleeve hems. If you do alterations, this is really a bonus to have these cut strips on hand.
Store these strips in a photo box next to your sewing station and you are all set!
A few tips on the rotary blade:
Always clear your cutting area from pins! It always amazes me how one little dent in the blade can ruin the cutting, but it is true. Maybe it’s not quite as noticeable when cutting thick fabric, but try cutting bias strips of silk chiffon. If the blade is damaged, even in the slightest bit, the cutting is fragmented and you end up cutting the strips over with scissors. Pain in the tush 🙂 I used to try to sharpen the blades, but seriously I am trying to save time not cause more work. The blades are not that expensive, especially this month they are 25% off at WAWAK sewing, time to stock up for a few months! The replacement blades come in a nice plastic container. As I am always fearful of throwing a blade in the trash, I use one of the containers to store bad blades. See the blue dot in the photo above, that dot tells me this package is bad blades. When its full, snap the container closed, add a piece of tape for extra security, and toss with no worries.
Lastly, take extra precaution and close the blade cover when not in use. It makes me crazy when anyone in my studio leaves the blade exposed when they are not using it! I have a pretty long cutting table and I am often grabbing bolts of fabric and sliding patterns around, one slip could end up being a bloody mess. Thankfully that hasn’t happened, but I have heard a few horror stories 🙁
My question to you – Have you ever tried sharpening your old blades and did you have any luck or do you prefer stocking up on replacement blades when a great sale hits?
Have fun filling your pinterest board, remember to add #wardrobechallenge when sharing your experience!
When I asked what part of sewing jackets you find the most intimidating to sew, many of you left a comment about the collar and lapel. I must have had a premonition, as this week’s episode of It’s Sew Easy gives you a few tips for success. You are right, the collar and lapel is what really makes your jacket stand out … and the good news … it’s easier to sew than you think. In fact, sewing is only a minute part involved in tailoring a collar. The most time-consuming part involves preparing the center front jacket, upper collar, and under collar pattern pieces with interfacing and twill tape, not to mention pad stitching if you are going the traditional tailoring route. The weight of the interfacing will determine the thickness and stability of your lapel and collar, so be sure to test a sample first. My two favorites for jackets are armo-weft fusible interfacing (shown here) and horse hair canvas (perfect if you plan on pad stitching – which I will show in a later blog post). Fusible interfacing can be added in layers if you need more structure at the end of the lapel, keep that in mind if you interfacing supply is limited.
Despite adding interfacing, extra measures need to be taken to prevent the neckline and center front of the jacket from stretching out. Twill tape is the perfect solution! Look closely and you can see hand stitching attaching the 1/4″ wide cotton twill tape to the front edge of the jacket. As I am hand stitching, I am holding the twill tape tight and allowing the jacket fabric to ease in. Not too much easing though! Make sure the jacket doesn’t change shape or become skewed.
What about that perfect roll on the lapel? Again, twill tape is hand stitched to the roll line (the roll line should be printed on your jacket pattern)
When hand stitching the twill tape to the roll line, keep the twill tape tight (tighter than when we added twill tape to the center front and neckline). Again, easing in the fashion fabric. I use a pin to hold one end of the twill tape and start stitching from the other end. You can see below how much I am easing!
Here I started hand stitching the twill tape in place, the main part of the stitch is on the twill tape and I am just picking a short fiber in the fashion fabric, then back through the twill tape. You can barely see the stitching from the right side of the fabric. When you are finished steam press the lapel roll using a seam roll. Again, for more details see this weeks episode of It’s Sew Easy, scroll to the bottom of their page and click on the video.
Another Giveaway, this one is for my online class: Sewing a Designer Unlined Jacket on PatternReveiw.com. Does your favorite jacket style close in the center front or asymmetrically? Just tell us your preference to enter the jacket class giveaway. (A random winner will be drawn next Monday) Congratulations to last weeks winner JRP53 who will be joining me in the Beginner’s Guide to Sewing Jackets on PatternReview! Good luck on your jackets!


