NEVER use a dull seam ripper!!!!! I buy my seam rippers in bulk from WAWAK Sewing and you should too 🙂 Then you can throw them away at the first sign of dullness and grab a new one.
Embellishing is one of my favorite things to do, in fact sometimes I even add touches to ready-to-wear garments. One of the easiest ways to restyle is to change the buttons. Even better, your own custom covered buttons! From simple to couture, this is what I will cover in the next series of blogs.
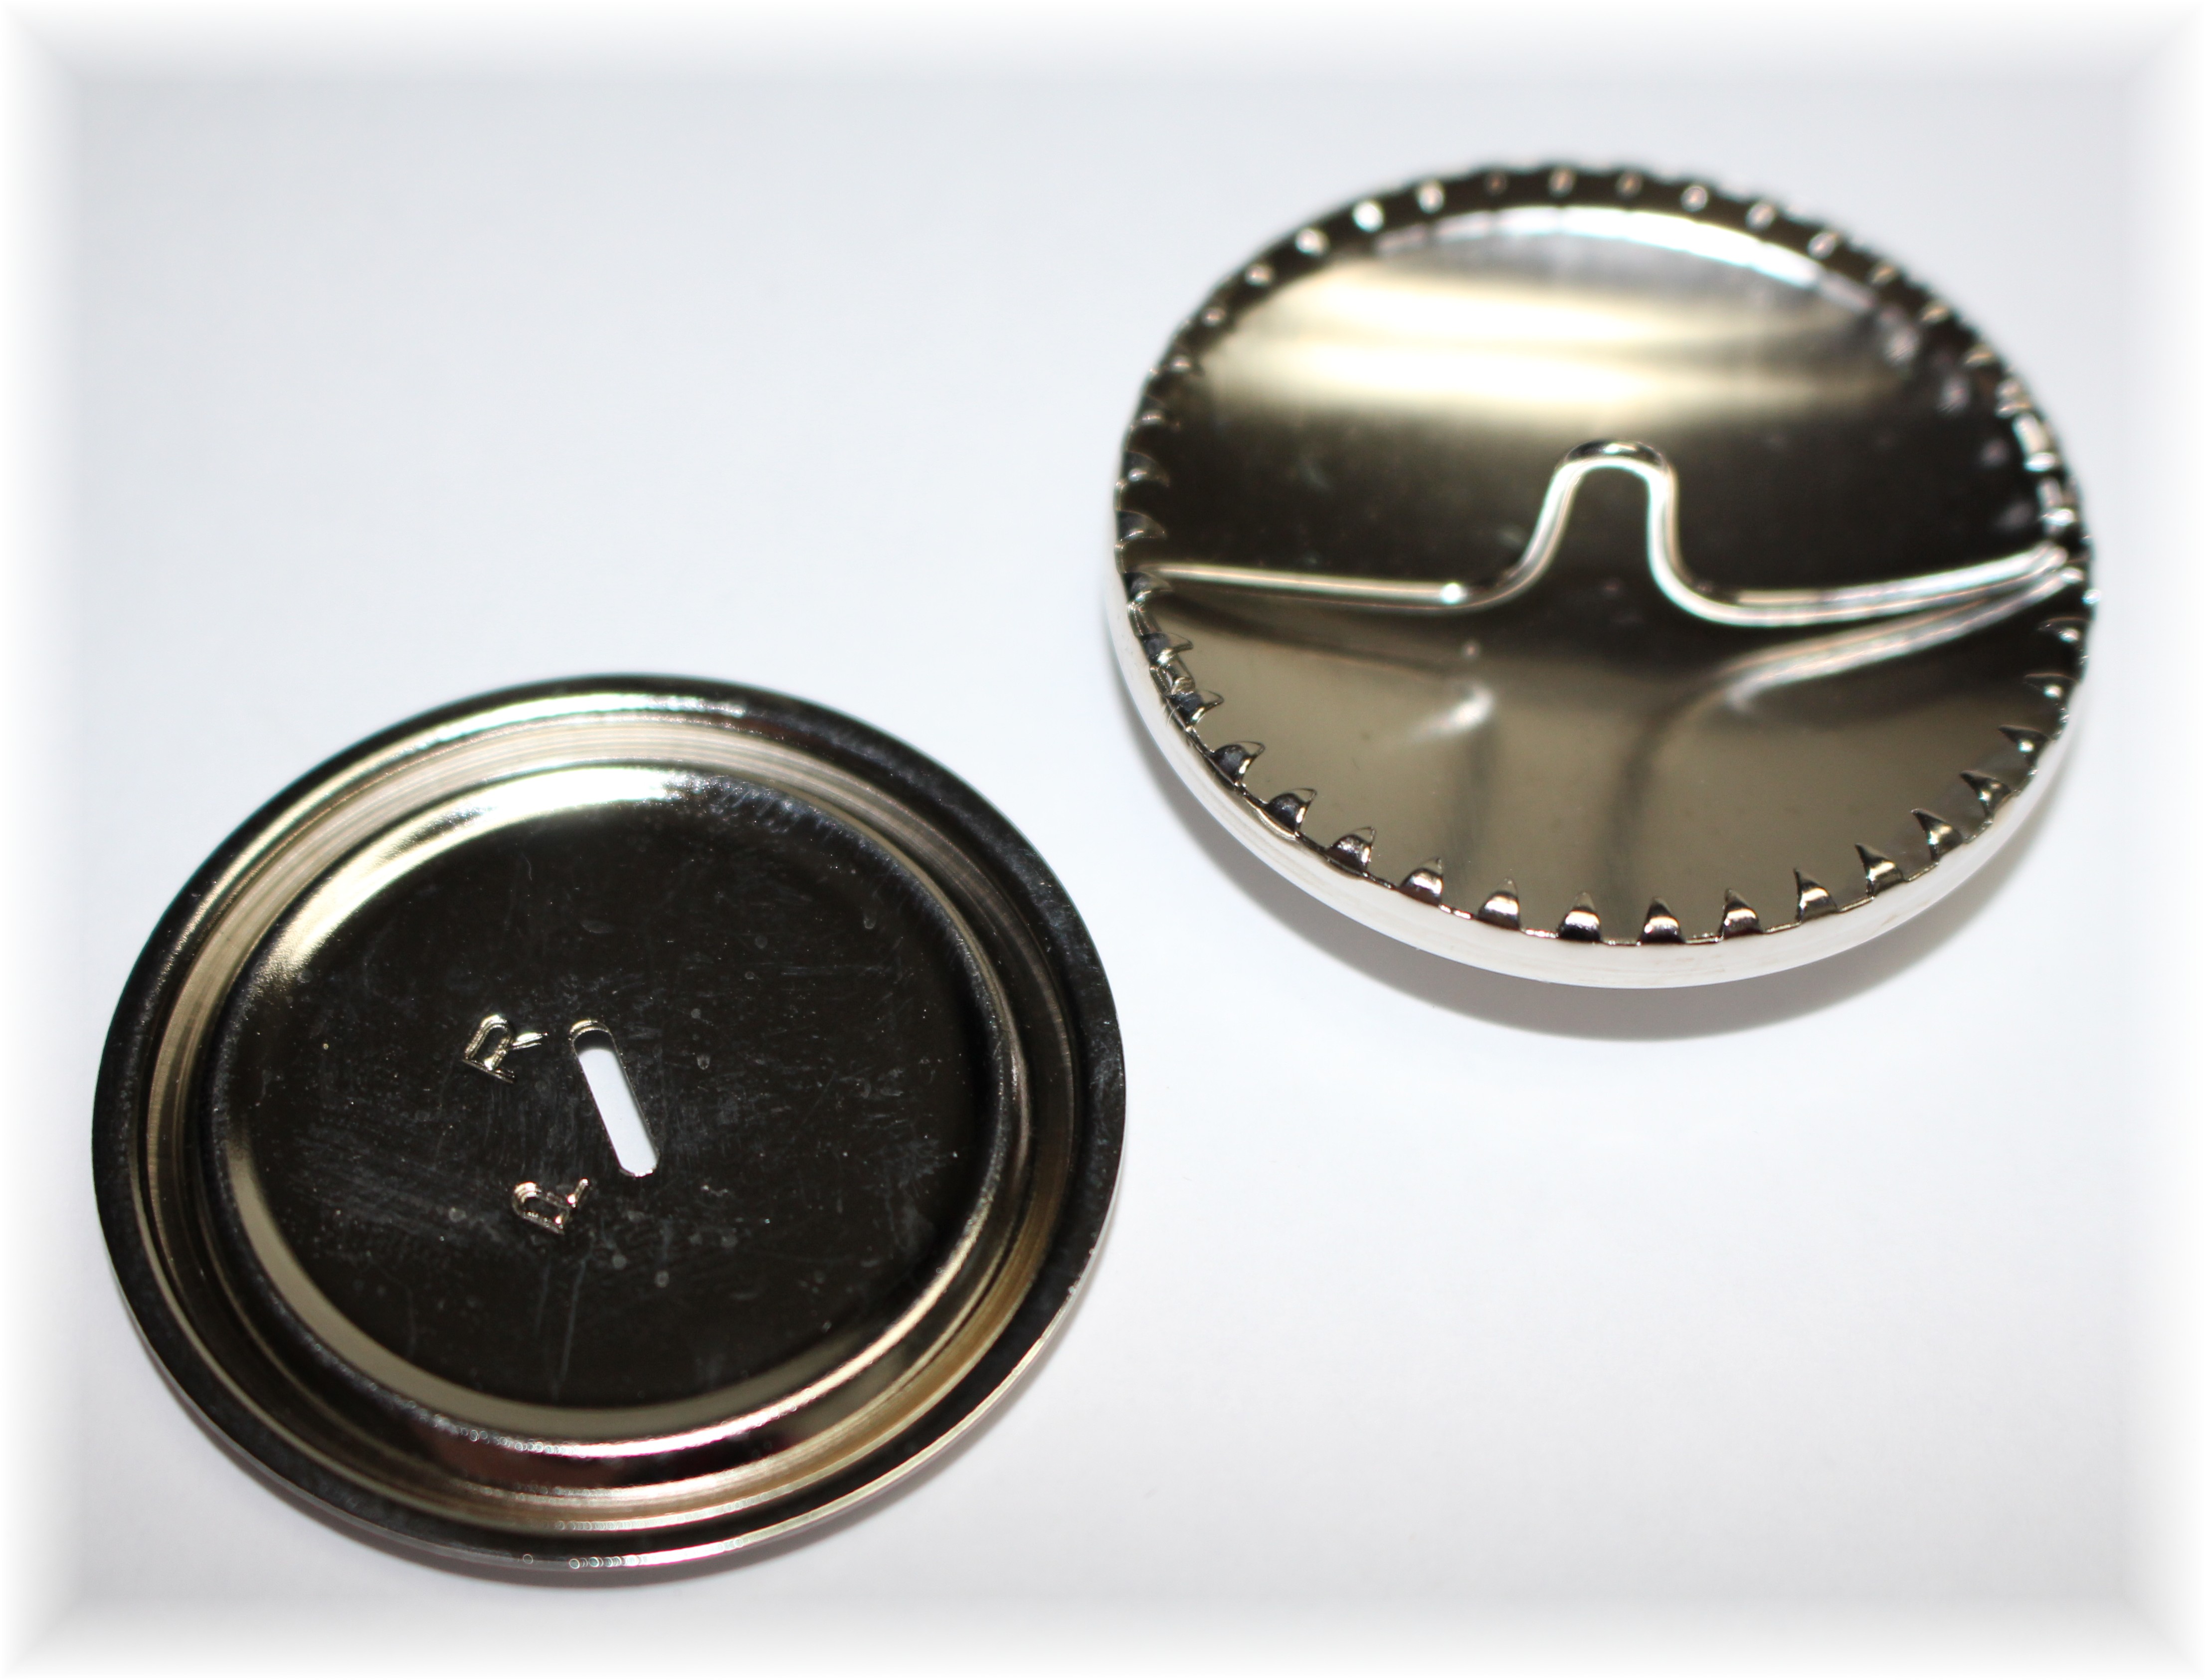
First, lets start with the basics on how to cover a button. The base of the button looks just like the ones above and they come in many sizes. There at two kinds available, I prefer the ones with what I call “teeth”, like this one from WAWAK.
Each button has 2 parts: a top that you will wrap your fabric around and a base that snaps onto the back, securing the fabric.
Let’s get started!
Cut out a circle from your fashion fabric, just little bit bigger than the button.
Note: the circle above is too large for that button, it should look more like the photo below
2. Wrap the fabric around the curve of the button top, securing edges of fabric in the teeth. If the fabric is plaid or striped, take care in placing the button and check the alignment of the shank to make sure its the same on every button.
3. Continue all the way around until the fabric is tight and secure.
See why I prefer the teeth, so much easier to tighten the fabric!
4. Place the backing on and snap into place with needle nose pliers. Snap all the way around the button to make sure the back is tightly closed.
Trouble Shooting: If you can’t snap the back of the button in place, you might have too much fabric inside. This means the circle of fabric was too large, but you can still trim out the excess fabric to make it work.
That’s it! Super easy and trend with a touch of couture 🙂
I have quite a few more buttons to go, but this jacket has been cut and sitting in my “to do” bin for over a year! Hand-dyed silk charmeuse lining and all, I must finish this before spring!
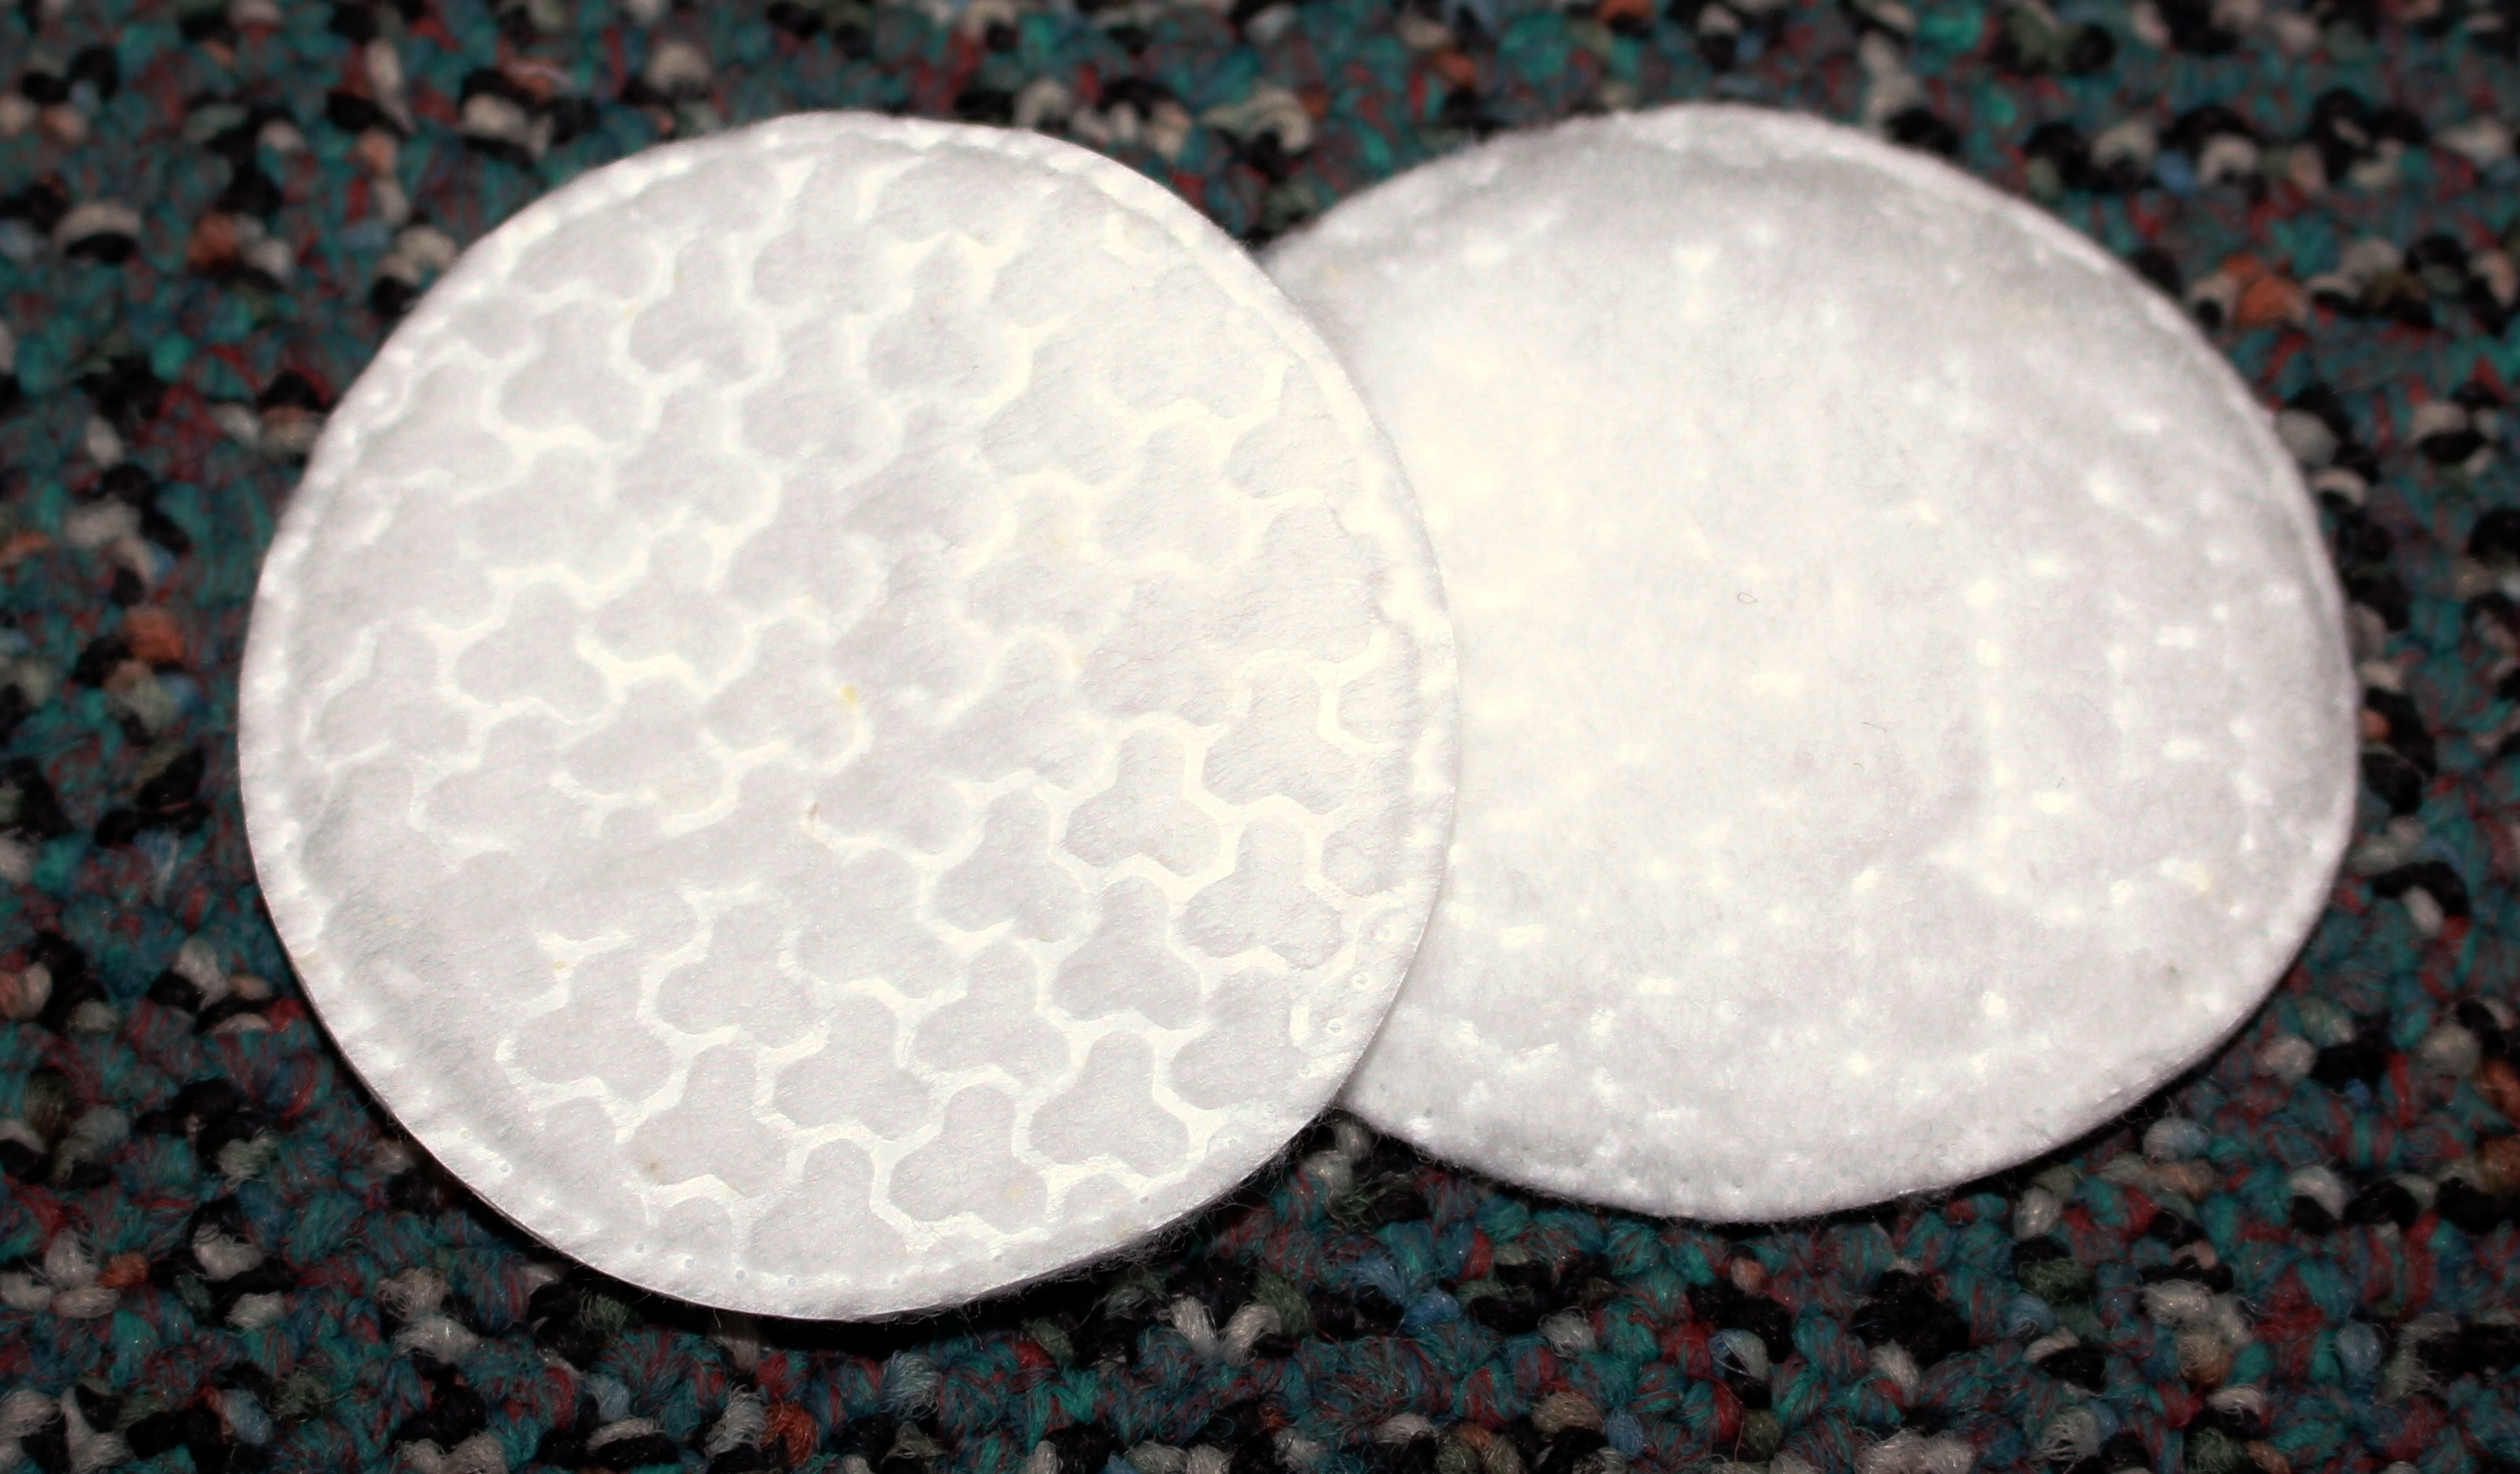
One more thing about covering buttons: A little trick that I do to make my buttons look more professional is to add a touch of cotton. You can use cotton balls, make-up remover cotton, batting, even a thin piece of polar fleece.
Center the cotton on the button, then wrap the fabric over the cotton. Now when you secure the fabric tightly you won’t see any metal through the fabric and it softens the look. Now when I want to add beading to the button I can actually get my needle through the fabric. If you have a hard time keeping the cotton in place, use a tab of super glue, just let the glue dry before covering with fabric.
Buying Covered Buttons:
There are so many covered buttons to choose from it can get a little overwhelming, so I have included links to the ones that I use from WAWAK Sewing:
I just got back from a 6 day Sit & Sew tour visiting all the Allbrands stores which started in Louisiana and ended in Texas. Fabulous trip, but definitely dragging a little today. I will be sharing details of the week as soon as I organize all the photos. In short, I met so many wonderful people, ate some amazing food, got over my fear of bridges, I now have official Mardi Gras beads …
In the meantime, I posted this message to facebook and realized not all of you are on facebook, so I thought I would THANK YOU again.
Saturday was the last day of teaching and I was flying out the next morning. Super tired, but before crashing I decided to scan my emails and came across one from Craftsy with the title “Are you a blogger award finalist?”. I clicked on the link and couldn’t believe it! You nominated my blog to the top 4 Best Sewing Instructor Blog again. You all are AWESOME! This means so much to me, thank you, thank you. I also know it is a little work to nominate a blog at the first stage, you have to fill out a lot of things. Thanks so much for going through the effort, you inspire me to keep at it 🙂
One More Round of Voting
Now, there is a last round of voting that ends Wednesday at midnight. This vote is quick and easy:
Click here to vote: Scroll down the page to Vote Now! Best Craftsy Sewing Instructor’s Blog and you will see my name. Vote and then watch the tally live.
Just being in the top 4 is such an honor and knowing it’s because of your effort to nominate me really makes my day and a huge THANK YOU is all I can say! By the way, while you are scanning the page you might want to check out a few of my friends blogs that also made the top 4 in their category: Leah Day has a great one for quilting and Lisa Shaw in Embroidery.
WARDROBE CHALLENGE
The 2014 Wardrobe Challenge was so much fun! Seeing your outfits on flickr and following your Pinterest boards has been a treat and a quick way to get in the sewing mood, I hope you have enjoyed it as much as I have. There have been a few hiccups on my end, so thanks for your patience. (Note to self: Never plan anything while I am traveling to teach, tape It’s Sew Easy, or shoot online classes – just not enough time and brain space ) In fact, I still need to post the list of winners, but I wanted to give you the last challenge.
LAST CHALLENGE
I told you the last challenge would be an easy one. Take a picture of the clothes in your closet that you have sewn this past year and post it on Flickr before February 15th (the same way you posted the other photos – click here if you need help uploading to flickr). Even if you only have 1 garment, your photo qualifies you for this last challenge. Winners will be all random drawings from the entrants, so even if you haven’t participated yet or you feel intimidated by the rock stars who have really used the challenge to fill their closet, let us see what you have made. Again this is just 1 photo, just like mine. Good luck and thanks again to all that have participated.
I don’t know if you read my last post about the cooking adventure, but many of you gave the best tips for cleaning the pan! the baking soda worked like a charm and I wrote all the cleaning tips down so I am ready for the next burn. Well, I am off to edit pictures and explain to Winn how I got my mardi gras beads 🙂
First off, I want to wish you a Happy New Year and I hope you are off to a great start in 2015! So far so good on this end J
I started the year with a mini-vacation up north. Although, the snow didn’t arrive until after the mini-vacation, which resulted in another mini-vacation at home, not all bad J
yes, I took this fuzzy photo and it’s on the new years list to get better
I am not big into New Year’s resolutions, as I would hate to set myself up for failure – that being said I still have a very long list, as I do every year: work out, eat healthier, go to bed early and get up early, take more time for friends and family, get organized, get rid of clutter, and on and on …… I have to ask, why not just take time each month and re-evaluate life – wouldn’t it be so much easier to try changing and improving on things one month at a time versus an entire year? What a novel thought, that ultimately has become my New Year’s Resolution!
Resolutions #1: Get in Better Shape
To start, I bought Jillian Michaels ripped in 30 workout DVD and a slew of new workout clothes. You can’t work out properly without the proper clothing, right? (even if I am working out in my own living room … and yes, I bought them as I didn’t have time to sew them)
Day 1: REALLY?!? Have any of you tried this workout?!? I really thought I was in pretty good shape – she had no problem proving that different! First day, thought I would die in the middle (remember this only 30 minutes – longest 30 minutes of my life!)
Day 7: Let’s just say, this is going to be re-evaluated at the end of the month – as I am SO out of shape! And thank heaven’s I can do this in my own house and no one is taping me!!!! Oh – and by the way – I will not be offering before and after photos! J
Resolution #2: Learn How to Cook
As many of you already know, cooking is not my forte. I am not ashamed of that, as those of you that have read my book already know, for the first years out of college – my custom apparel business was my main focus and the kitchen cabinets were only to be used for fabric storage – they made excellent storage if I might add. My last cooking attempt was 7 years ago, 3 days of it and it was catastrophic, so let’s give it a go in 2015. What the heck, don’t they call it the 7 year itch J
First, let me just say, I have the best husband ever! Winn, loves to cook and he is really good at it, so I am a bit spoiled. In order to not starve the man the death, I will attempt cooking while he is away:
1st Recipe: Cooking Light Magazine – Parmesan and Pine Nut – Crusted Oven-Fried Chicken (Winn’s up north ice fishing, perfect opportunity!)
Take 1: Spent 2 hours in the grocery store trying to find all the ingredients, got home and was way too tired to attempt.
Result: Dinner served is cottage cheese and triscuits.
Take 2: Ready to go … everything went well until the “sauté the chicken for 3 minutes” and mine turned black instantly!
I will just give you a hint, Tyler (the cat) is more like a dog and love’s people food. Last weekend, my husbands chicken dish:
My dish? He snubbed, in the kindest way:
In fact, if it wasn’t for Ranch dressing (which makes anything taste good) Tyler’s dinner was even looking a bit enticing.
Cooking is just like Sewing!
This is when I realized cooking is so much like sewing! When I teach a class, I assume you know how to do certain things, just like these recipes:
2 TBSP Pine nuts, toasted (for us beginners, how do you toast these – in the toaster LOL J )
Sauté for 3 minutes or until brown – well, mine turned black so fast, there wasn’t a brown option! (Maybe the author had a better quality pan?)
Cook for 10 minutes or until chicken is done: what if my oven is hotter than yours? What if I use convection cook?
As I am pulling a blackened chicken breast out of the oven, two things occurred to me. Sewer’s have this same problem. For example: interfacing – What is it? What kind? Where do I put it? How do I press it in place?
I can just picture a new sewer in Joann fabrics staring at the rack of interfacing, as I am in the grocery store staring at the spice rack – totally lost!
And then the comparison of sewing machines and sergers to stoves and ovens. They are all different. I read the recipe and followed by the book, but maybe the person writing it has a gas stove, did they bake with a convection oven, or were they using a different pan?
After botching my dinner, I sat down to answer my online class questions and had to laugh when I got to one of my serging class questions: my gathering foot doesn’t gather like you showed. WOW! This is exactly what I am experiencing with cooking! My serger is different and all serger’s don’t offer the same stitch quality or feet accessories. See where I am going? There are so many factors to creative learning.
And to help my fellow beginner sewers, I have fun plans for you this year! I can’t tell you them all yet, but my blog will feature a “Back to the Basics” section to help you learn the basics of sewing as I am learning to cook! Let’s learn together J For my advanced sewing fans, don’t worry, I have a lot in store for you too!
Wardrobe Challenge
How can I ever thank you all for participating in my wardrobe challenge of 2014, the response in email, flickr, and pinterest was phenomenal. My wardrobe challenge started with the idea to inspire you to fill your closet with clothes sewn by you! The best part was getting sponsors to offer great gifts to inspire you even further: Brother, WAWAK sewing,Threads and SewStylish Magazines, Coats & Clark, It’s Sew Easy Tv, and myself. As you know, I extended the deadlines into 2015 for many reasons and look forward to awarding the final winners. This contest was an inspiration of mine to get you all to fill your closets with your own sewn clothes! I will be announcing a slew of past winners this week and giving you the last challenge for the grand prize, don’t worry the last challenge is the easiest J
Happy New Year! Can you share some of your resolutions for 2015? I would love to hear J
Leather is a major trend this season and continues on into the spring, yes leather for spring and summer! Here are a few tips to get you started:
TIP 1. FABRIC
Check the fabric for flaws, especially in faux leather you might find scratches or cuts that you will need to work around when cutting out the pattern pieces.
Consider the weight and feel of the fabric for the design. For example a biker jacket will need a thicker fabric than say a peplum style jacket. Also, squeeze the fabric in your hand and if it has deep creases or wrinkles, that is how it will look after wearing it (better to know now :))
TIP 2. NEEDLES
Use a Leather Needle in the sewing machine. Start with a size 12 or 14 for light to medium weight fabric.
Go up to a 16 or 18 for heavier fabric, but be sure to CHECK your sewing machine as to what is the largest size needle it will accommodate. One of my older machines will only allow up to a size 14.
For sewing faux leather I prefer using a Jean Needle size 14. If you are having a problem with skipped stitches try this needle.
When it comes to hand-stitching, standard needles have a difficult time piercing the fabric. Instead use a Leather Hand Needle, this needle has a triangular point that pierces the fabric. Just be careful, the tip is REALLY sharp!
TIP 3: NO PINS
Just as difficult as it is to pierce leather / faux leather, once you do pierce the fabric the hole is there forever! Use fabricclips to hold the fabric instead of pins. They are lightweight and don’t damage the fabric.
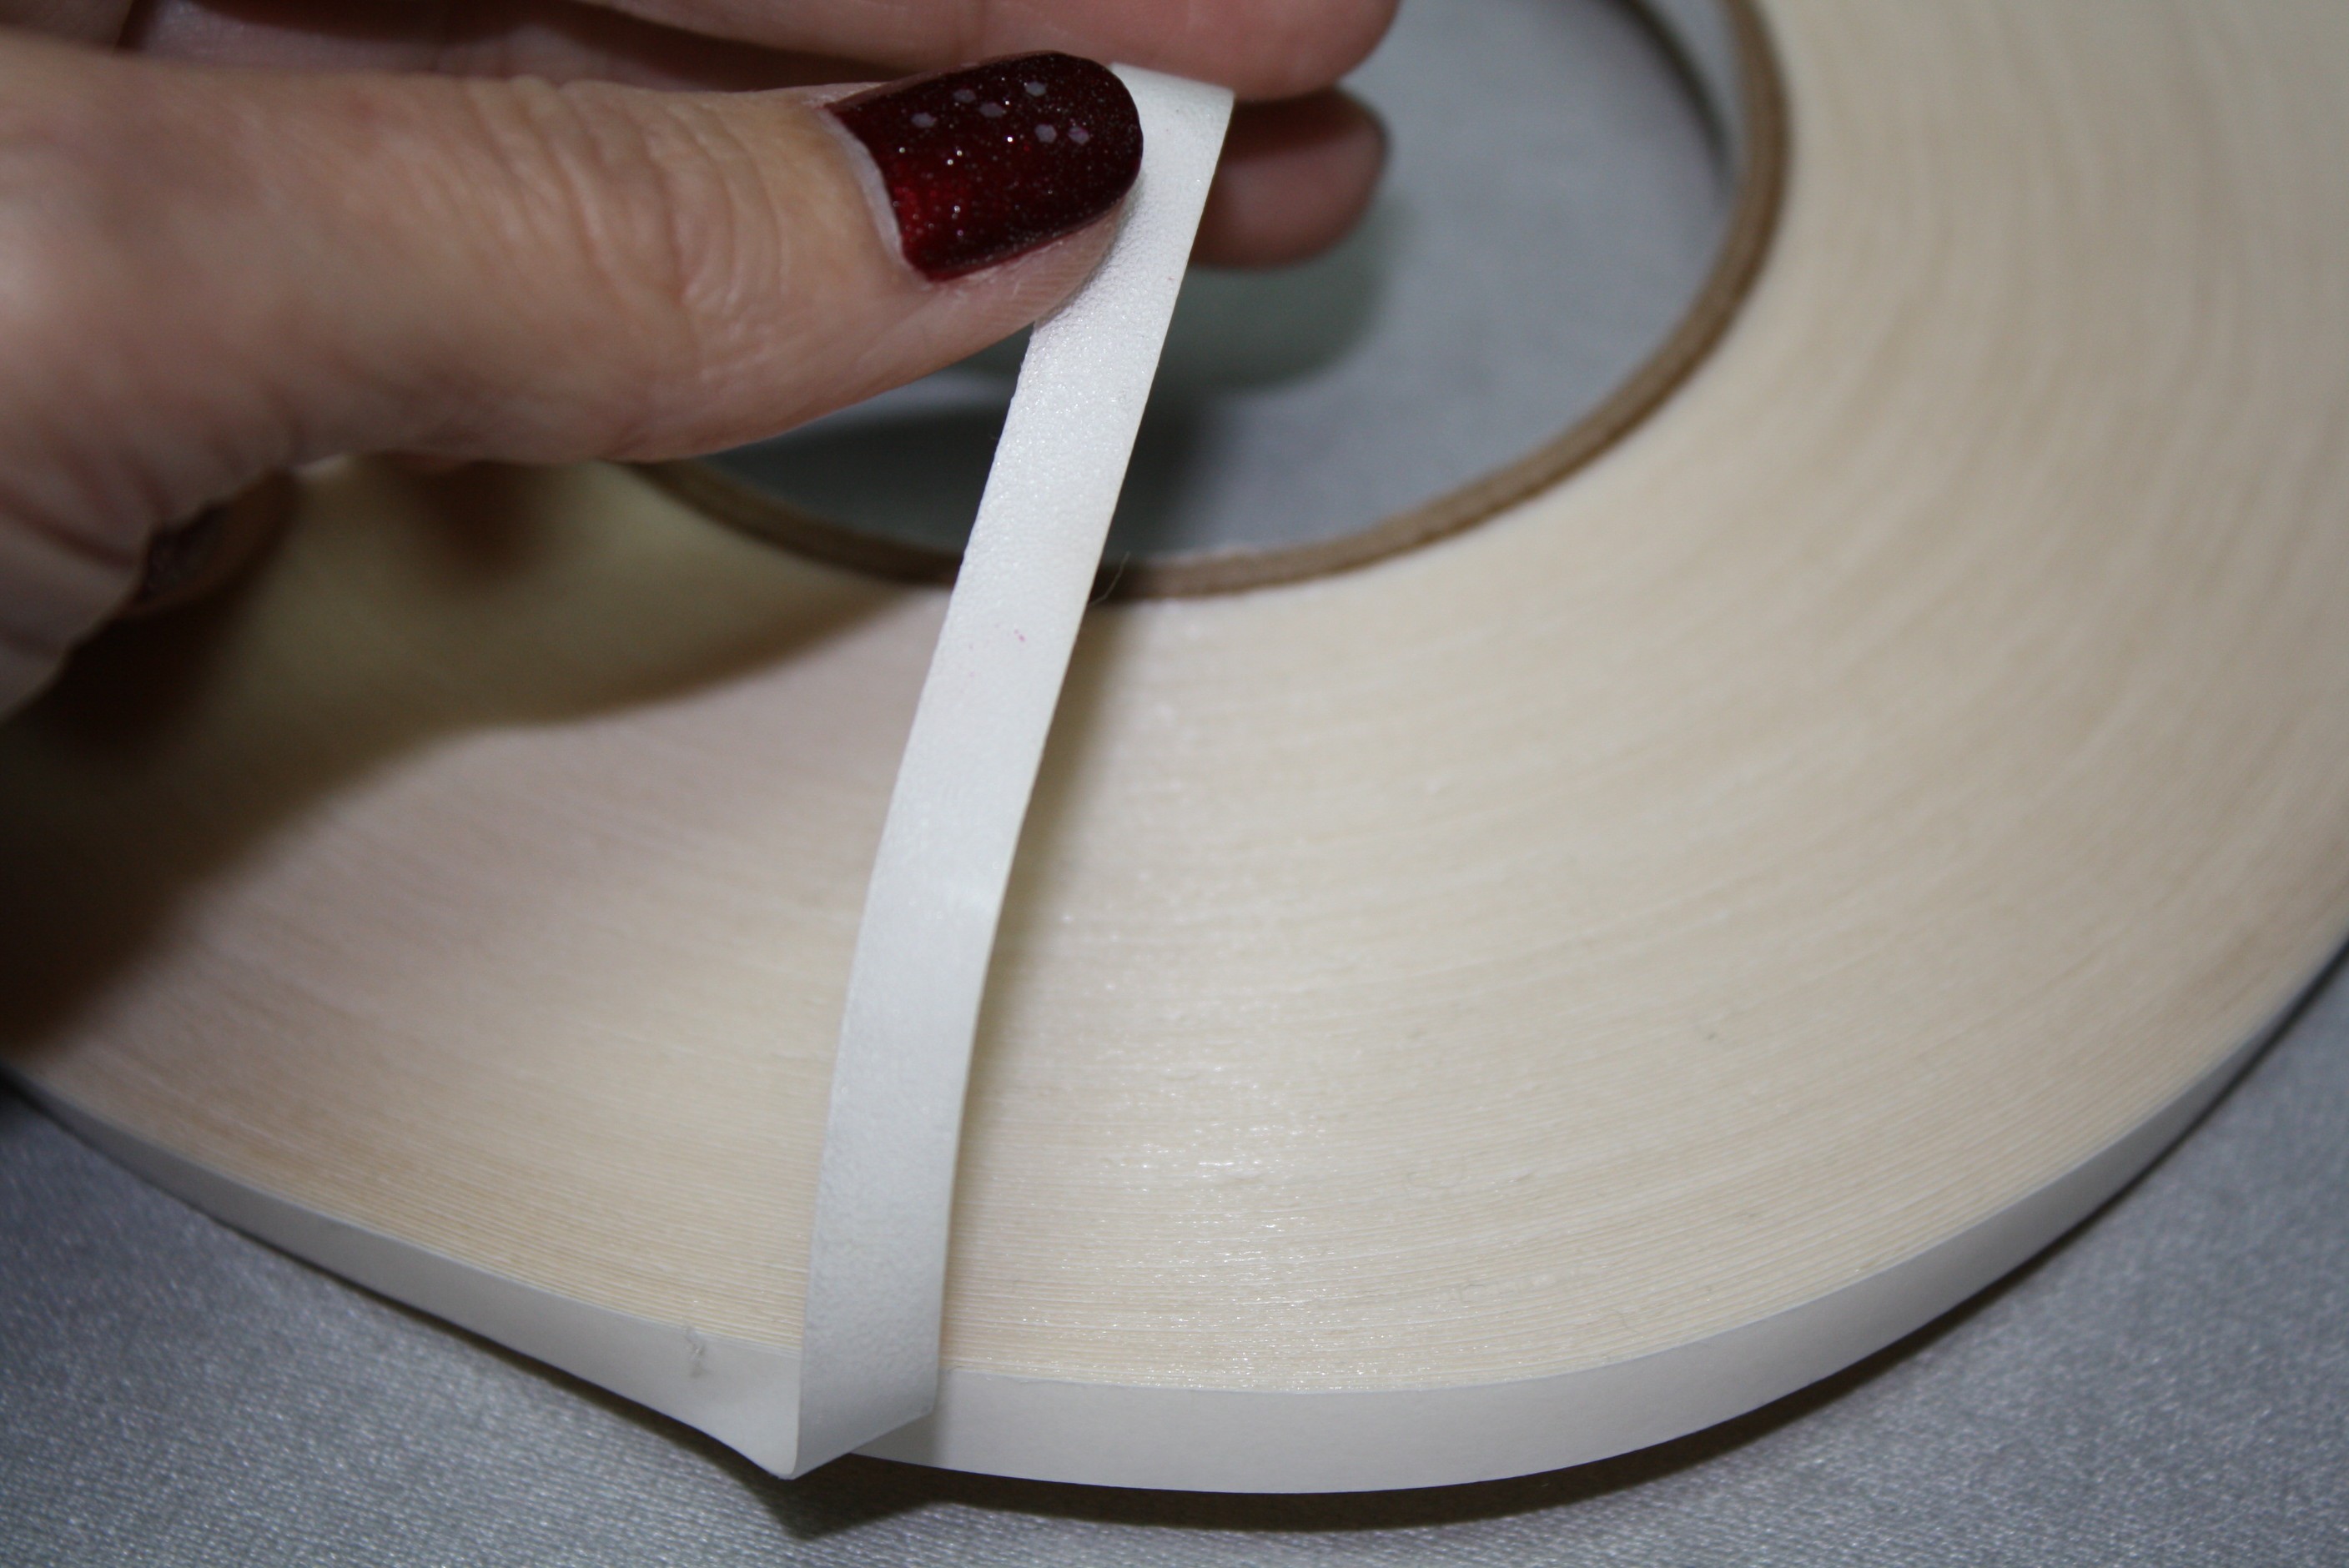
TIP 4: TAPING SEAM ALLOWANCES
When sewing garments, pressing the seam allowances open with a Tailor’s Clapper is the best option. Unfortunately with leather, faux leather, vinyl, and suede, even if you safely press the fabric with an iron shoe, the seam allowance will not stay open. The best solution for securing seam allowances and hemming is either topstitching or leather tape (a special double-sided tape).
This is how easy it works:
1. Place a strip of LEATHER TAPE in the seam allowance with the sticky side down.
2. Remove paper backing, revealing the other side of the tape.
3. Fold back the seam allowance or hem allowance.
I use the 1/4″ wide tape for seam allowances and 1/2″ wide tape for hems.
Episode 105 Behind the Scenes LIVE with Angela Wolf ? A short episode while we are all getting ready for Thanksgiving ? Colin and Cody show how they embroider their hoodies, turkey day tips, a sneak peek at last weeks fabric haul, and schedule for next...
Episode 3 Sewing News LIVE with Angela Wolf talking Brother ScanNcut with Cindy Hogan from Cynthia's Embroidery ? Thanksgiving decorations ? Announcing some new Brother sales & discounts ? and of course there will be time for a live Q&A ? ? Be sure...
Episode 3 Sewing News LIVE with Angela Wolf talking Brother ScanNcut with Cindy Hogan from Cynthia's Embroidery Thanksgiving decorations Announcing some new Brother sales & discounts and of course there will be time for a live Q&A Be sure to share this with your...
Episode 104 Behind the Scenes LIVE ? Houston Quilt Festival Recap, Tutorial on using the Projector for Embroidery, Announcing New Events in 2019 and Getting Ready for Original Sewing & Quilt Expo in Novi ? See you soon! xoxo Angela
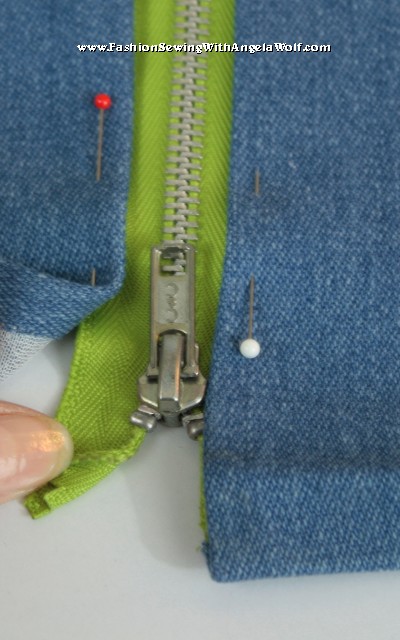
Step 1: On the wrong side of the fabric, mark the center of the pant leg (could be front or back, wherever you want the zipper).
If marking an existing pair of jeans, rip out the hem at least 5″ from each side of new mark. Press the fusible interfacing along the newly marked center line.
Step 2: Mark the hem, hem allowance, and the length of the zipper opening down center of the pant leg.
Step 3: Determine the width of the zipper opening (depends on the width of the zipper teeth). Draw in opening, top edge, and then add a triangle from the center cut line to each corner (as shown above).
Step 4: Cut along center marking. Cut each triangle point (if you are worried about the fabric fraying, add Fray Check to the top corners)
Step 5: Press the seam allowances back and press triangle tip up.
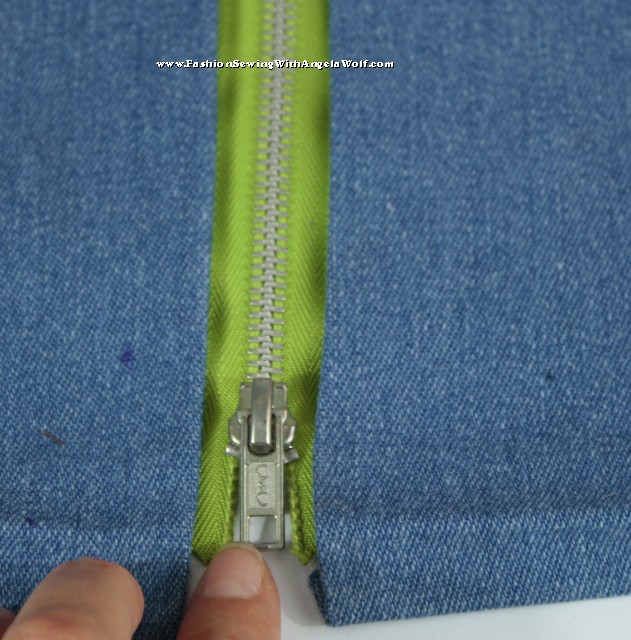
Step 6: Line up the zipper with the metal teeth in the center of the opening. Check the placement of the zipper stop and zipper tab.
Step 7: Fold back the zipper tape and press in place at the hemline.
Step 8: Pin zipper in place.
Step 9: In this example, I am using standard polyester thread, cotton or silk thread would work too. Set the sewing machine to a triple stitch and lengthen the stitch length to 4.0. (Note: if you don’t have this feature, use denim thread, straight stitch, stitch length 4.0)
Step 10: Stitch along the edge of the zipper. Open and close the zipper as needed in order to get the foot by the zipper tab. Step 11: Notice how I have lined up the edge of the zipper foot with the metal teeth, a very easy to get a straight stitch … or this would be a great time to utilize the laser vision guidefeature on your machine! 🙂
Step 12: Press up the hem with the tailor’s clapper for a crisp crease. By the way, did I mention WAWAK Sewing is now carrying my tailor’s clapper! Yeah!
Step 13: Hem the jeans and move onto the other leg.
That’s it! Now this is just one quick, easy way to install a hidden zipper. I will give you some more ideas next time.
I love sweaters and shawls, especially since I am always cold in the air-conditioned restaurants (not that we have needed air conditioning in Michigan this summer!). Thinking of the wardrobe challenge, sweaters are one of the items that I end up buying. Yes I do know how to crochet, yet trim on a jacket is about as far as that usually ends up. A small knitting machine sits in the corner of the studio (on my bucket list to learn how to use 🙂 ).
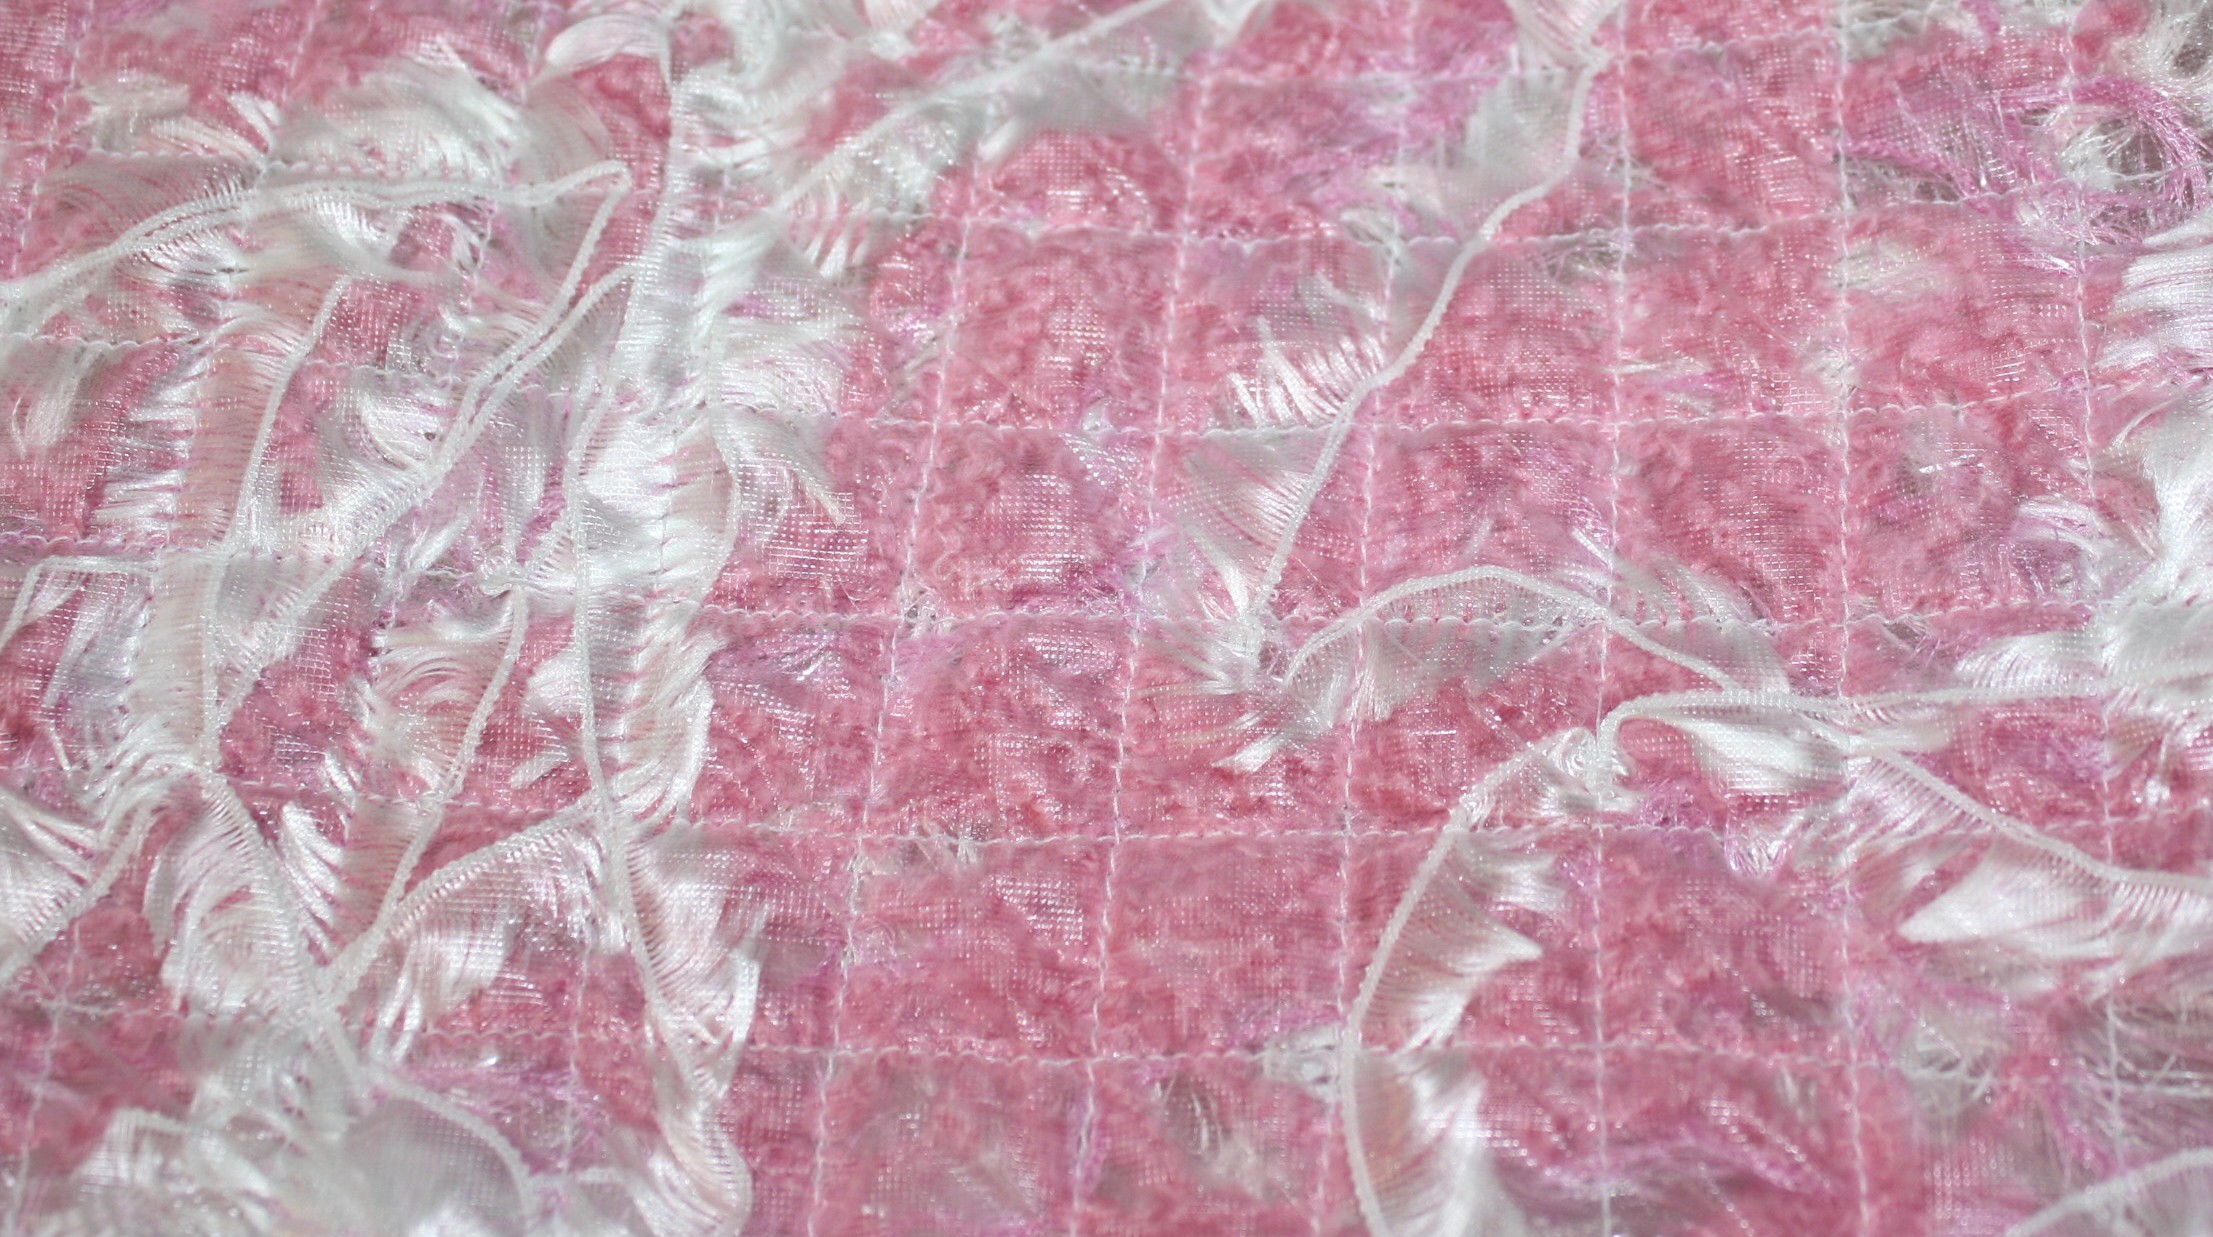
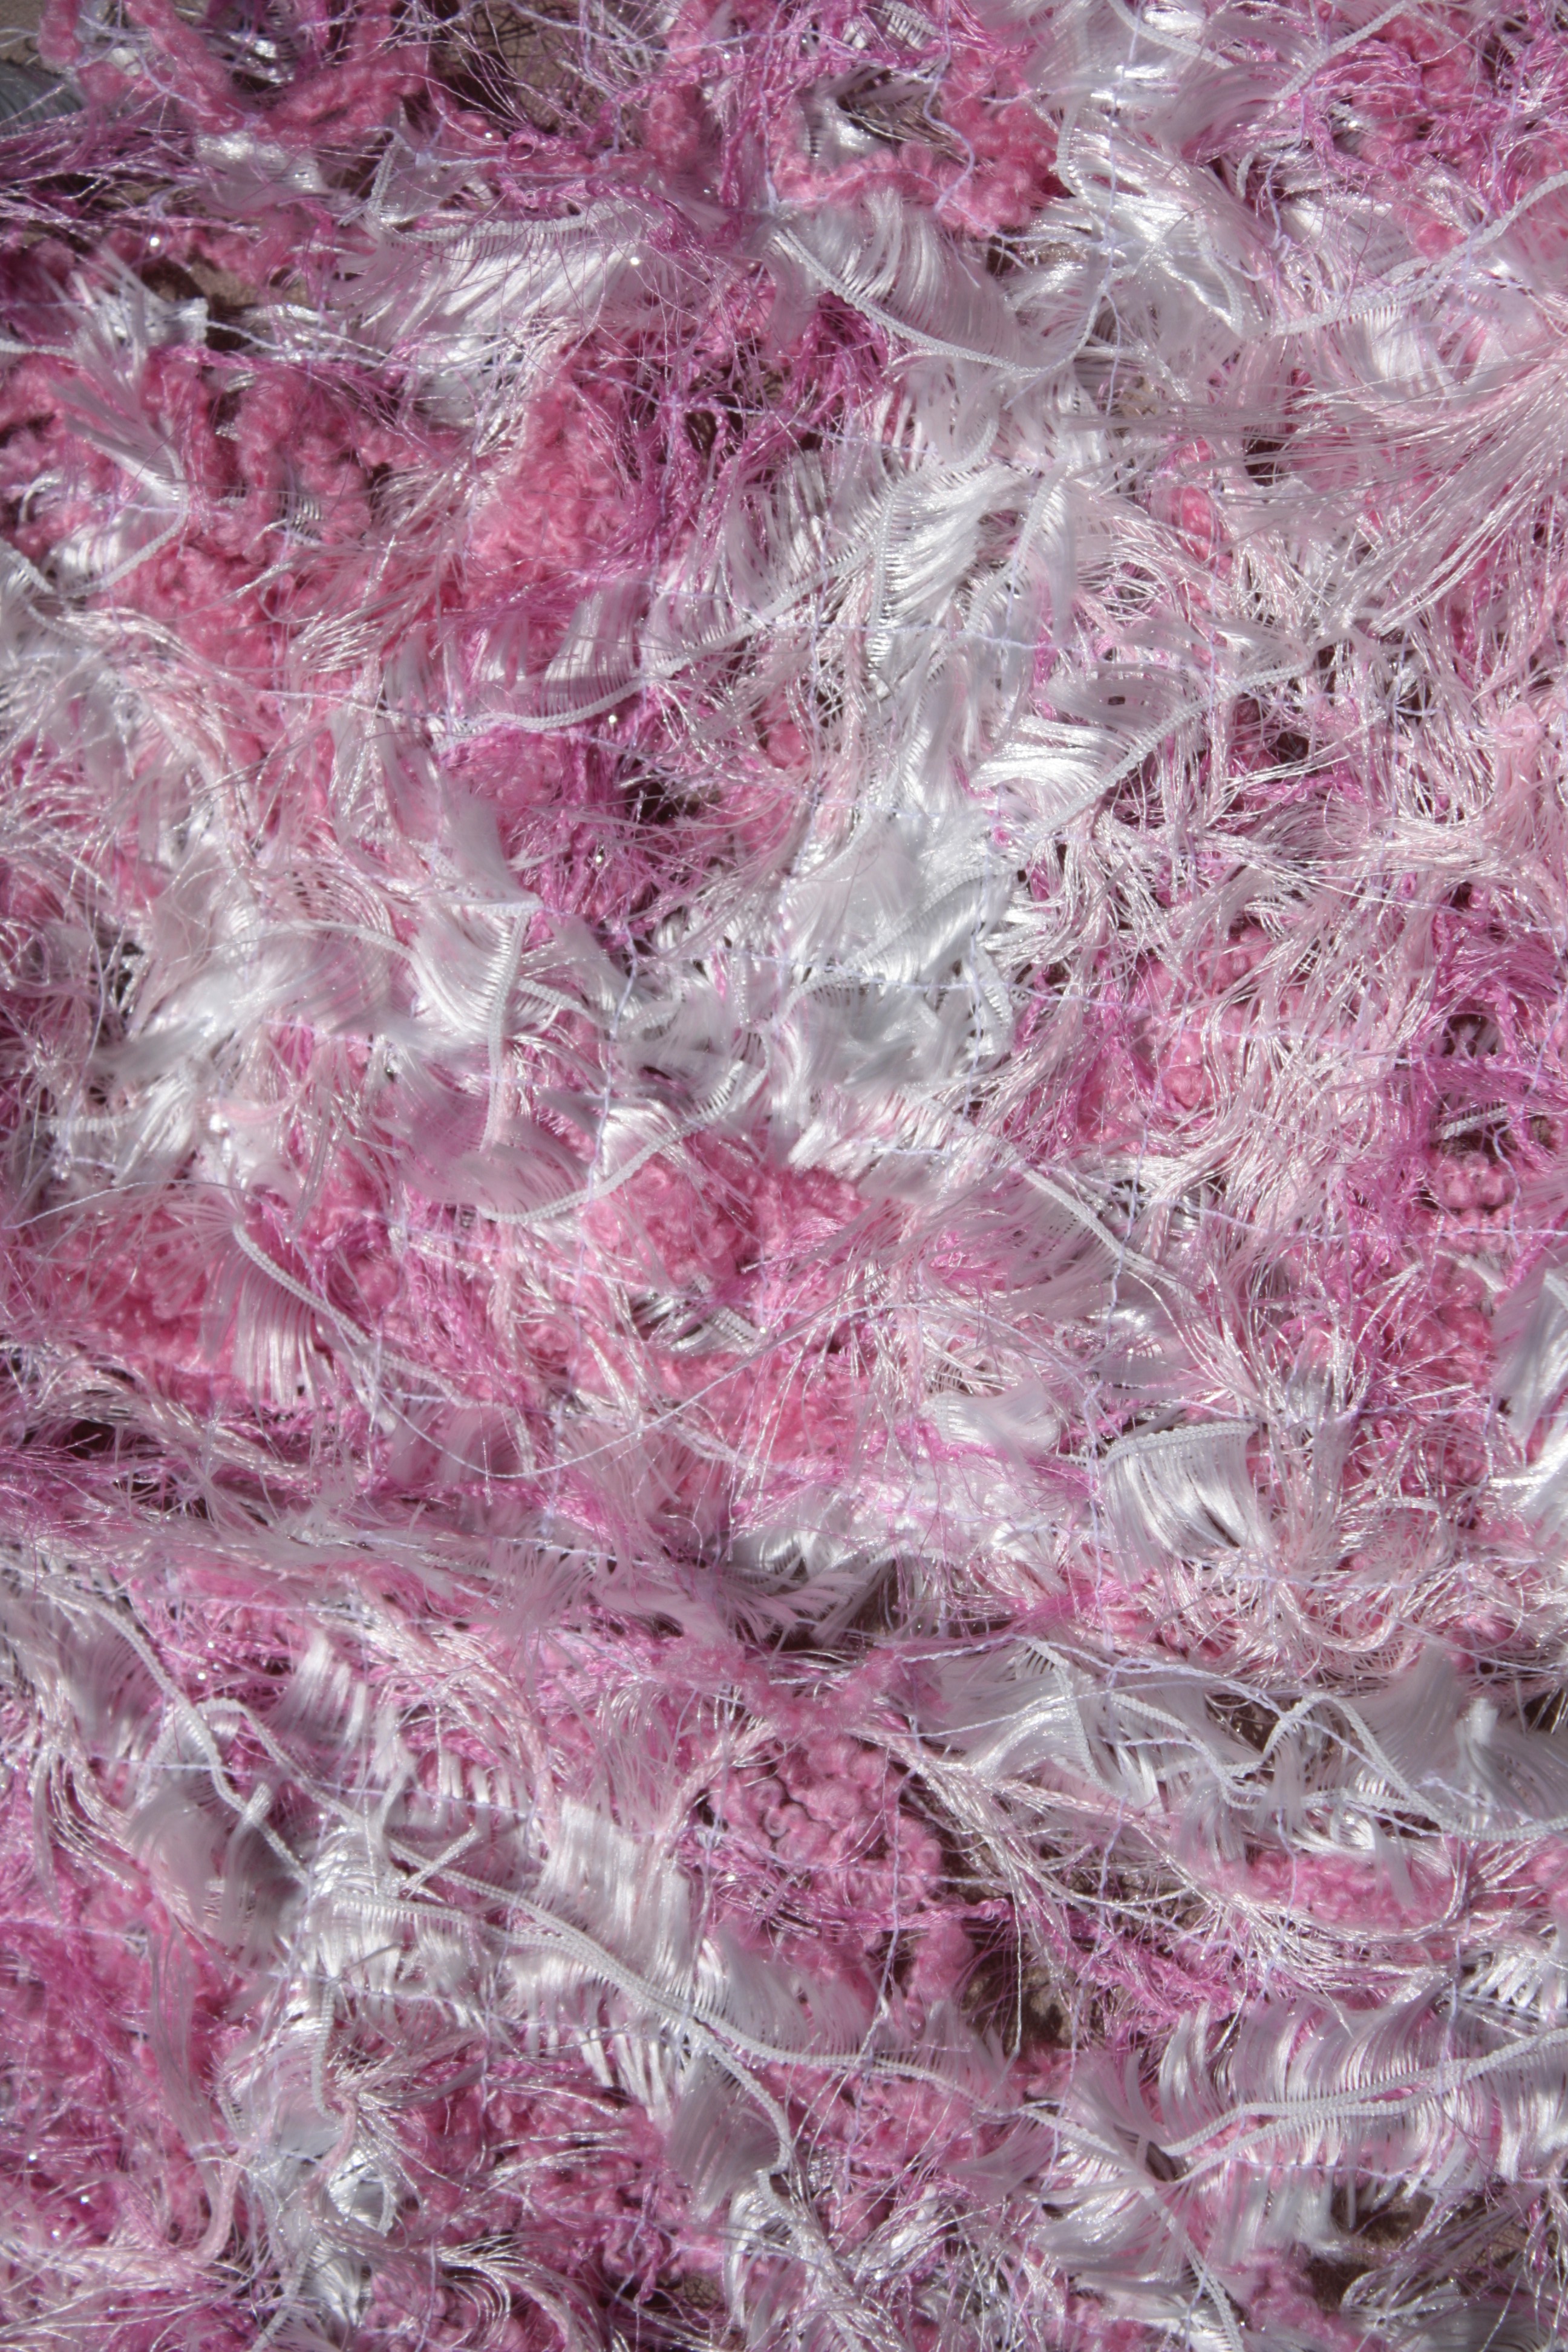
I was recently sewing a fringe skirt and the tweed scraps falling on the floor reminded me of meeting a women wearing a really cute, long, loosely woven (sweater looking) vest. It was at the annual conference for ASDP, so I had to ask the question that only sewer’s are allowed to ask each other “did you make that?”. She had indeed! I was really intrigued when she mentioned using water-soluble stabilizer and scraps from her last sewing project – yes, scraps!
Below is an example of using scraps from my tweed skirt:
Supplies needed:
Decorative Yarn, tweed fabric threads, or other scraps
NOTE: WAWAK sewing has offered my readers a discount for July – yeah!
Purchase a minimum of $30 and receive 10% off your entire order – Use coupon code WAB714 when checking out (expires July 31st) Thank them when you order, they are the best! :))
Lay out one layer of water-soluble stabilizer (54″ for a scarf)
Randomly place yarn, scraps, hairy yarn, etc.
Place another layer of water-soluble stabilizer (same length as the first piece) on top of the yarns
Using long pins, pin through all the layers
Starting at one end, stitch down the center of the stabilizer, stitching through all the layers. Be careful not to sew through any pins, stitch all the way to the end. (Draw a straight line down the center if you need something to follow).
From the center, align the edge of the presser foot with the first stitched line. Stitch a second row, and a third, and 4th, until you get to about 1″ from the edge of the stabilizer. (If your machine has a Laser Vision Guide, like my BrotherDreamweaver, this would be the perfect application!)
Continue stitching rows along the entire length of the stabilizer until you have the desired width.
Turn the fabric and stitch a row from side to side, across the width of the stabilizer.
Continue to stitch row after row until the entire length is filled.
The width of the stitched rows depend on how tight you want the weave of the new fabric or lace. Just be sure to keep it somewhat tight or the yarns will fall away.
The next step is easy! Rinse the fabric panel in warm water and watch the water-soluble stabilizer disappear or throw the fabric in the wash on a hand-wash cycle, again with warm water.
Above you can see the stabilizer has disappeared and I am left with a loosely woven fabric. Notice the stitching lines, this is good to keep in mind when you choose the thread color.
Who would have ever guessed
our scraps
could go so far!
A few more tips:
Throw the fabric in the dryer to soften the hand
The stabilizer and yarns shrink up after washing and drying, keep that in mind if you need a specific length.
The more yarn and scraps, the thicker the fabric
To make an outfit, stitch all the pieces together before washing out the stabilizer
This is a great technique to use for June’s Fabricate Challenge – which I extended the deadline until July 31st.
Have you ever tried this? If so, please share any tips you might have!
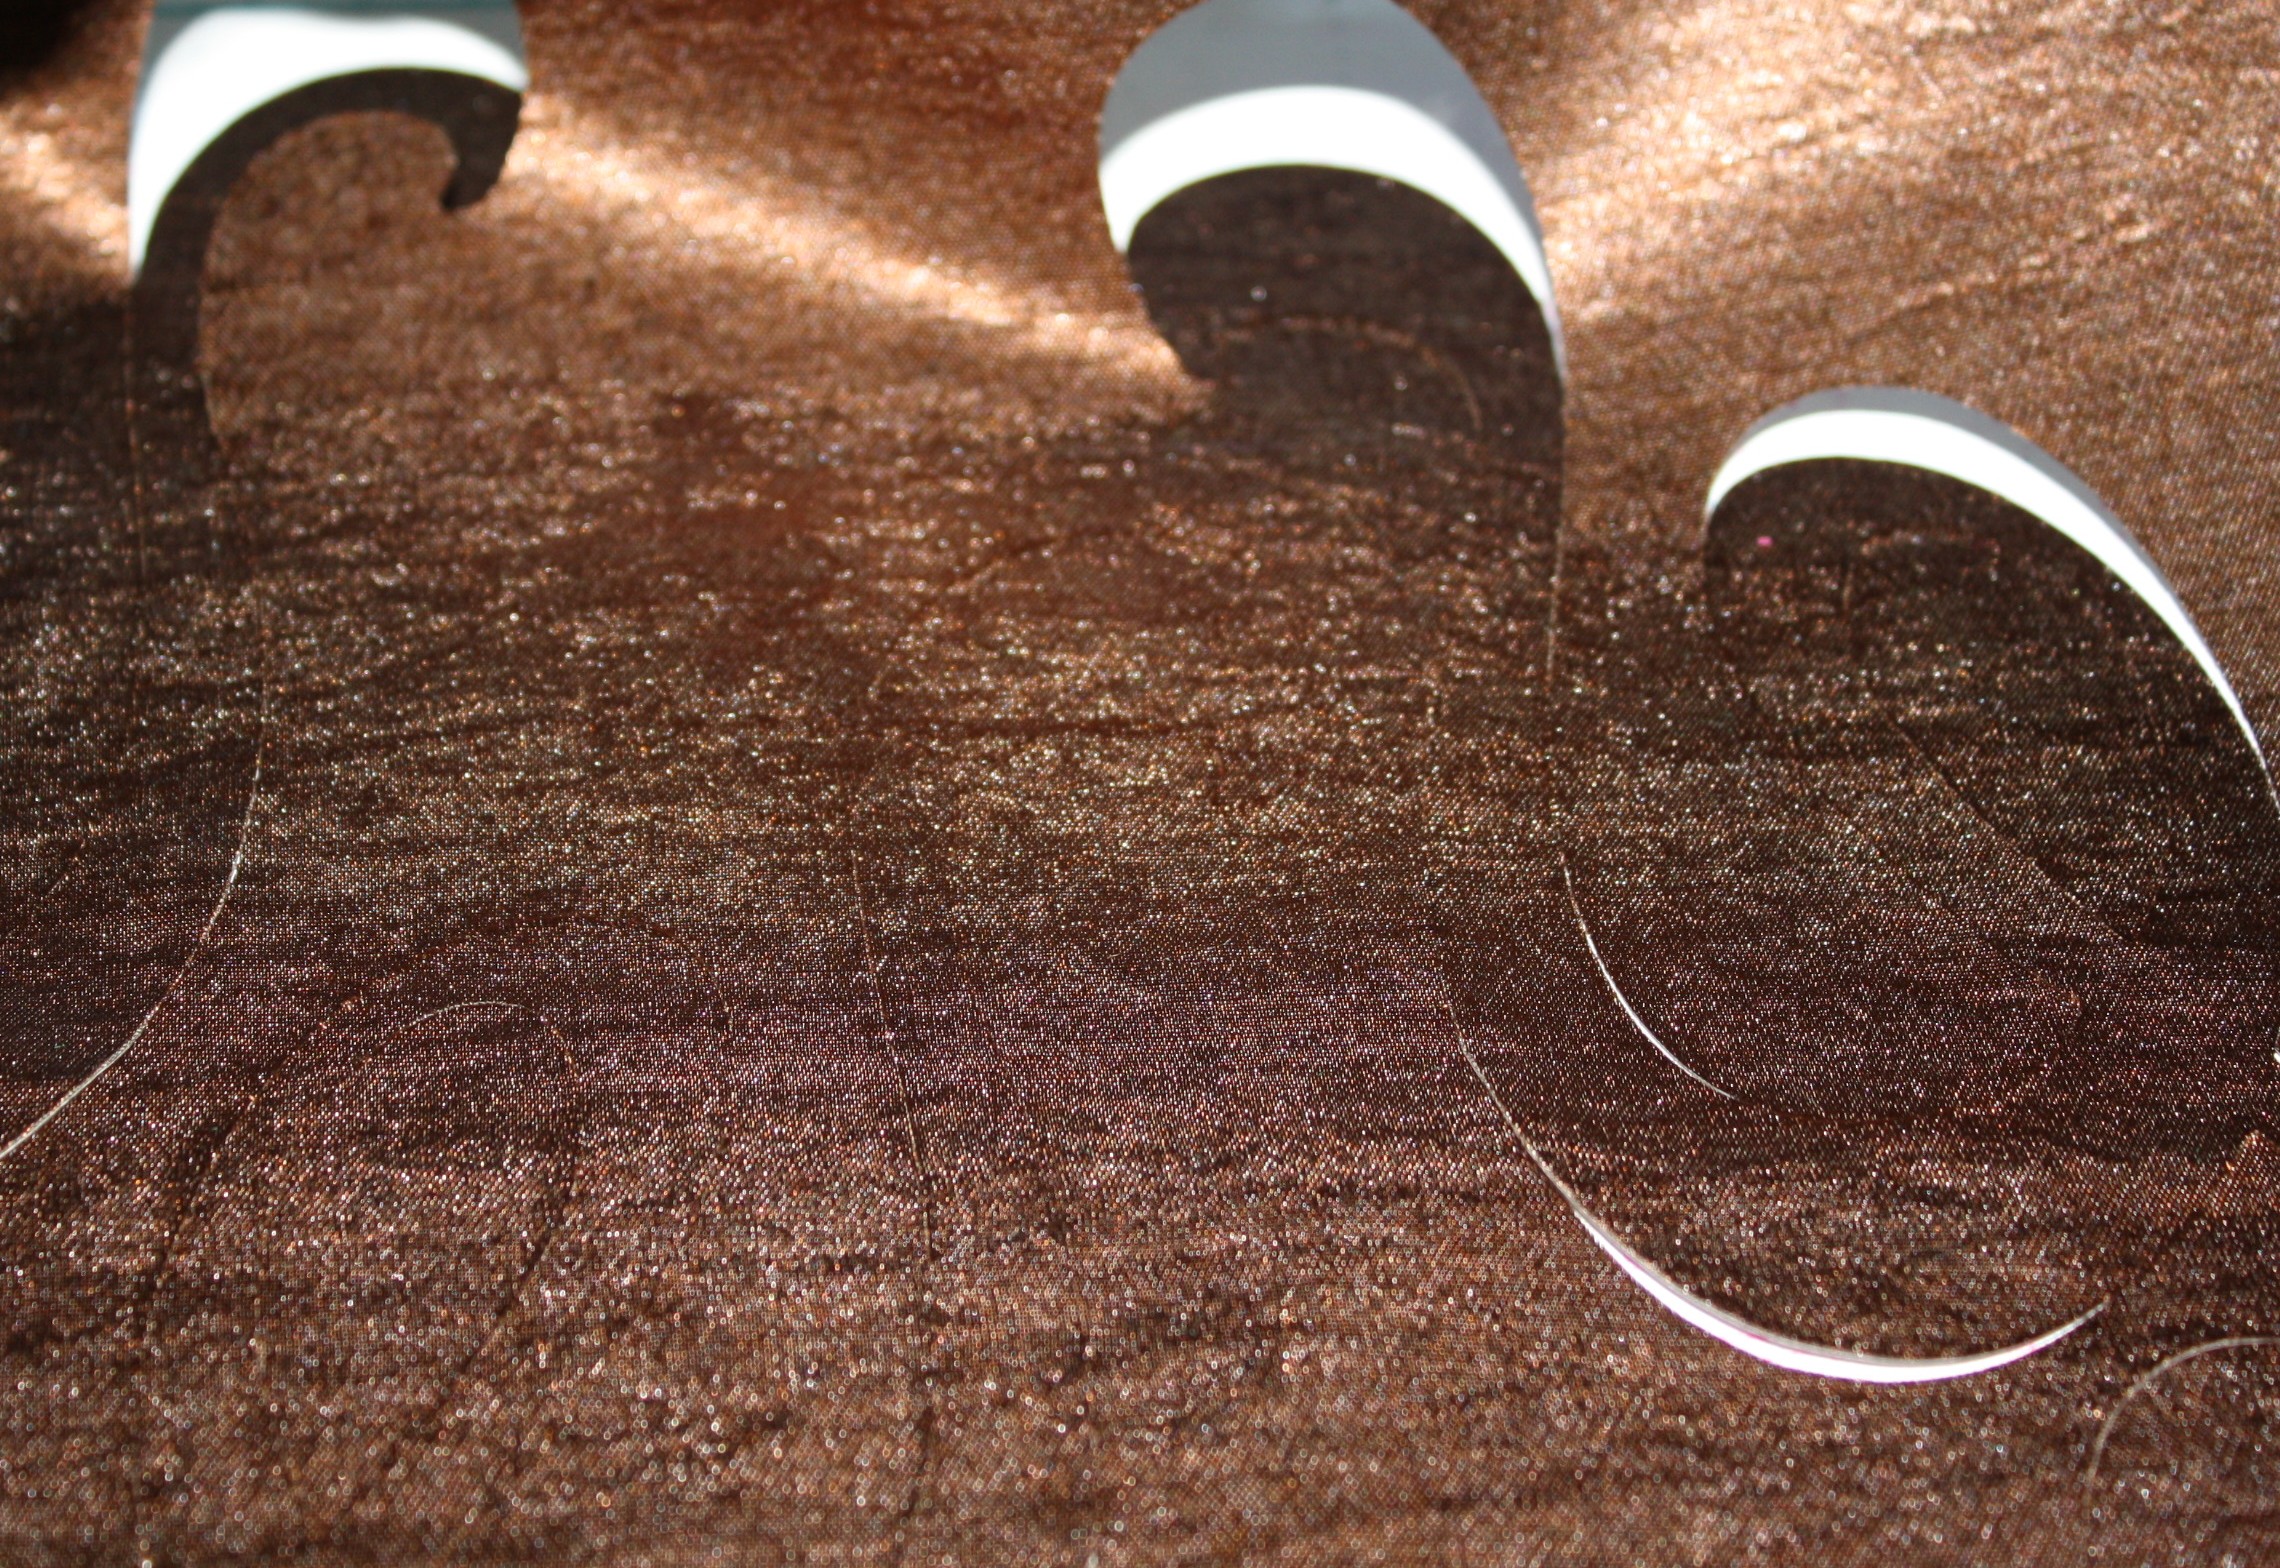
That definition pretty much leaves the door open for ultimate creativity, wouldn’t you say? One idea includes designing your own fabric or altering a fabric into something totally different, which is what I did with the above jacket.
The fabric used for the applique trimming is a polyester / satin. A lightweight fabric with fabulous drape, perfect for a blouse or lining (both of which I plan to add to jacket). That fabric, if left alone, would be a nightmare to create appliques or cut-outs, so I fabricated – sounds like a bad word 🙂 !
The trick – Heat N Bond, now available from my favorite placeWAWAK Sewing and comes in 5 yard and 35 yard pieces. At first I wasn’t too sure about this stuff, but basically you iron it to the back of the fabric and it makes it easier for you to cut out an applique – especially if you are using the Brother Scan-n-Cut
This is how easy an applique can be:
Choose a design – for the sleeve I enlarged a design already in the scan-n-cut memory.
Place the bonded fabric onto the cutting mat (the paper backing on the heat –n-bond makes it easy to stick)
Press the start button (told you it was easy!)
Peel off the backing and place the appliques on the garment.
Once you have the perfect placement, use a press cloth and press the applique in place. Notice I attach the appliques before sewing the sleeve together.
Even though the cut of the scan-n-cut prevents the fabric edges from fraying, I still stitch the applique in place. I choose the blanket stitch and stitched around each applique. That took some time, but it looks great. Almost looks like leather!
I followed all those steps for the jacket front and again used a blanket stitch.
Of course I could cut these appliques by hand, but I really like the fact that all the front pieces are exactly the same! By the way, don’t look too closely at my studio – can you tell I have been working 🙂
Well, that’s one fun way to fabricate. Have you ever tried appliqueing apparel?
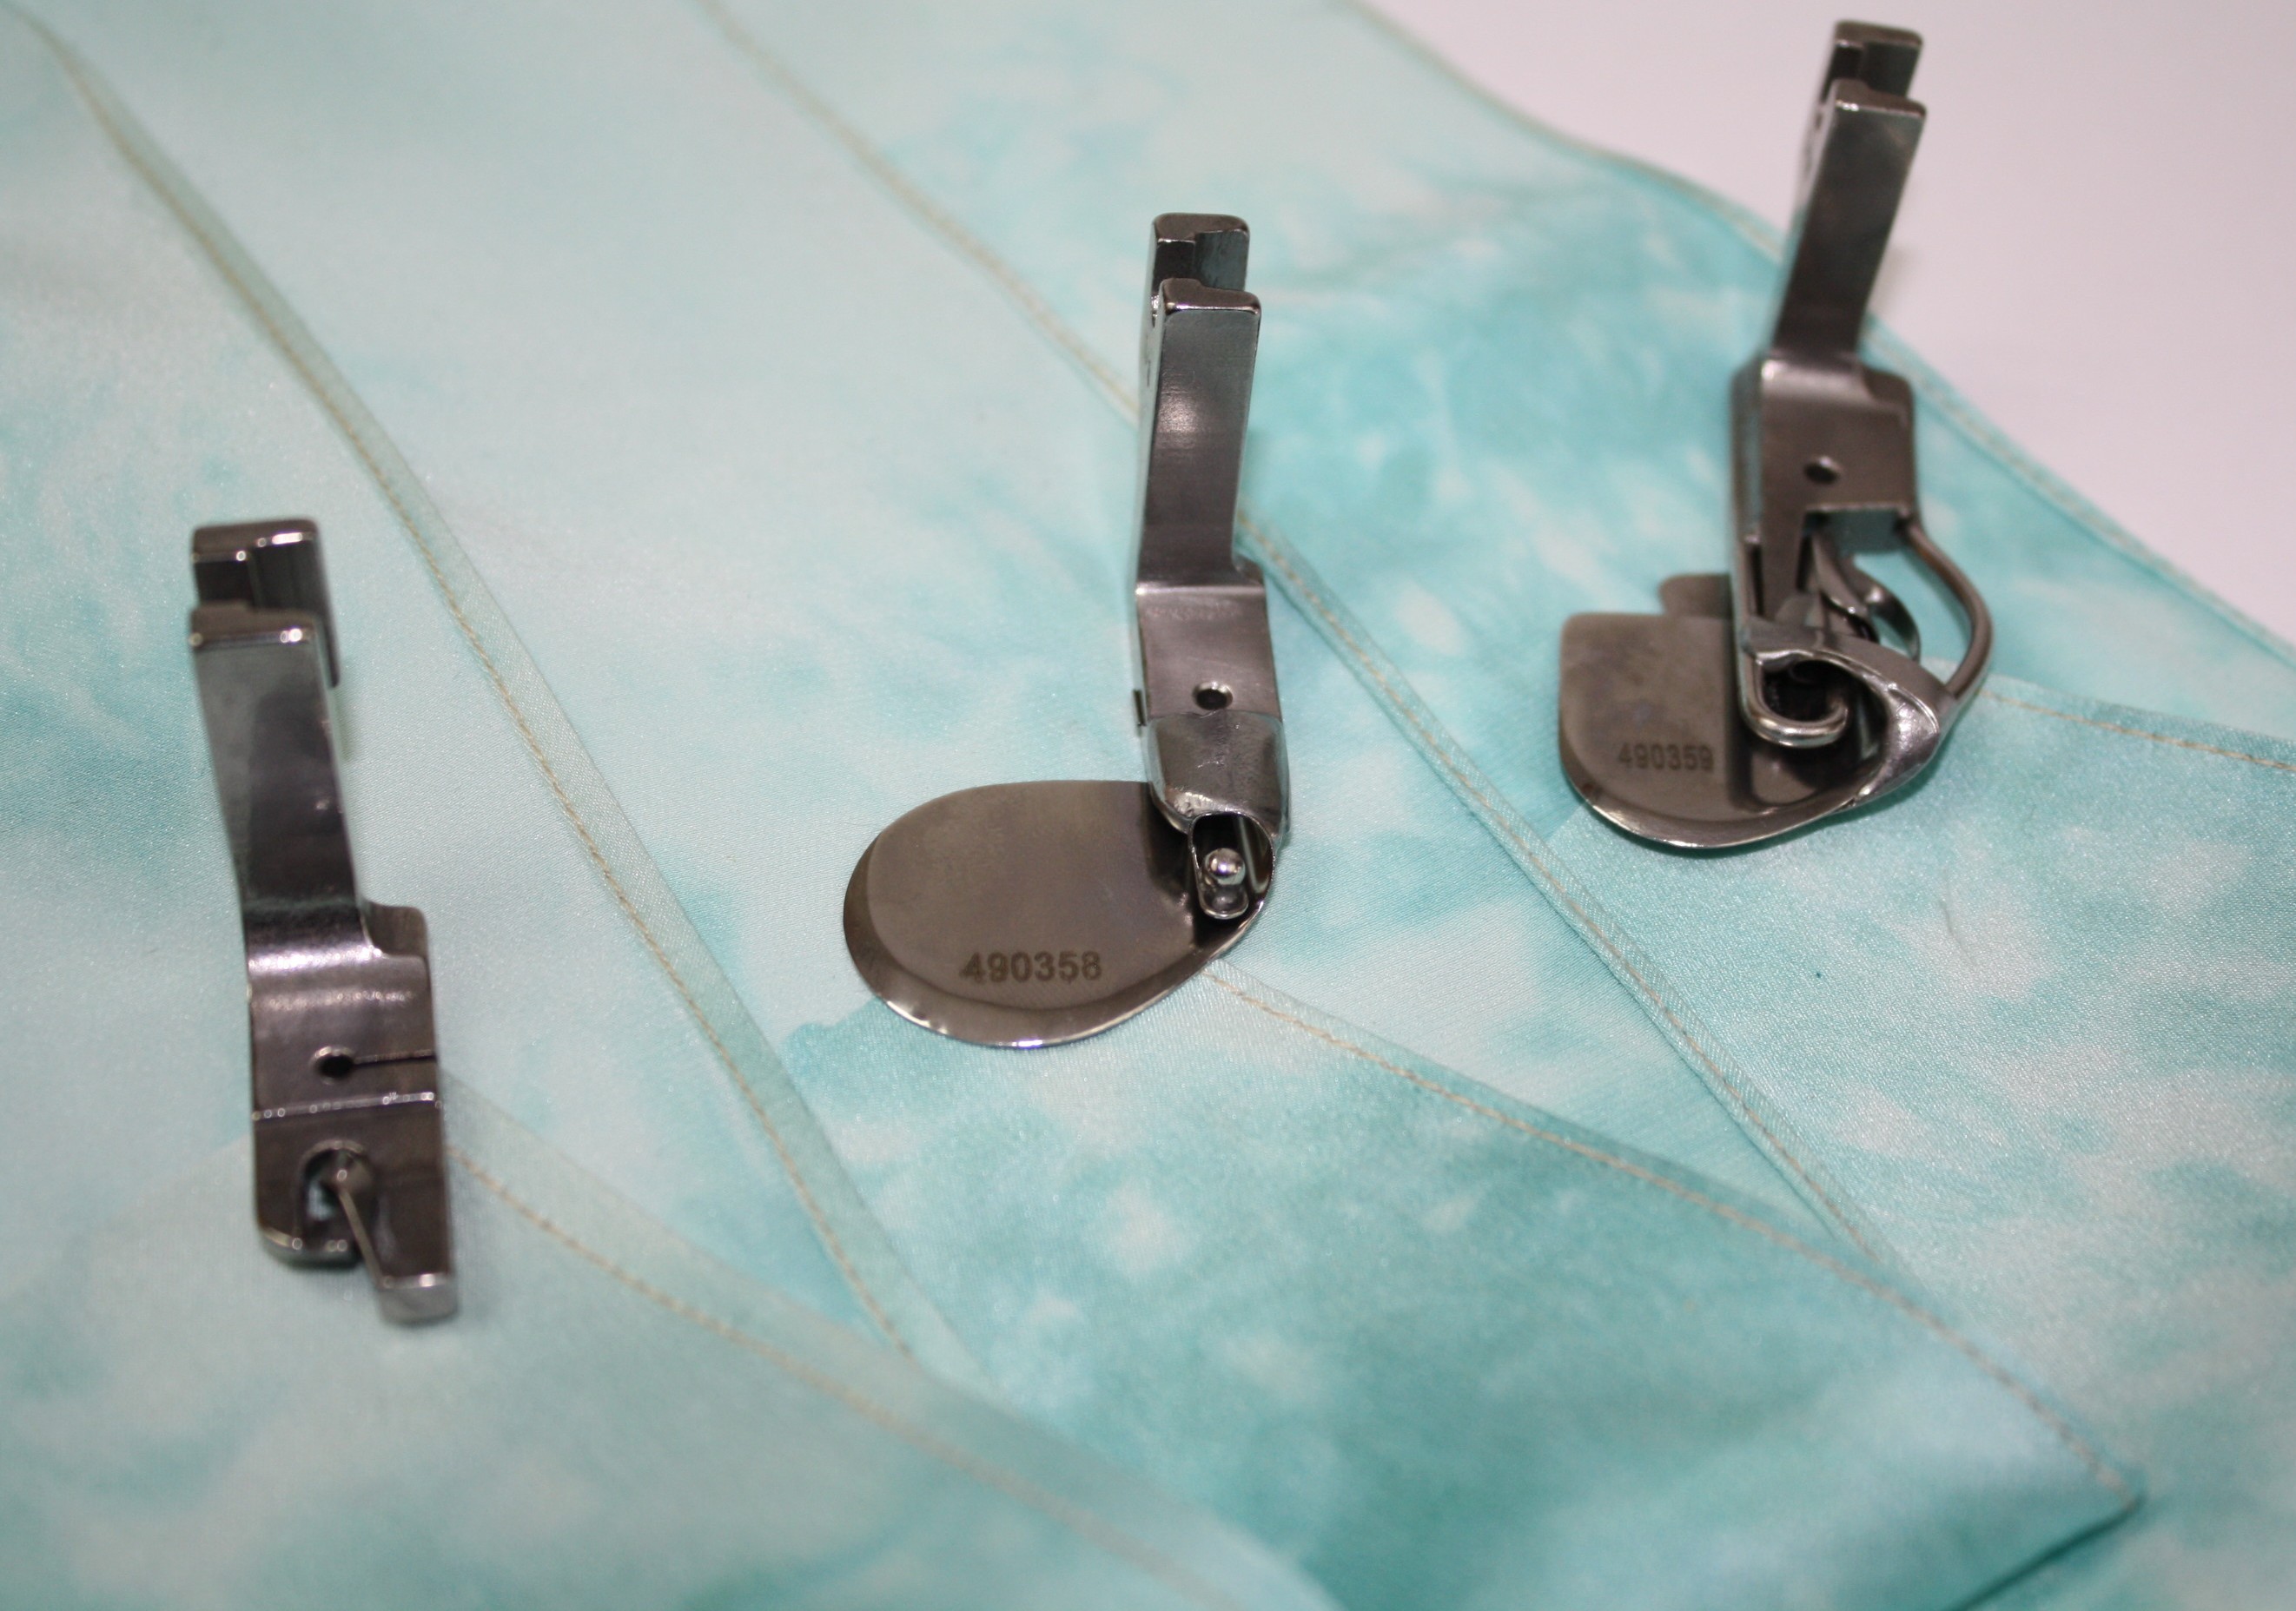
There are so many sewing machine feet to choose from, it can get overwhelming deciding which foot is best for the job. Why bother, right? If using a specific foot for a specific job could drastically cut the sewing time down and offer professional looking results, wouldn’t you want to try? I sure would.
Home sewing machines usually come with a fabulous manual explaining what each foot is for and a tutorial explaining how to use it. Industrial machines don’t always offer such advice, at least mine didn’t. With a 5 page manual, written in a language I don’t speak, I am surprised I got the thing put together in the first place! I don’t use this machine as frequently as all the others, mainly because it’s loud, doesn’t have a thread cutting feature and I don’t have any accessories for it. I bought it for speed and that it has.
Scanning the list of additional feet for industrial machines, I found the feet to be are very inexpensive, but again I ran into the issue of which foot is the right foot for the job. I thought I would start testing some of these feet and share with you my findings.
A Narrow Rolled Hem
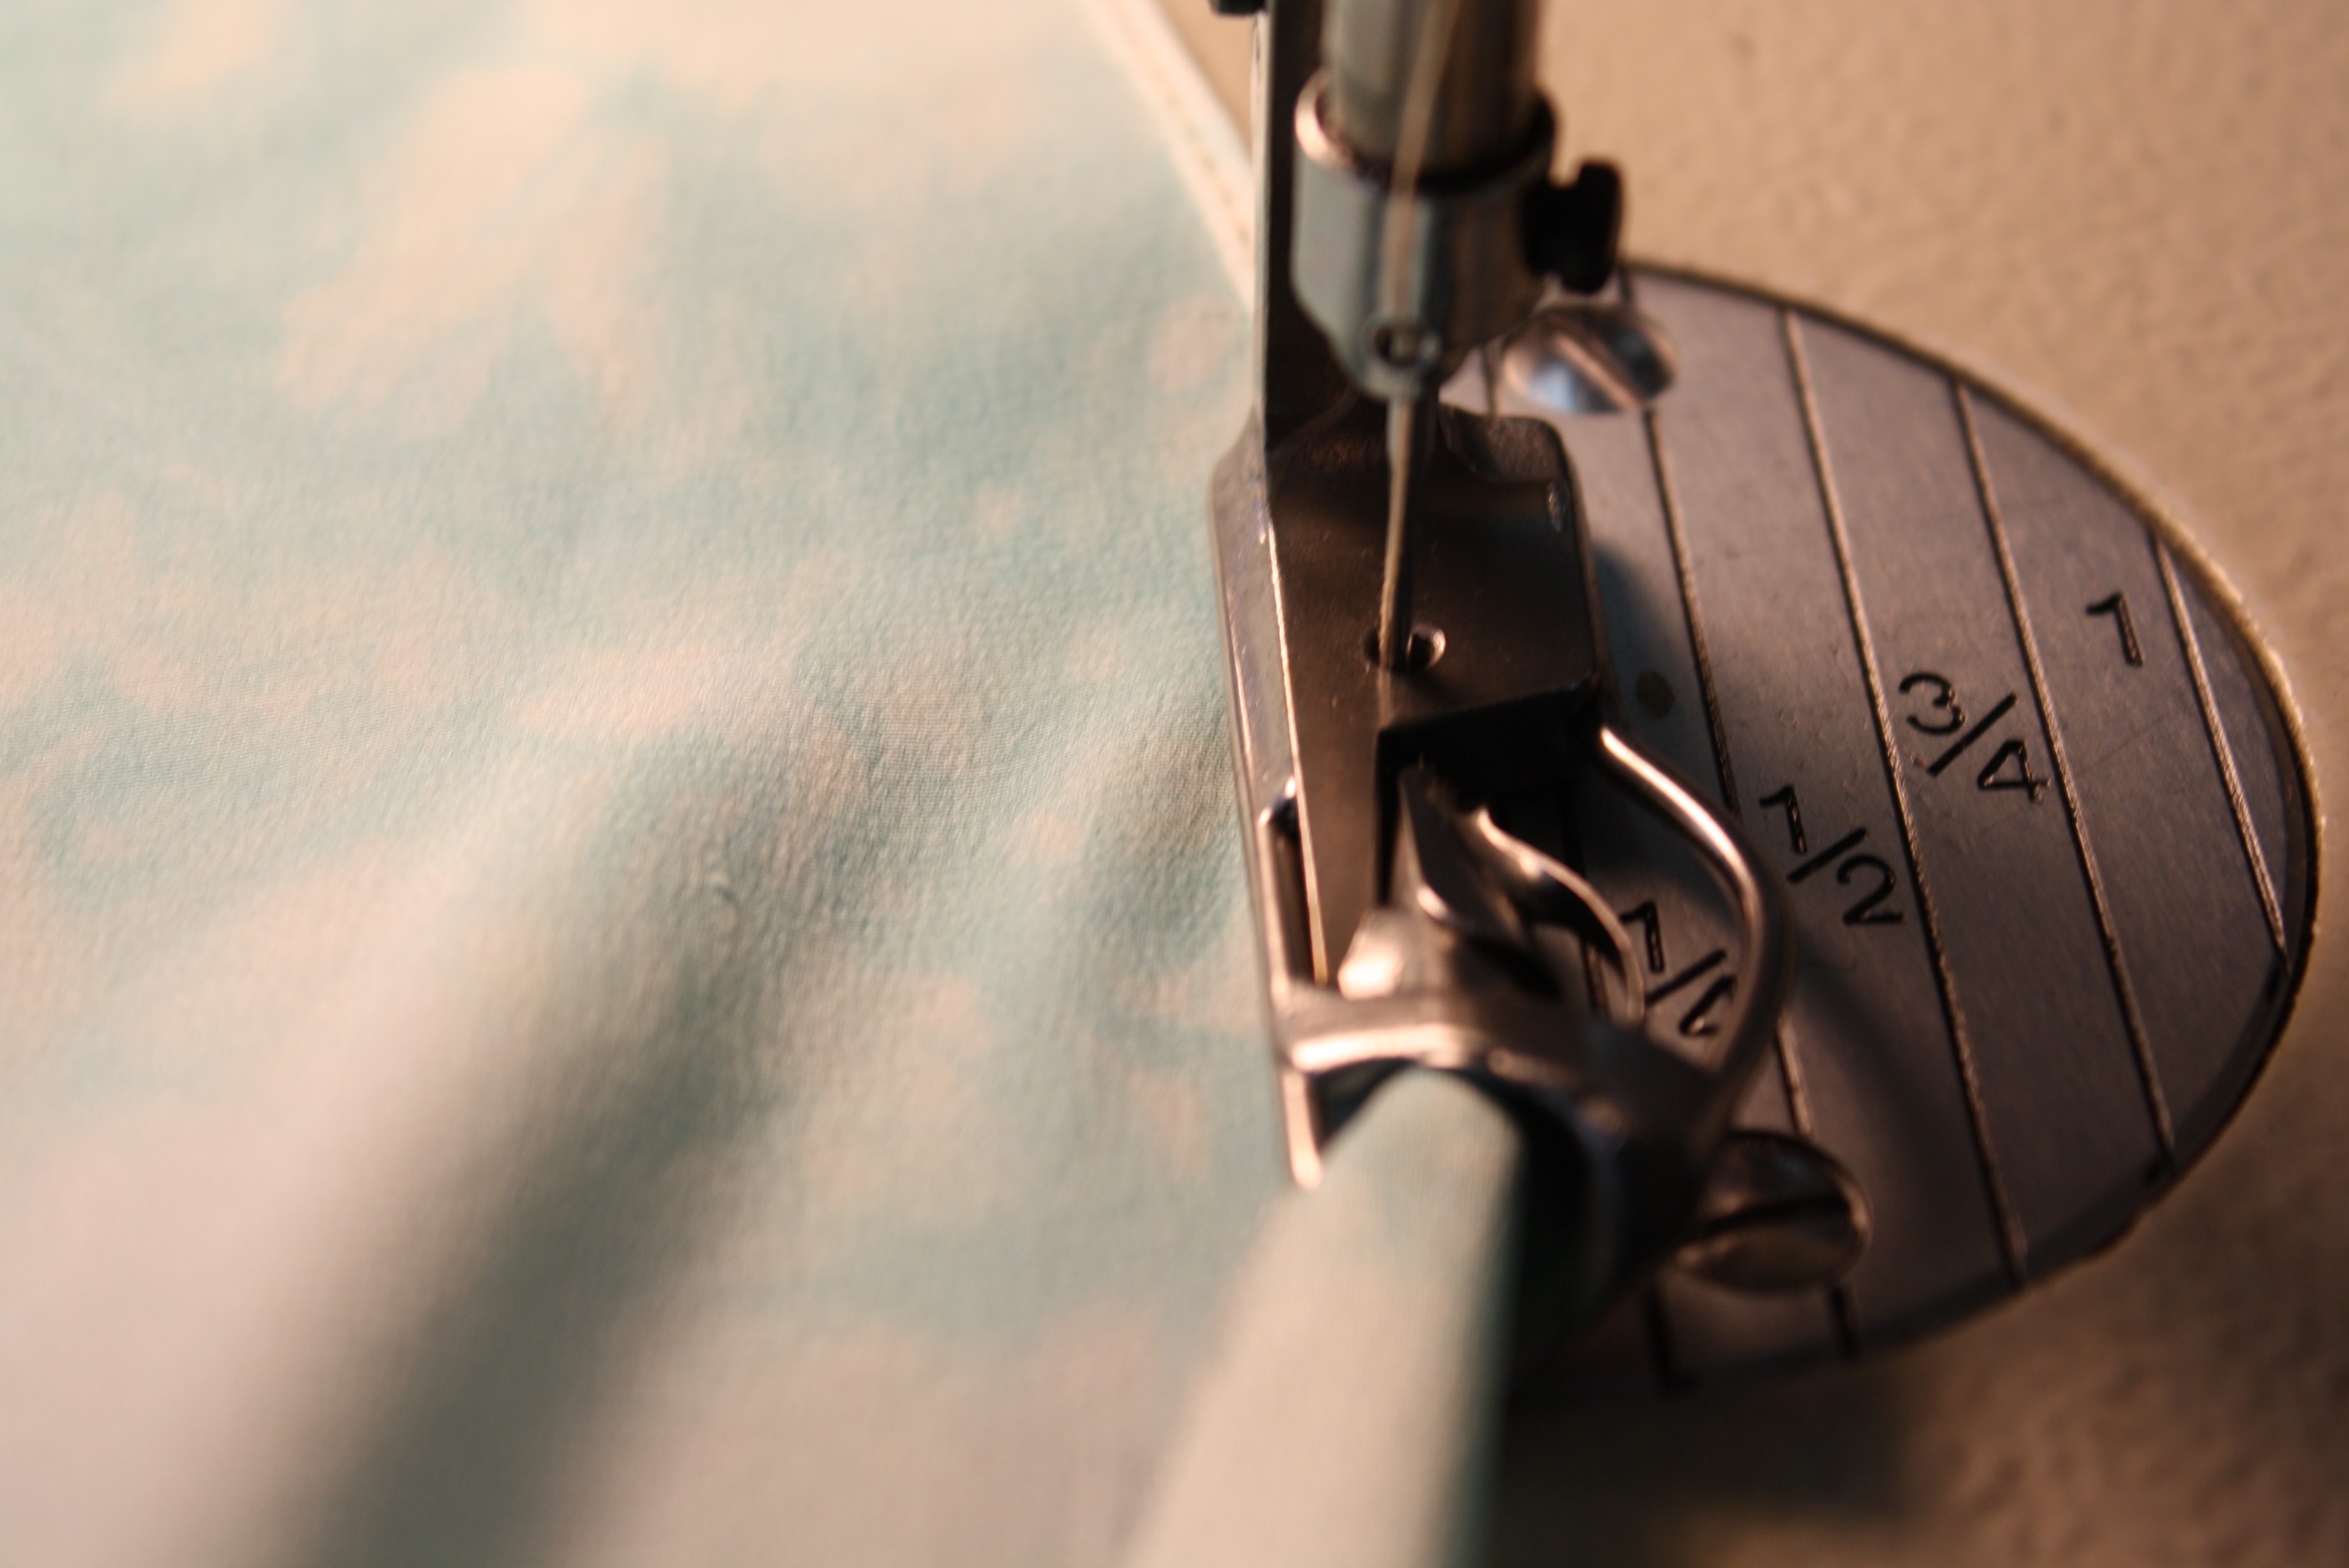
I sew a lot of garments with sheer fabrics (especially this months wardrobe challenge; Dress the Part) and my go-to stitch is usually a narrow rolled hem on the serger – its super fast and looks professional. But sometimes a rolled hem on the sewing machine would be more appropriate. I found 3 different feet for the industrial machine:
You have probably seen the Rolled Hem Foot, as it comes with most home sewing machines. This is the only foot I had ever seen used for the job. It does make a rolled hem easy, but has its challenges as well. Getting over thick seams can be interesting and sometimes the fabric doesn’t feed evenly. Of course there are tricks:
Hold the fabric to the left side of the foot as it feeds into the machine and trimming seam allowances for less bulk.
Results: A nice rolled hem, I had to use the tweezers to get the fabric started and the rolled hem is a little uneven. With practice this foot will work.
If you have an industrial machine, you have more options and each offers different results:
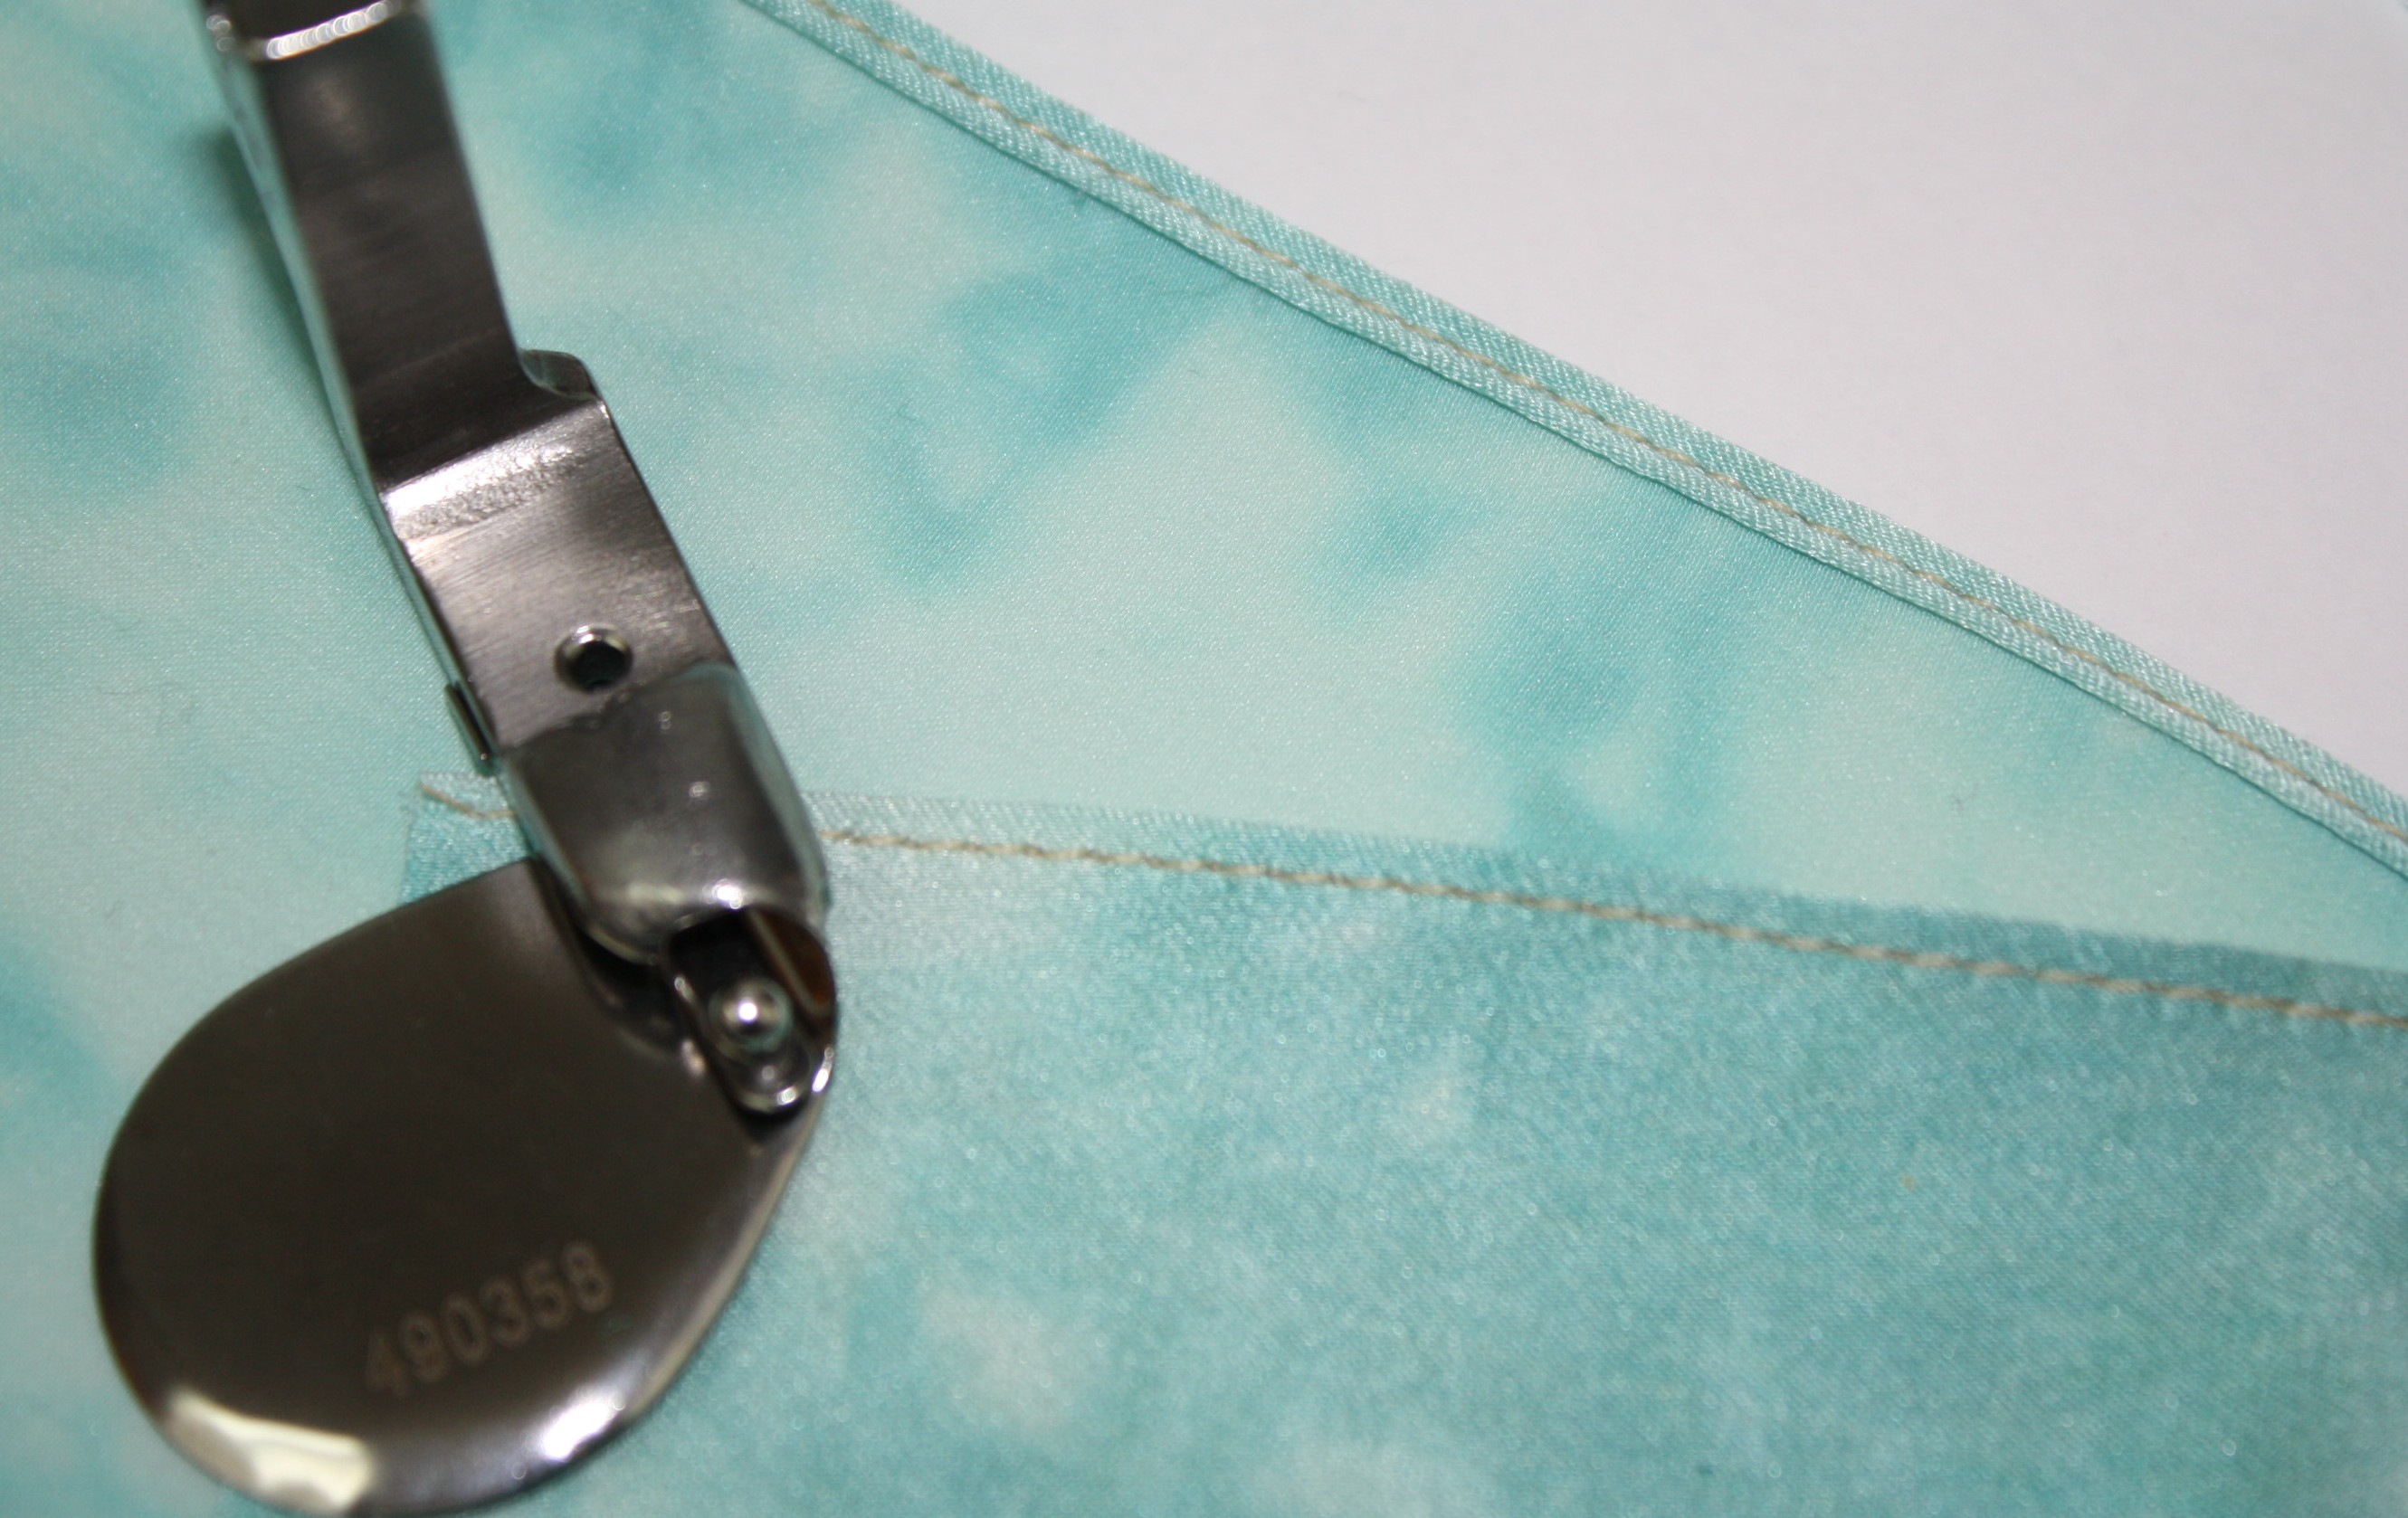
This foot has a plate that covers the front feed dogs allowing the fabric to feed perfectly. You can see the ball at the tip of the foot, the fabric will roll over that ball as it double folds into a narrow hem. I must say, I love this foot! This is how it works:
Feed the fabric into the foot, above the plate. Notice how the place covers the front feed dogs. Insert the fabric the same way you would for the rolled hem foot.
The fabric folds over the ball.
Hold the fabric a little to the left side of the foot as the fabric feeds into the foot (as shown above). Stitch.
Results: A perfect narrow hem! This foot offers the easiest rolled hem I have ever tried! I hardly had to do anything with the fabric except guide it into the foot. I even sewed at a high-speed and the rolled hem is perfectly even. A definite A+++++
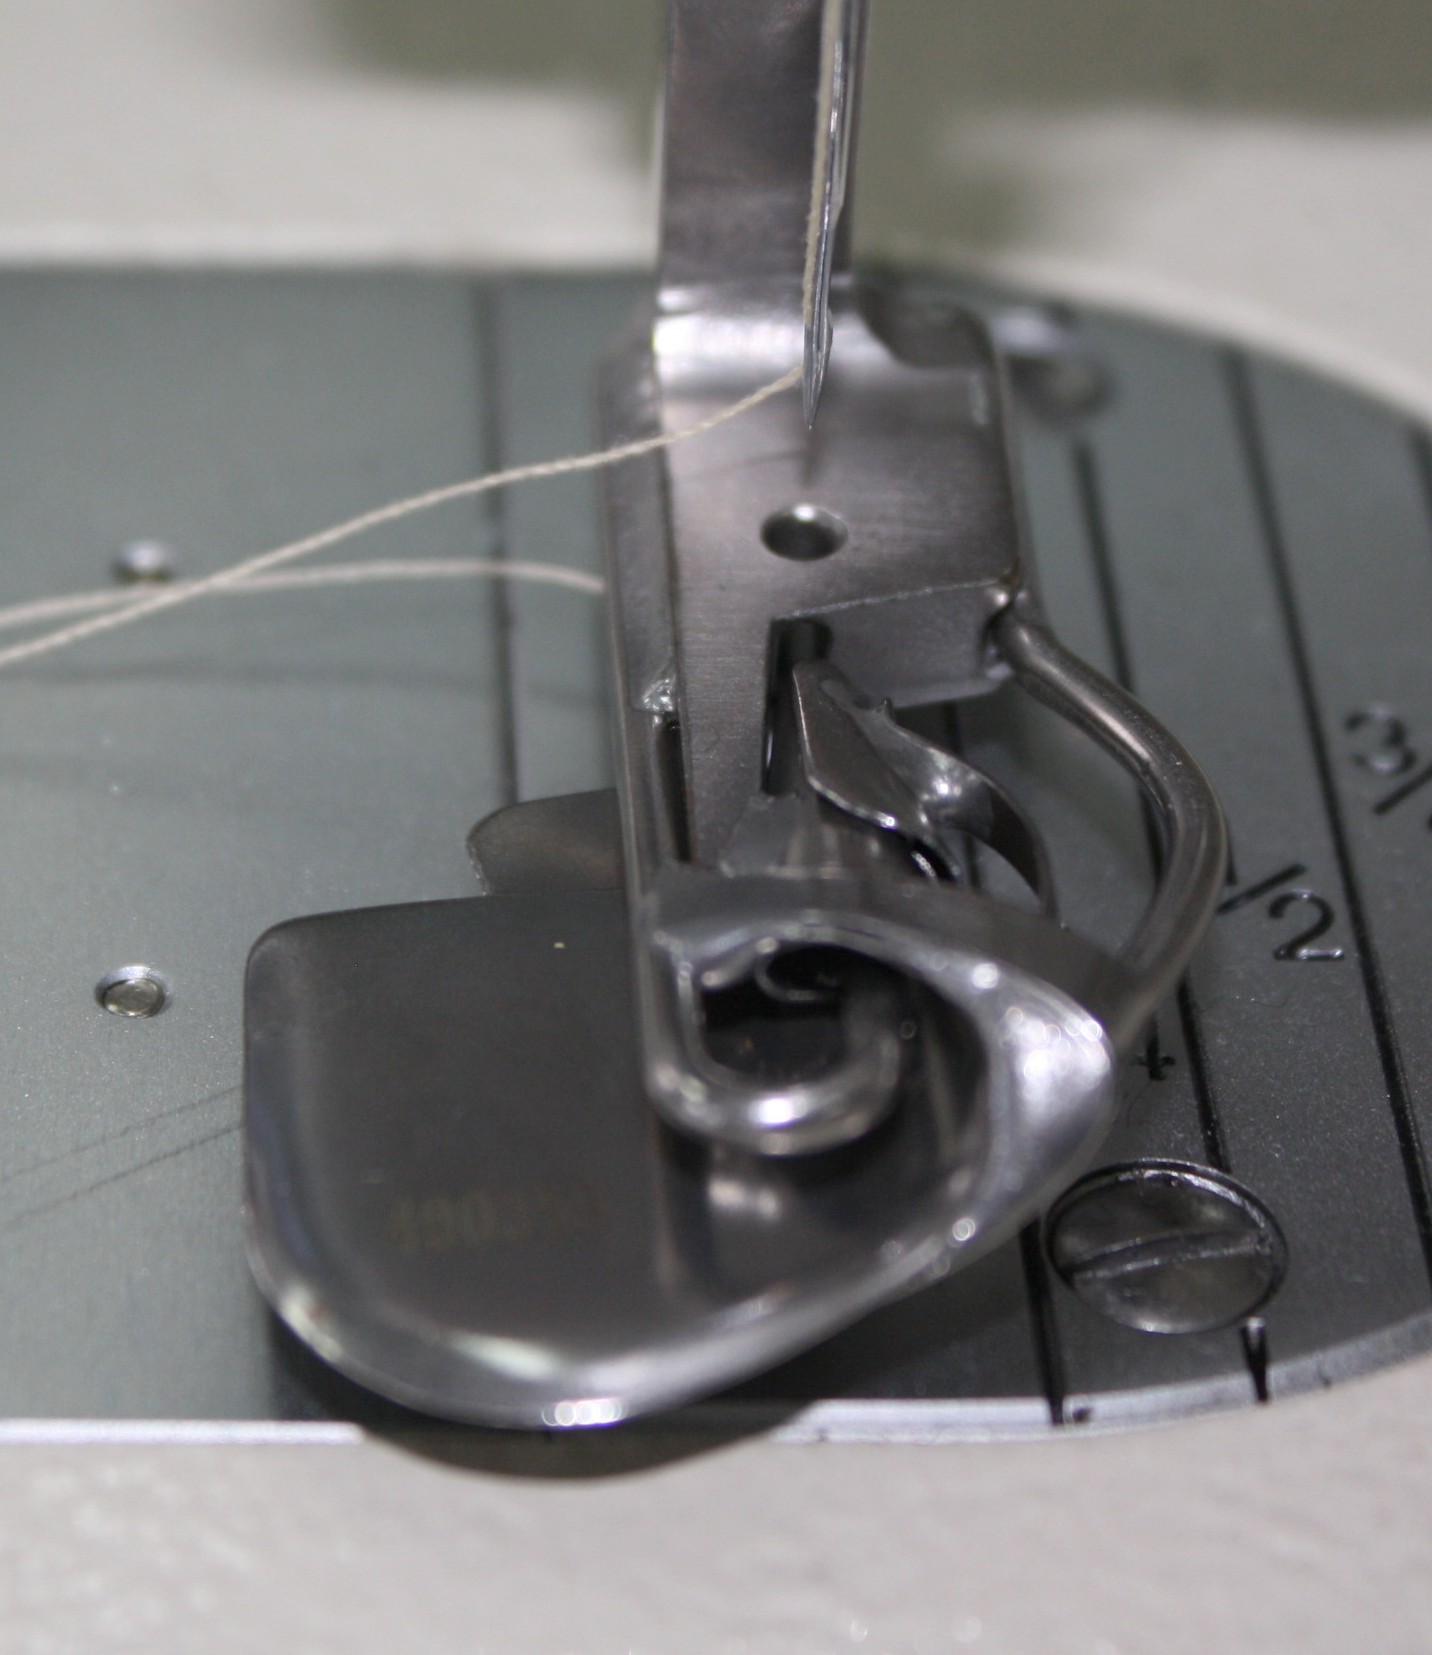
The “spring” part is what intrigued me about this foot. You can see the foot looks very similar to the Ball Hemmer Foot, yet there is not a ball. Instead, there is a movable area that the fabric will go through. Look closely, this is the back of the foot:
Looking at the left photo first: see the corner touching my finger tip. When I do nothing with that corner, the opening on the foot remains unchanged (see opening at yellow arrow).
Take a look at the right photo: Here I have pushed that corner in and the opening gets larger (see yellow arrow).
Now we know what the “spring” means. This opening adjusts for the thickness of fabric as the fabric flows through.
There is a plate protecting the fabric from the front feed dogs, just like the ball hemmer. Slide the fabric on the top of the plate.
Again, feed the fabric into the foot and stitch.
Results: Another perfect rolled hem! Just as easy as the ball hemmer foot.
My favorite foot for the rolled hem on silk charmeuse is the Ball Hemmer Foot. The rolled hem was a little thicker than the other two and perfect!
What about crossing seams and thicker fabrics? I will test these and more, and let you know the results. So far both feet are winners!
I also have to check to see if these feet will work on my Brother PQ1500. The PQ1500 straight stitch machine is just like an industrial machine with speed and ease of use, plus it’s not attached to a large table and easy to move around. Fingers crosses on that one! Otherwise, I have my eye on the Brother Industrial Machine used on Project Runway. Do you have an industrial machine? Have you tried these rolled hem feet?
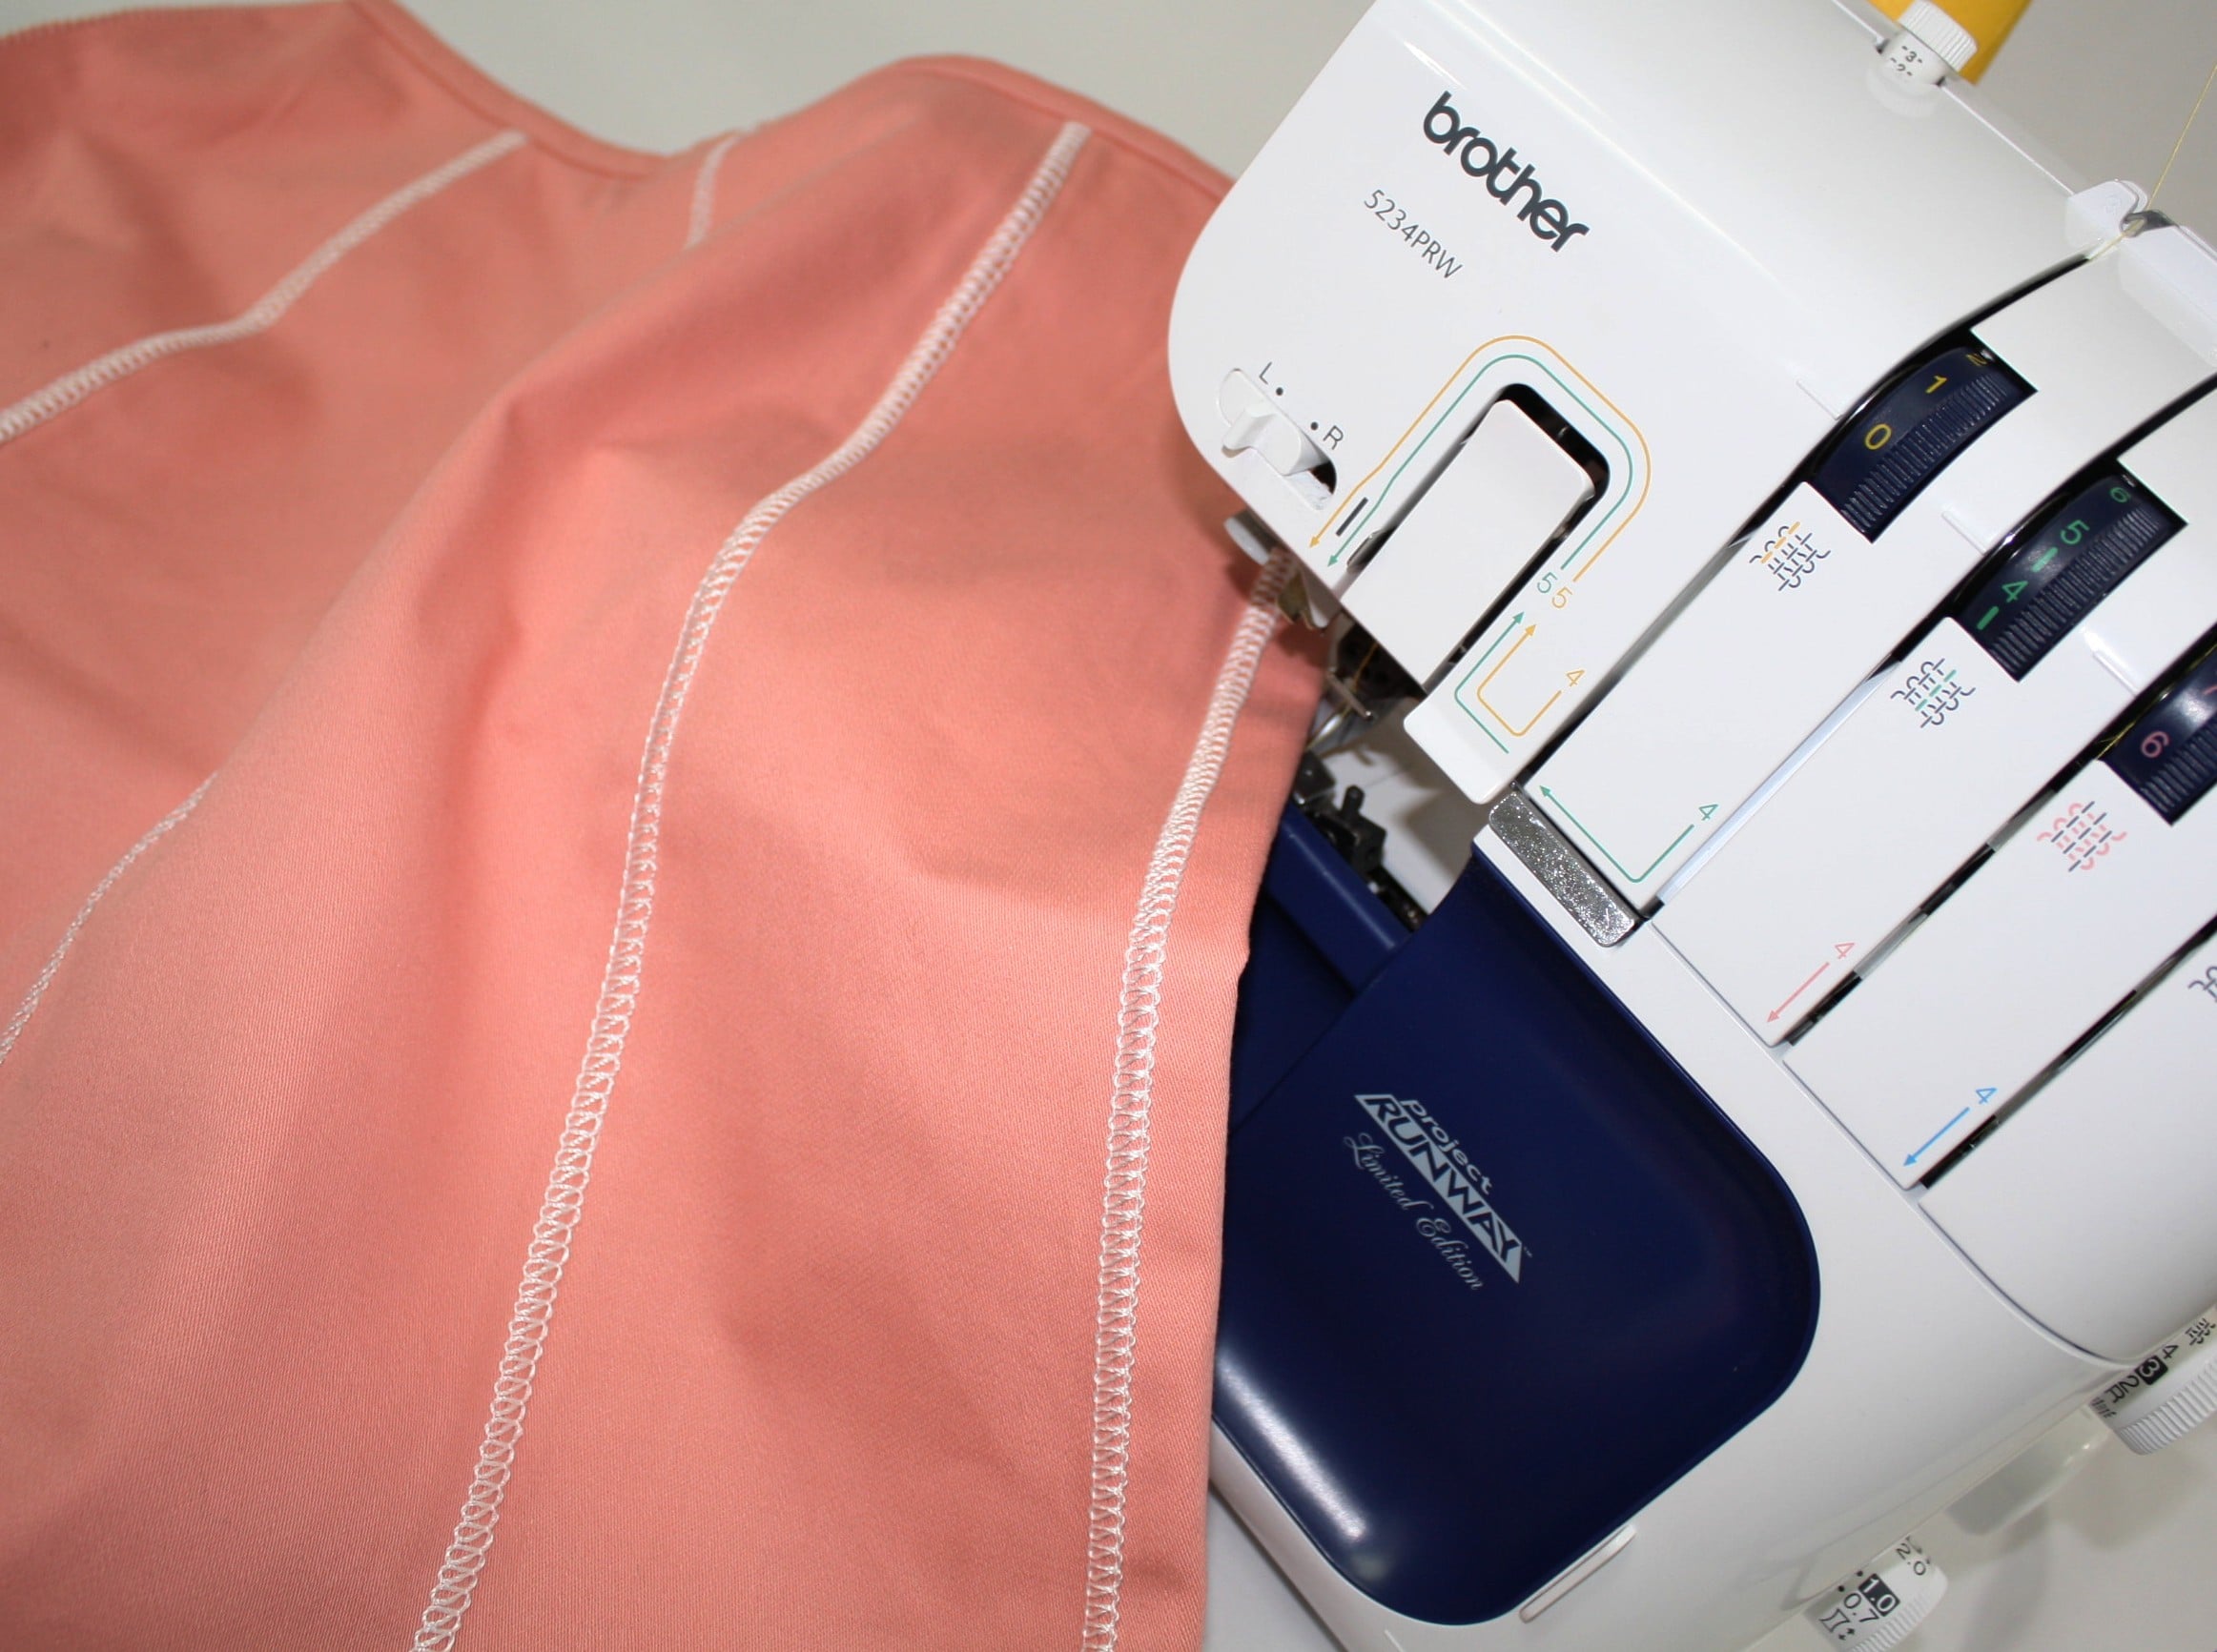
The serger can do so much more than simply finish fabric raw edges. Using crochet thread or yarn in the upper looper can create an entirely different look! This is a great way to restyle or embellishment fabric or a garment.
I am using the Brother Serger: 3-thread flatlock stitch with a decorative crochet thread in the upper looper. The left needle and lower looper have a similar color polyester thread. The photo above shows the front of the flatlock stitch and the backside. The backside looks like a ladder stitch. (the peach thread is just the serged edge of the seam).
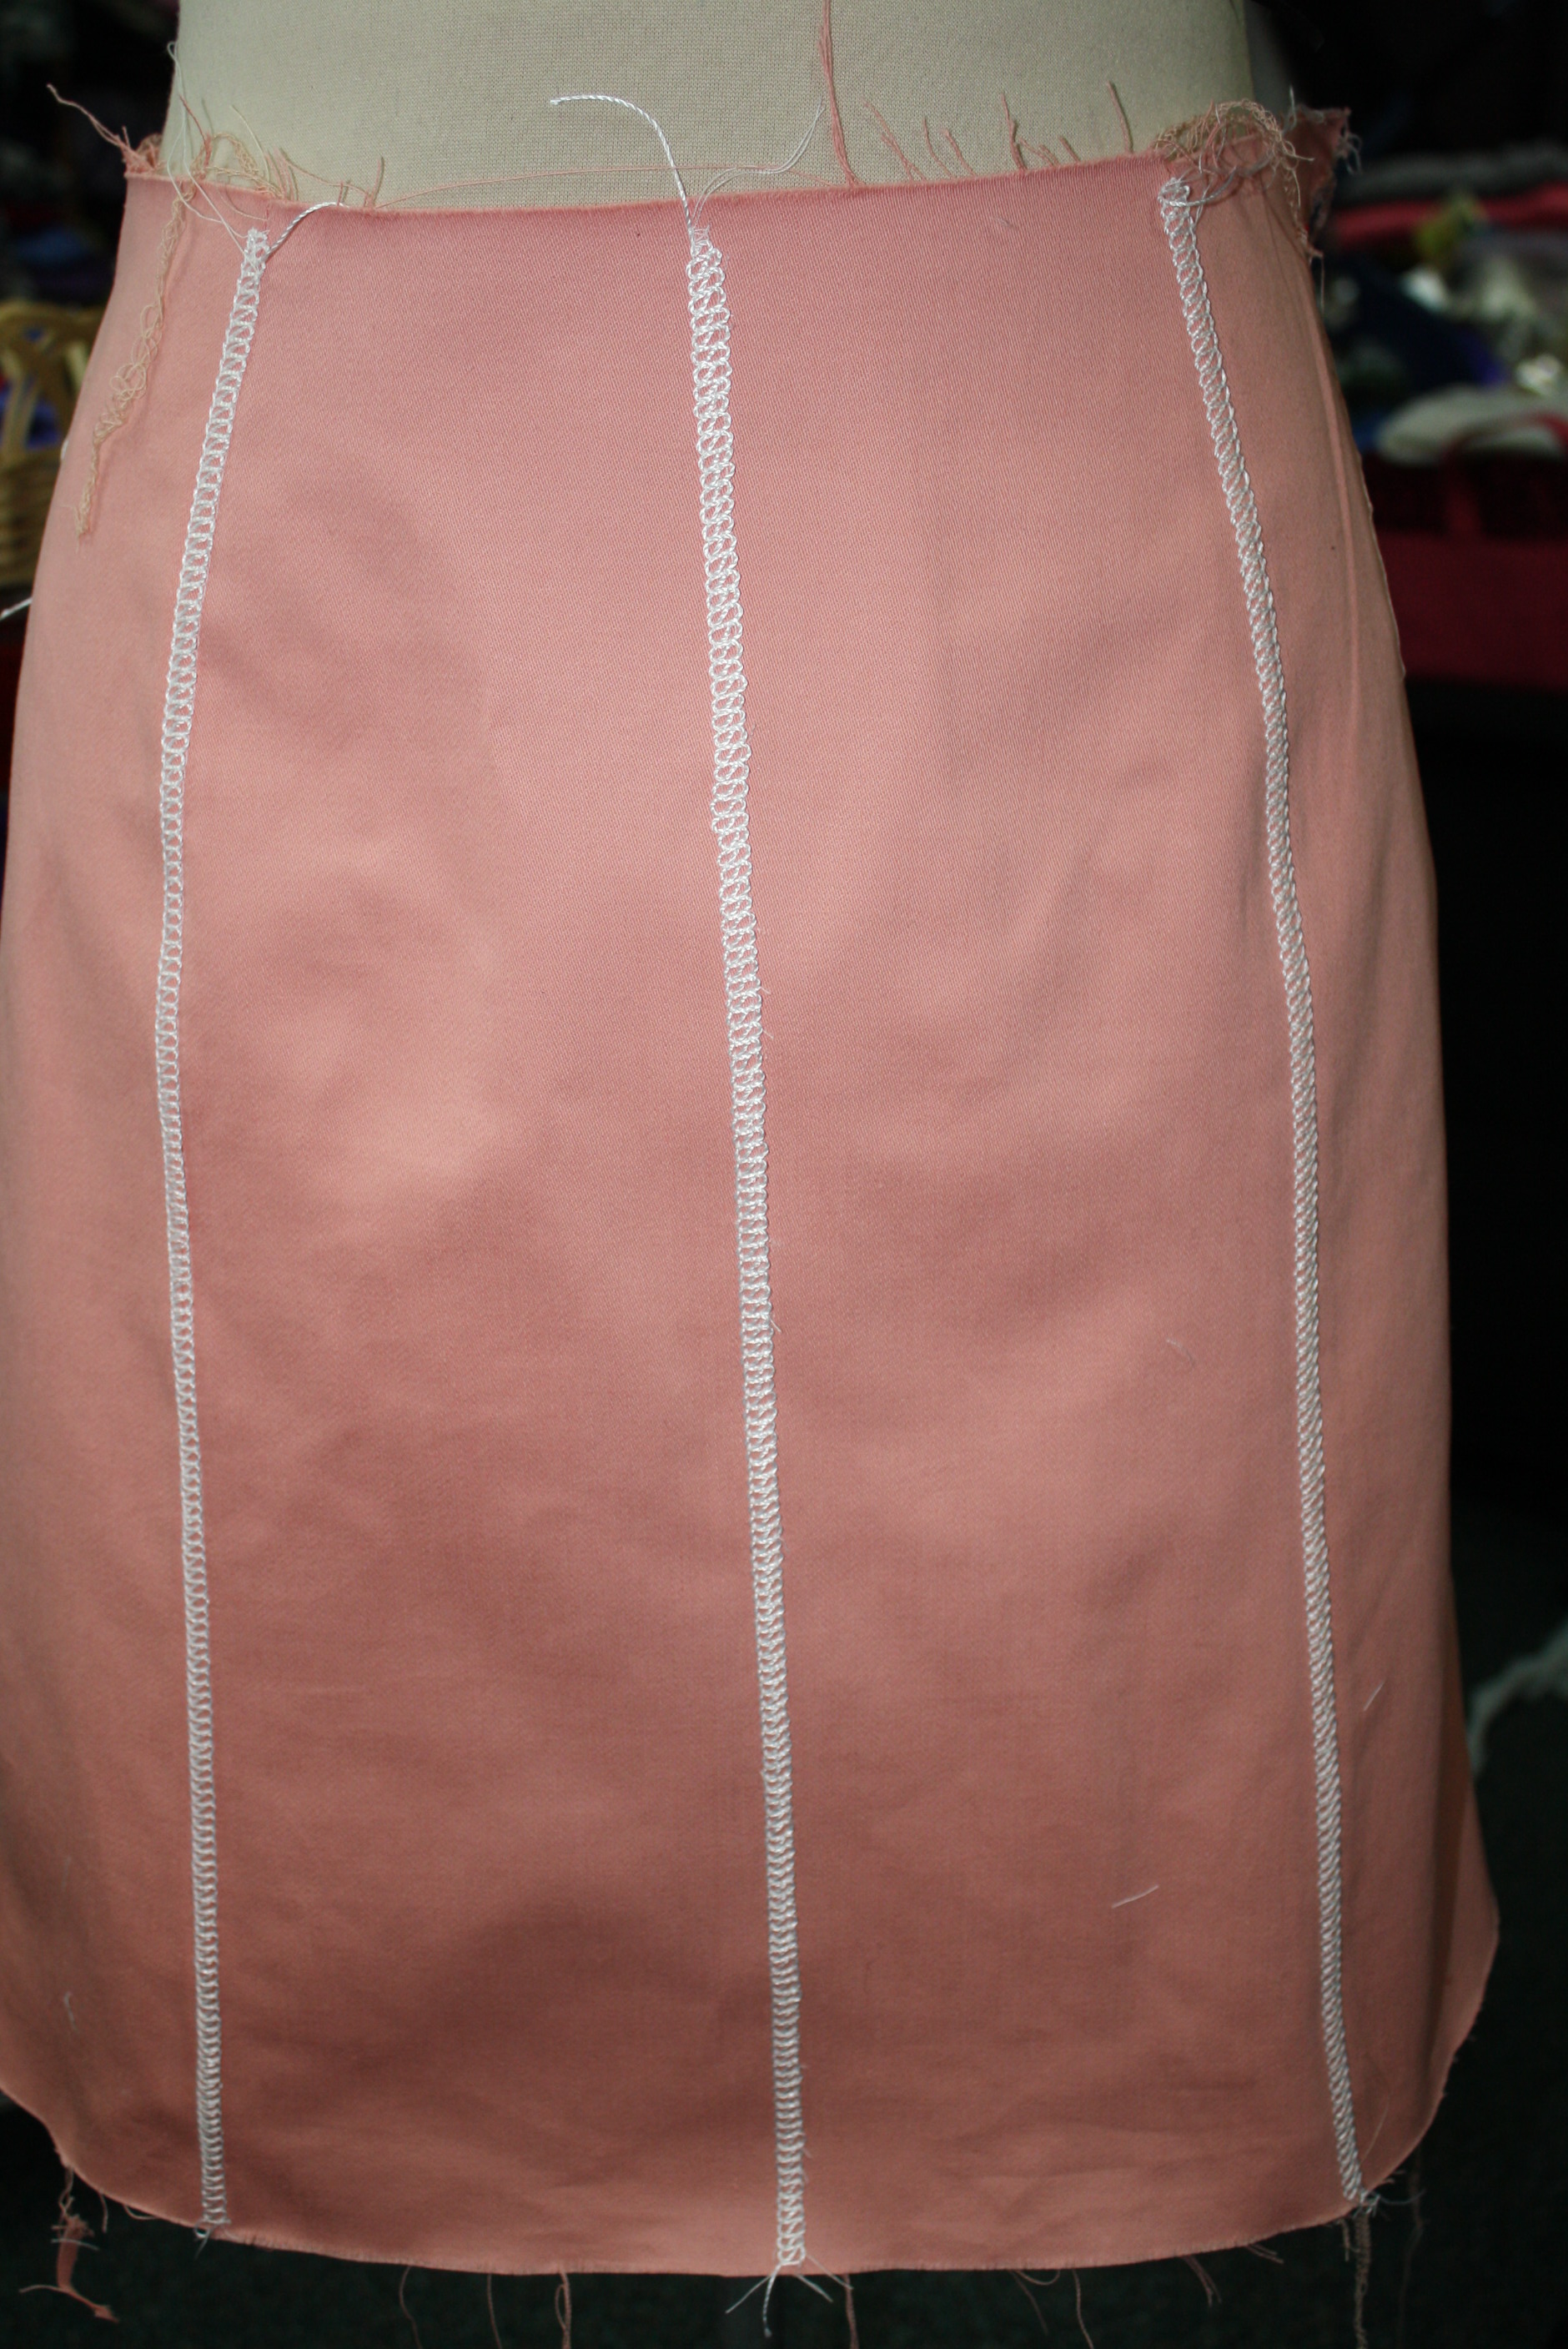
I started with the Kate Skirt Pattern. I added seams to the front and center back, but you could just pencil in a line with tailors chalk – it doesn’t need to be a seam to add the flatlock decorative stitch.
Here is the back view. Again there are 2 seams on each side back and this time there is a seam down the center back with a hidden zip. In order for this stitching to look even (with the zipper), I stitched the flat-felled embellishment down the edge of each center back seam, then added the zipper and closed the seam. That part got a little tricky and you can see the stitches are not perfectly even. I haven’t decided if I am going to rip it out and start again or hope nobody is looking at my tush that closely to notice 🙂
Setting up the Serger:
Set your serger up for a 3-thread overlock: I am using a serger from Brother and the standard setting for the needle and looper tensions are 4. When I give you new tension numbers you can compare this with your serger, if your serger has manual tension dials. If you are serging with an air-threading serger, like this Babylock, set up your serger for the 2-thread flatlock – wide.
Thread the upper looper (or the only looper for the 2-thread flatlock) with a decorative thread. Use standard poly serging thread in the needle and lower looper.
Next, there are a few changes to the serger settings:
Stitch Width: 5mm
Stitch Length: 2-4mm
Needle Tension: Decrease to 0 -3 (remember my standard setting is 4 so adjust for your serger)
Upper Looper Tension: Decrease to 2 – 3
Lower Looper Tension: Increase to 6 – 9
Disengage the knife
These setting serve as a guide. It will depend on the fabric and thread you end up serging with.
See if your serger had aBlind Hem Foot, if not you can use the standard foot.
There is a setting on the foot that moves to the plastic or metal piece to right and left, allowing the needle to pierce more or less of the fabric. Test the stitch on your fabric to determine the setting.
Fold the fabric in half or if you are embellishing a seam, fold along the seam line. Align the fabric along the shield on the blind hem foot (if using a standard foot, mark a spot to align with).
The idea is for the needle to pierce the fabric – half the stitch is on the fabric and half is off the fabric. In fact the stitch looks really messy coming out of the serger!
Stretch out the folded fabric to lie flat and press.
Pretty simple, but so fun! Have you ever tried this before? I would love some more ideas for decorative threads or yarns to use with this stitch.
Be sure to share photos of your creative serged project 🙂 #angelawolf
This week I hosted the first ever Brother Brand Ambassdor Retreat at my new studio in St. Joseph, Michigan. A good way for me to finish unpacking and get the studio organized after that big move! Did I mention I am never moving again!!! If so, I will invite all of...
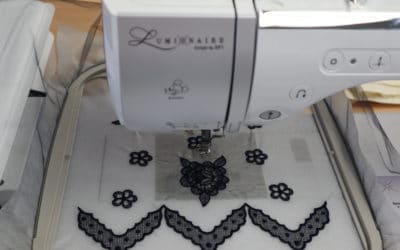
How to Embroider Lace on Tulle With the launch of my new lace embroidery collection A Touch of Lace, I thought this would be a good time to share a few tutorials showing how to embroider lace. I am going to start with my all time favorite, embroidering on tulle...
Episode 104 Behind the Scenes LIVE ? Houston Quilt Festival Recap, Tutorial on using the Projector for Embroidery, Announcing New Events in 2019 and Getting Ready for Original Sewing & Quilt Expo in Novi ? See you soon! xoxo AngelaLaunching Birthday Week Sewing...


 I love sweaters and shawls, especially since I am always cold in the air-conditioned restaurants (not that we have needed air conditioning in Michigan this summer!). Thinking of the wardrobe challenge, sweaters are one of the items that I end up buying. Yes I do know how to crochet, yet trim on a jacket is about as far as that usually ends up. A small knitting machine sits in the corner of the studio (on my bucket list to learn how to use 🙂 ).


