I can’t believe it, but my first pattern is finished and printed! What an adventure this has been. From a fashion designer perspective, I typically design a garment and have it made in a range of sizes … meaning I don’t have to supply directions with illustrations :). Knowing I can’t be in your sewing room, I wanted to guide you through every step in sewing a professional looking garment with a tutorial booklet. So, I decided to ask my worst critic to review the new pattern format since he seems to be the one always sitting on my laptop keyboard, sewing machine, and papers.
He loves the spiral bound direction booklet that accompanies every pattern, great to chew on … I chose this layout because it’s perfect to sit next to your sewing machine to follow along and take notes.
Tyler analyzed the directions and is happy to see detailed illustrations and designer sewing tips, now anyone can have a professional looking knit top in less than an hour with these easy to follow directions. If you’re a beginner sewer there are extra sewing tips just for you. If you are an advanced sewer, the booklet is laid out in a fashion that you can quickly skip ahead to the directions that you need. Another great feature that will be available for all the patterns (coming in November) is a special area on the website for fitting with video’s and tutorials to help guide you through step by step.
This particular pattern has many design options including three sleeve lengths, ruching options, and various collars. Sizing for the Angela Wolf Pattern Collection is based on the ready-to-wear clothing line so make sure to check the body measurements, this top is currently available in Misses size XXS – XL (women’s sizes will be out in January). Checkout the website for more details.
Last, but not least, is the quality of paper the pattern is printed on. I can’t tell you how many of my tissue patterns Tyler has shredded into pieces so I had to find an alternative. These patterns are printed on quality paper so not only will they not shred, they hardly wrinkle … you can even write on them and keep notes for fitting. Because the patterns are printed on one continuous sheet, you can even request that the pattern be shipped in a tube, then you won’t even have fold creases.
“Love the patterns and the fit is awesome, so the big question is how many more patterns are coming? This took forever and you are neglecting my brushing not to mention we haven’t played fetch in ages!” … Tyler
Did I mention my cat fetches a ball, rolls over, and begs for food – totally not normal! Well, the jean patterns are almost finished, followed by the skirts, and then onto the jackets …
Is your local PBS a little behind the times and not yet airing It’s Sew Easy? No worries, every week It’s Sew Easy will show one of their weekly episodes online. Totally free of charge and if you register on the website there are even additional tutorials you can follow. A new episode starts every Friday at noon and today starts Episode 113. Rebecca Cornell and Christy Howden open the show with felting techniques for a fun toy. Next, Tricia Waddell and Katrina Loving have a mom friendly tip for reinforcing seams for heavy wear on stuffed animals and clothing. Then, Sheree Schattenmann creates a simple duvet for a baby’s room. Angela Wolf wraps up the show and the first season of It’s Sew Easy showing how to distress jeans for a fashion look suitable for kids, teens, and moms.
Threads and Sew Stylish posted a blog with my tips on styling and sewing designer jeans. Check out my full article in the summer issue of Sew Stylish Magazine that hits shelves this month. If you have any questions or looking for fabulous denim fabric, send me a note. Cheers! Angela
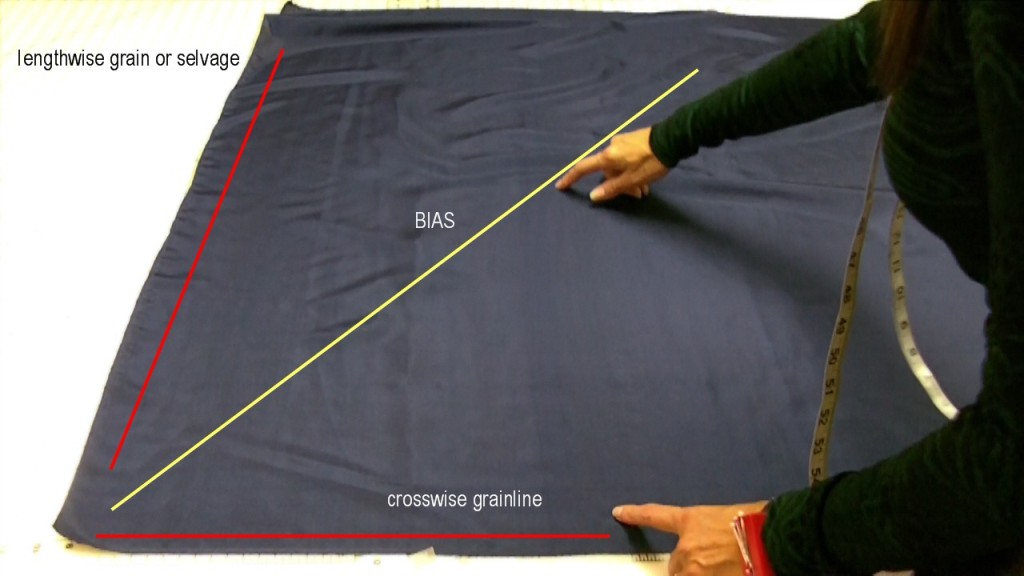
Making bias tape has never been easier! It is really important to make sure your bias strip are really cut on the true bias. Here are a few tips to make sure you have success:
To find the true bias: lay your fabric on a flat surface. It is easier if there is a grid to follow in order to line up your grainlines. Here I line up the crosswise grainline and the fabric salvage.
Take one corner and pull the fabric to match the selvage with the crosswise grain. This will create a triangle.
When working with slippery fabric, use a weight at one end so you can maneuver the fabric around. The bias is along the folded edge.
Align a see through ruler along the bias edge. I want 2″ bias strips so the first cut will be at the 1 inch mark because I am on the fold.
Now you will see you have a nice cut line on the bias. I then take the bias line and fold the fabric in half, so I don’t have to cut so far. I also move the fabric so I can line up the edge of the fabric along my grid underneath.
Again, using the see through ruler, cut every 2 inches.
Keep cutting strips until you run out of fabric. I always cut more than I need, you never know when you might need a strip of bias!
Does anyone have any other tips for cutting bias strips … especially when cutting slinky, slippery fabric? I would love to hear your ideas.
I have been putting off trying this software out for the simple fact I don’t have the time to learn an entire new program. Little did I know that in less than 30 minutes I would have custom embroidery at my fingertips! This software is so easy to use, the navigation, the titles, the options, etc. That’s why I am sharing this quick video with you, just in case you are thinking of upgrading to Brother’s PE-Design Next software, it is totally worth it.
Now I have all weekend to create new designs, can’t wait! I even noticed I can upload a picture for embroidery, that’s a little scary LOL! Although, I have some cute pictures from my nephew’s 1 and 2 year birthday party last weekend with lot’s of colorful cake. I wonder how many colors of embroidery thread I am going to need for this?


 lity of paper the pattern is printed on. I can’t tell you how many of my tissue patterns Tyler has shredded into pieces so I had to find an alternative. These patterns are printed on quality paper so not only will they not shred, they hardly wrinkle … you can even write on them and keep notes for fitting. Because the patterns are printed on one continuous sheet, you can even request that the pattern be shipped in a tube, then you won’t even have fold creases.