Hope you are all enjoying February, I can hardly believe it’s almost over! I spent last week taping season 5 for It’s Sew Easy TV, despite the cold and snow – we had a successful week. Here is one of my favorite photo’s on set with June Mellinger (Brother) and Christopher Straub (Project Runway). I have to say, he is one talented designer! He even left an autographed handbag for Katie, my ninth grade apprentice. She absolutely adores him and I can’t wait to see her face when she opens her gift 🙂 By the way, that handbag in the photo is fabric he designed. I foresee an order with spoonflower soon.
I have been busy working on some custom garments and my new collection, which I will be sharing over the next few weeks, including launching some new patterns. First, I have to share one of my last gown dilemma’s. The fabric was gorgeous, but challenging to work with … slipper, shiny, textured, get the idea? I was having a heck of a time inserting the back zipper. I couldn’t use a hidden zipper, as I could not find a color to matched the fabric. The problem occurred when I was topstitching around the zipper. I hand basted in the zipper, marked the center back seam with chalk (that was also basted closed), and marked the stitch line with chalk. The fabric really presented a challenge with the texture. Being a total perfectionist, I ripped the topstitching out twice because it just was not straight enough. Then I remembered the Laser Vision Guide on my Brother Dreamweaver XE VM6200D. This worked like a charm! I was able to line up the laser light with center back seam and topstitch perfectly straight, all the way around the zipper. I won’t forget about that handy tool next time. Here is the short video I put together if you want to see more details. Now, back to the cutting table. Enjoy 🙂 xoxo Angela
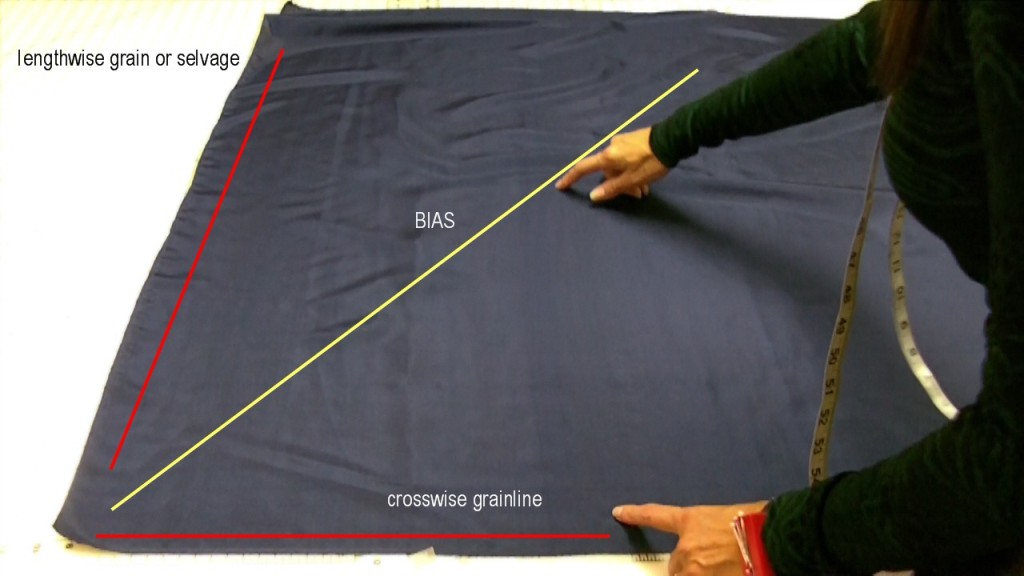
Making bias tape has never been easier! It is really important to make sure your bias strip are really cut on the true bias. Here are a few tips to make sure you have success:
To find the true bias: lay your fabric on a flat surface. It is easier if there is a grid to follow in order to line up your grainlines. Here I line up the crosswise grainline and the fabric salvage.
Take one corner and pull the fabric to match the selvage with the crosswise grain. This will create a triangle.
When working with slippery fabric, use a weight at one end so you can maneuver the fabric around. The bias is along the folded edge.
Align a see through ruler along the bias edge. I want 2″ bias strips so the first cut will be at the 1 inch mark because I am on the fold.
Now you will see you have a nice cut line on the bias. I then take the bias line and fold the fabric in half, so I don’t have to cut so far. I also move the fabric so I can line up the edge of the fabric along my grid underneath.
Again, using the see through ruler, cut every 2 inches.
Keep cutting strips until you run out of fabric. I always cut more than I need, you never know when you might need a strip of bias!
Does anyone have any other tips for cutting bias strips … especially when cutting slinky, slippery fabric? I would love to hear your ideas.
Fashion Designer: Angela Wolf ... Photographer: Johnson-Rauhoff ... Models: Laine Lu VonBehren, Jennifer Knapp, Jenna Warren ... Hair & Makeup: Shawn Frandsen and Sarah Schilling
If you saw my post a few months back, I showed off a few pieces of gorgeous faux fur that I bought at Haberman Fabrics. Well, I promised to give a rendition of the experience of sewing with faux fur and hopefully pass on a few lessons. I must admit this time around seemed so much easier than I remember. One of my first faux fur jackets, a thick white shaggy fur … I still have visions of coughing up fur balls for weeks, right alongside my cat. Not only that, I ended up with white fuzz/fur all over my clothes for weeks!
Either the furs are easier to sew or I learned a few lessons from the first episode. So here are a few tips:
Trace your pattern, with clay chalk onto the back of the faux fur. (I love the backing on this fur!)
Use sharp scissors! Start cutting from the back. Slide your scissor tip between the faux fur and the backing and cut in small snips, being carful to only cut the backing and not the faux fur.
I use Kai Scissors. These scissors are so sharp, I can literally slide the tip of the scissors right around the pattern pieces. (They work great when trimming Sherpa fabric as well).
Notice that I am only cutting the backing, leaving all the faux fur intact. Cut small snips at a time.
I used the salvage as the front seam and then folded it back and tacked it in place.
Trim your seam allowances. This really does not take long, again my Kai Scissors worked fantastic. I read that I should try an electric razor, but this worked perfectly. Maybe, I’ll try the razor next time 🙂
You can see here the seam allowance is all trimmed and ready to sew. That was it! I used the same process on all of the faux furs.
All in all, I really enjoyed sewing up these faux furs and believe it or not, one quick vacuum and the studio was back to normal. Although, I must confess, I could not part with the cute little faux fur scraps. So I have decided to use them as bows on my Christmas gifts 🙂
Fashion Designer: Angela Wolf ... Photographer: Gregg Rizzo ... Model: Dawn Yarborough ... Hair & Makekup: Shawn Frandsen & Sarah Schilling


 Hope you are all enjoying February, I can hardly believe it’s almost over! I spent last week taping season 5 for It’s Sew Easy TV, despite the cold and snow – we had a successful week. Here is one of my favorite photo’s on set with June Mellinger (Brother) and Christopher Straub (Project Runway). I have to say, he is one talented designer! He even left an autographed handbag for Katie, my ninth grade apprentice. She absolutely adores him and I can’t wait to see her face when she opens her gift 🙂 By the way, that handbag in the photo is fabric he designed. I foresee an order with spoonflower soon.